Guide Organization
This guide covers all modules of the Saurashtra Freight Customer Portal. Select any section below or search by title in the sidebar to jump directly to detailed instructions.
Getting Started
Welcome to the Saurashtra Freight — Customer Portal help documentation. This portal is your single window for KYC onboarding, digital cargo & container tracking, documentation management, and business reports & analytics.
The Customer Portal is designed with a strong focus on customer convenience — providing verified customer access, simple KYC onboarding, and faster portal readiness. Whether you are a new customer registering for the first time or an existing user managing your shipments, this guide will help you navigate every module with ease.
Who is this for? This guide is intended for all customers of Saurashtra Freight Pvt. Ltd. who use the Customer Portal for import/export cargo management, container tracking, and documentation.
Portal Features at a Glance
Port to CFS OperationEnd-to-end visibility from port to CFS operations
Real Time VisibilityLive tracking of container and cargo status
Business Reports & AnalyticsTEUs summary, weighment data, movement reports
Simple KYC OnboardingQuick GST-based KYC verification for new customers
Verified Customer AccessSecure login with email verification
Faster Portal ReadinessStreamlined registration and onboarding process
Landing Page
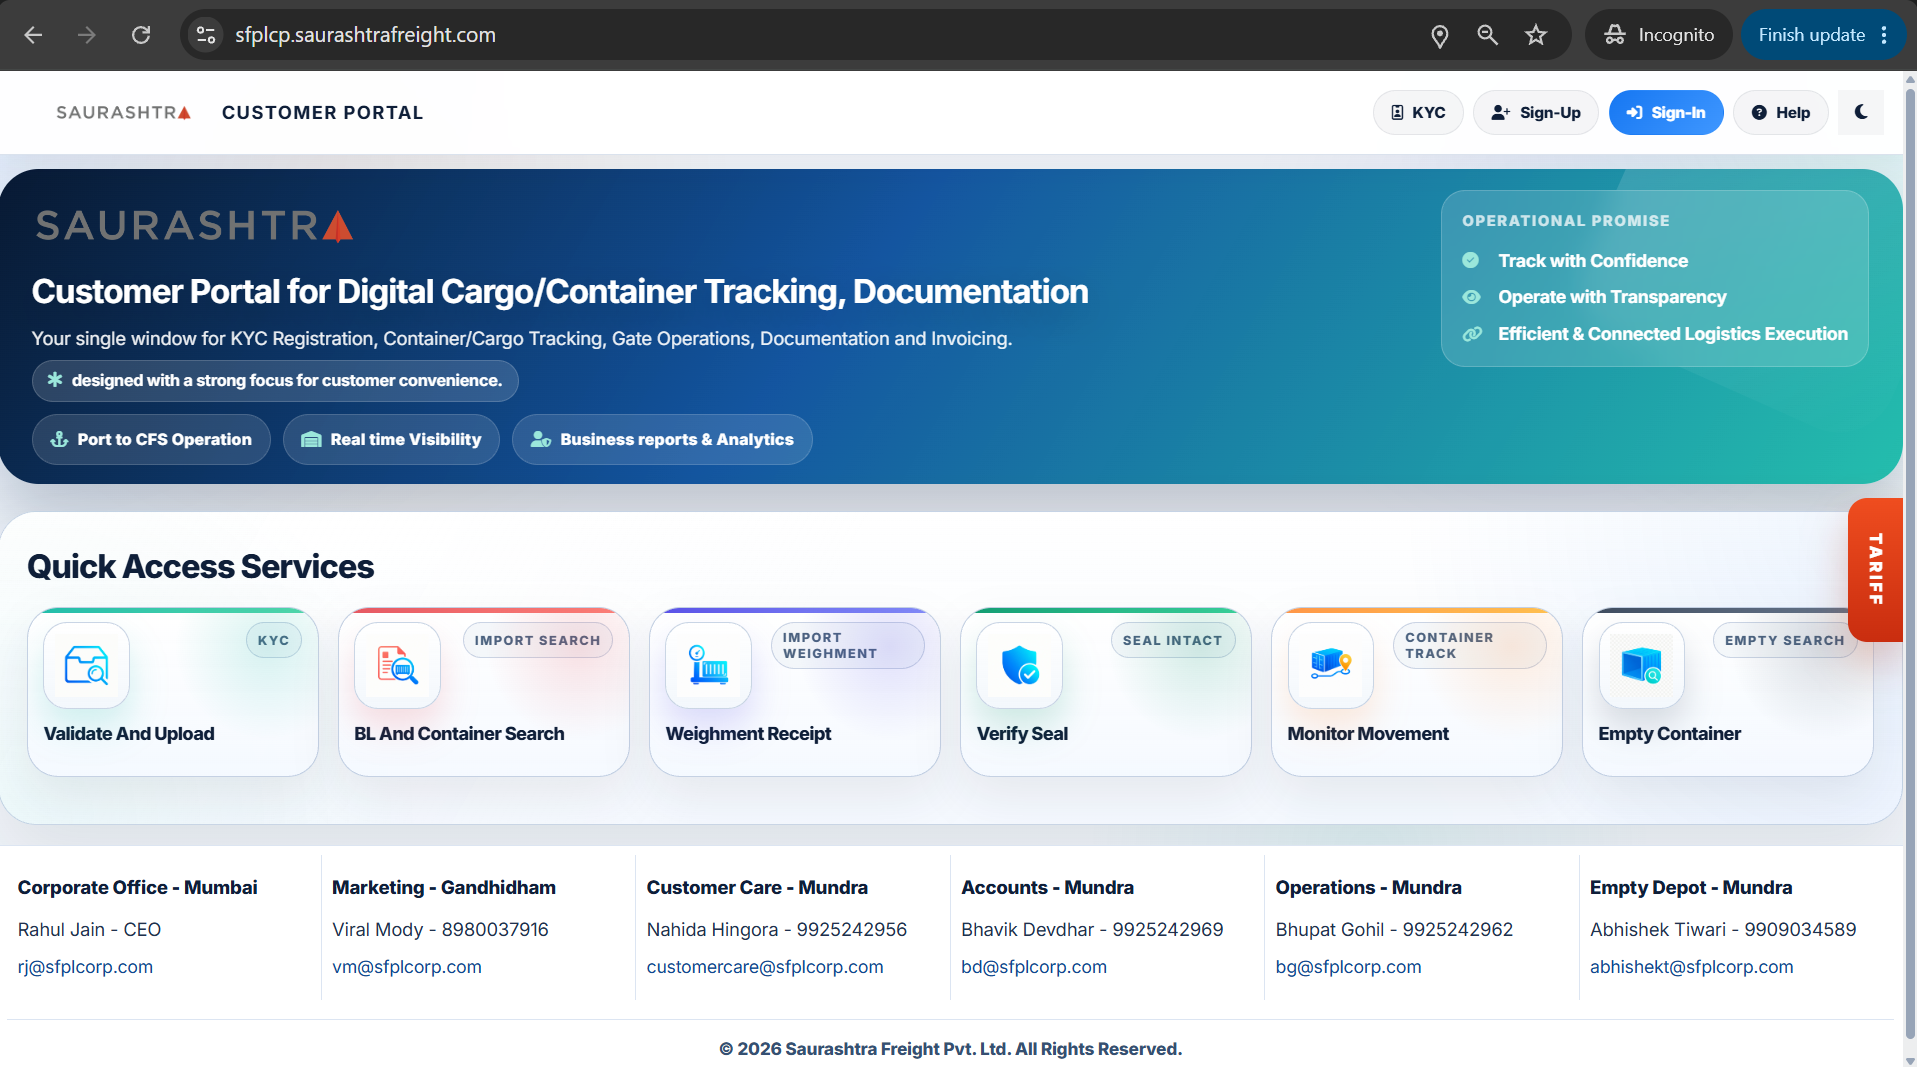
The landing page is the first page you see when you visit the Customer Portal. It provides an overview of the portal's capabilities and quick access to key actions like KYC, Sign-Up, and Sign-In.
Click image to view full size
Key Elements
- Navigation Bar — Contains links to KYC, Sign-Up, Sign-In, Help Documentation, and a theme toggle (light/dark mode).
- Hero Section — Displays the Saurashtra Freight logo, a tagline about digital cargo/container tracking, and key feature badges (Port to CFS Operation, Real Time Visibility, Business Reports & Analytics).
- Operational Promise — Highlights Track with Confidence, Operate with Transparency, and Efficient Connected Logistics Execution.
- Footer — Contact details for Corporate Office (Mumbai), Marketing (Gandhidham), Customer Care (Mundra), Accounts (Mundra), Operations (Mundra), and Empty Depot (Mundra).
KYC Module
Public
The KYC (Know Your Customer) module allows new customers to verify their identity using their GST number. This is the first step in the onboarding process before you can access full portal features.
KYC Screens & Process
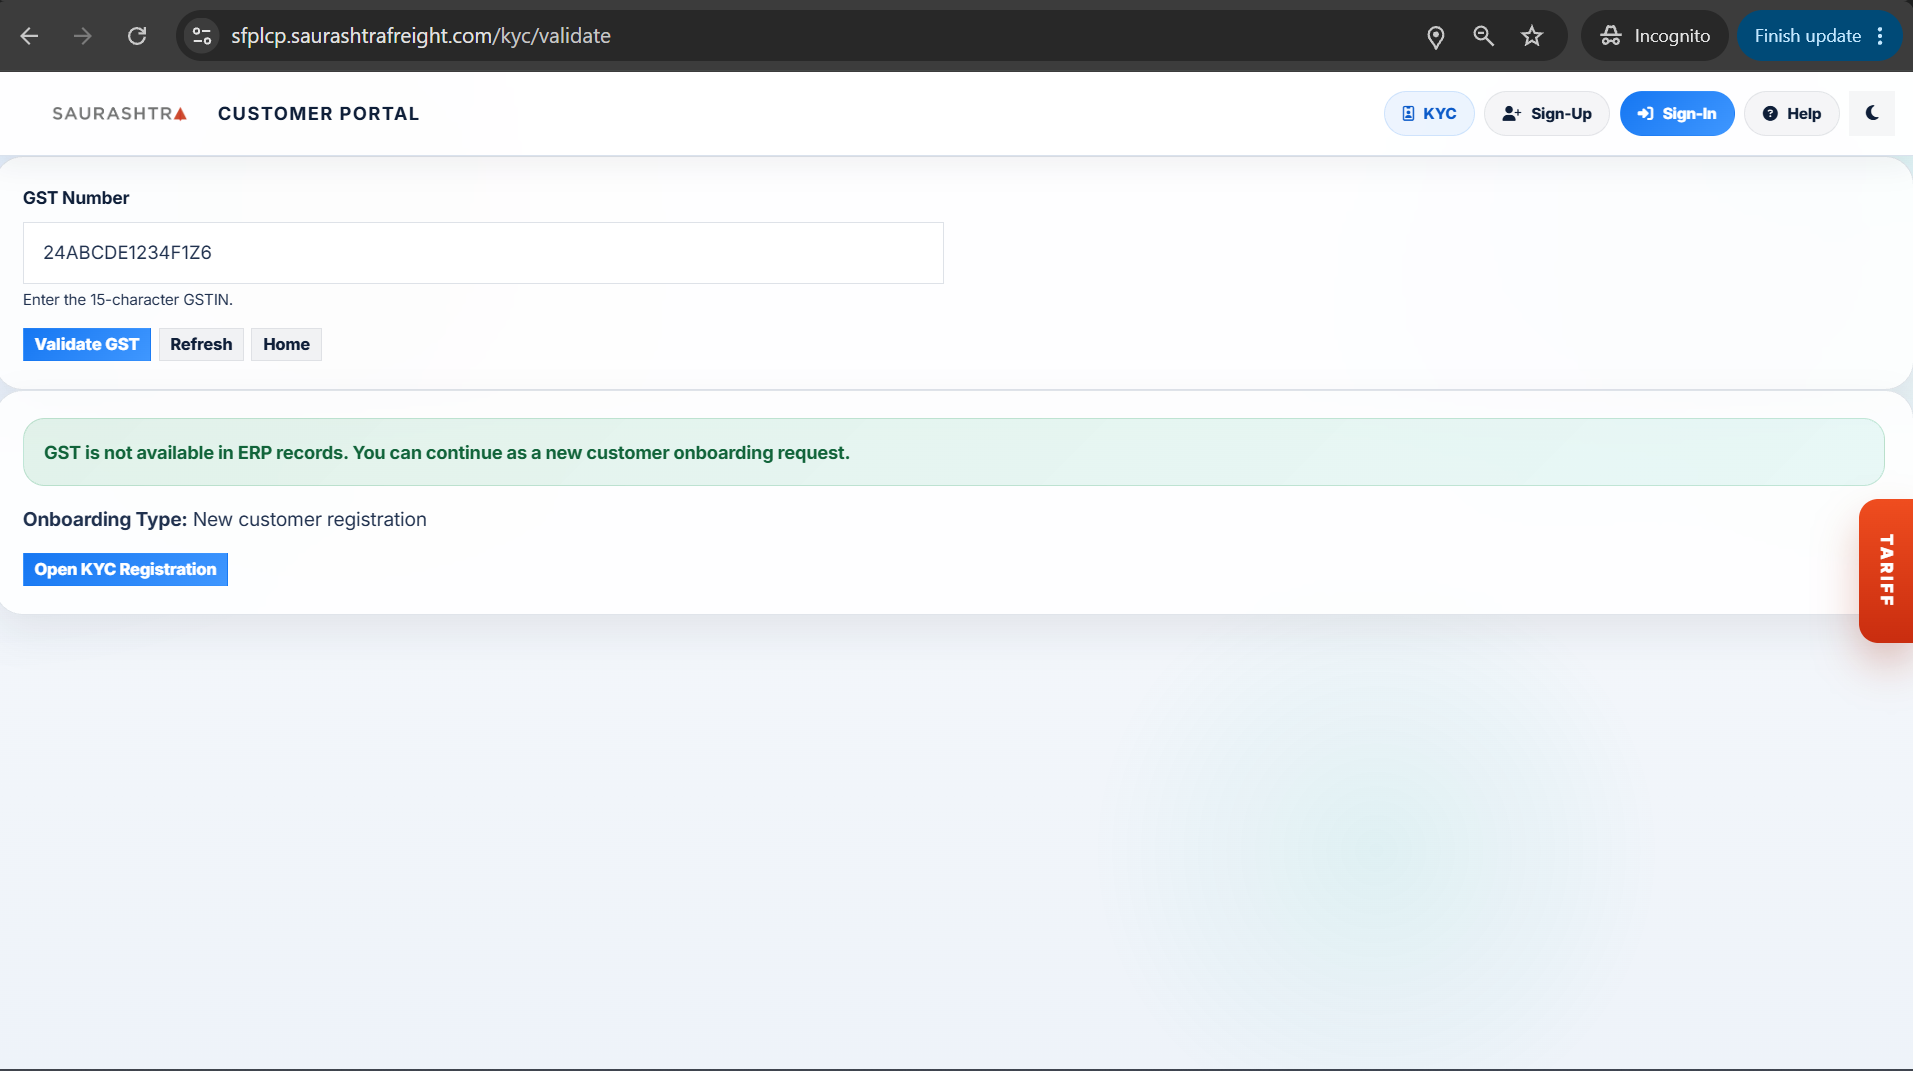
Step 1: GST Validation Form
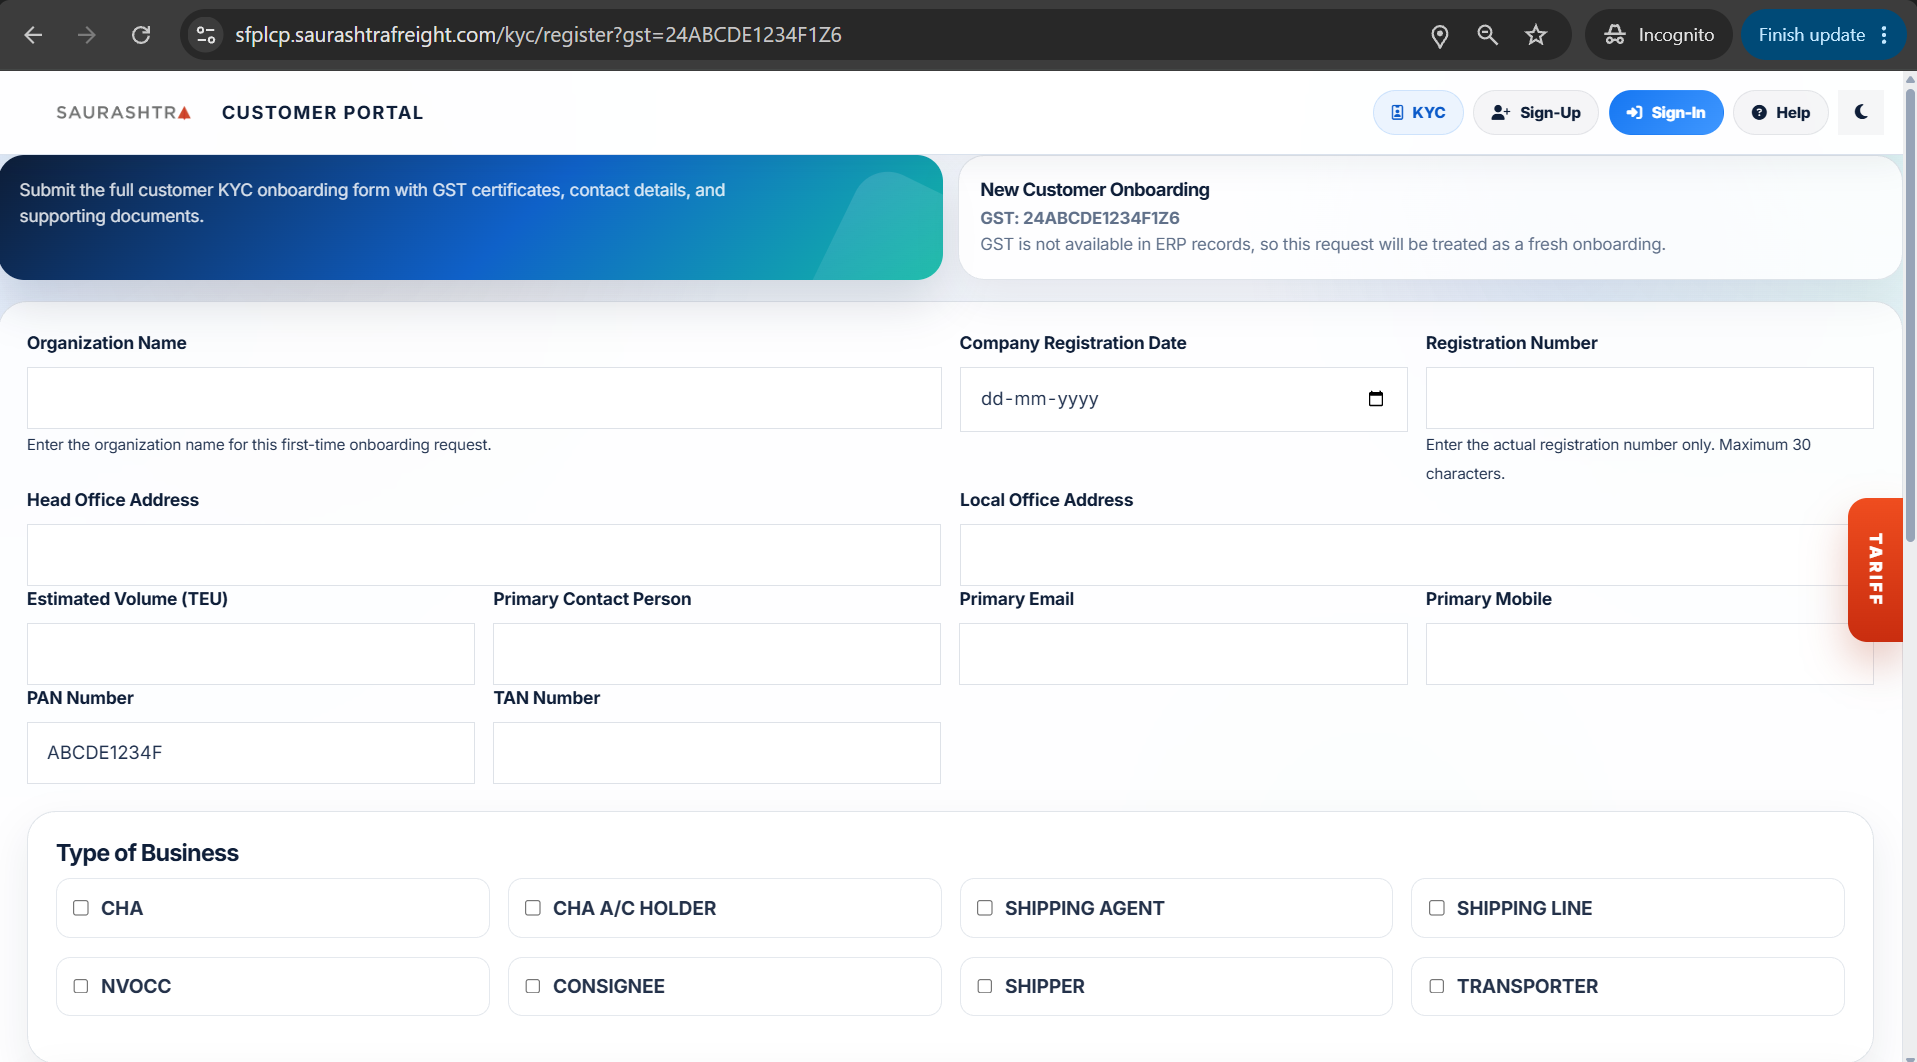
Step 2: Registration Form (Part 1)
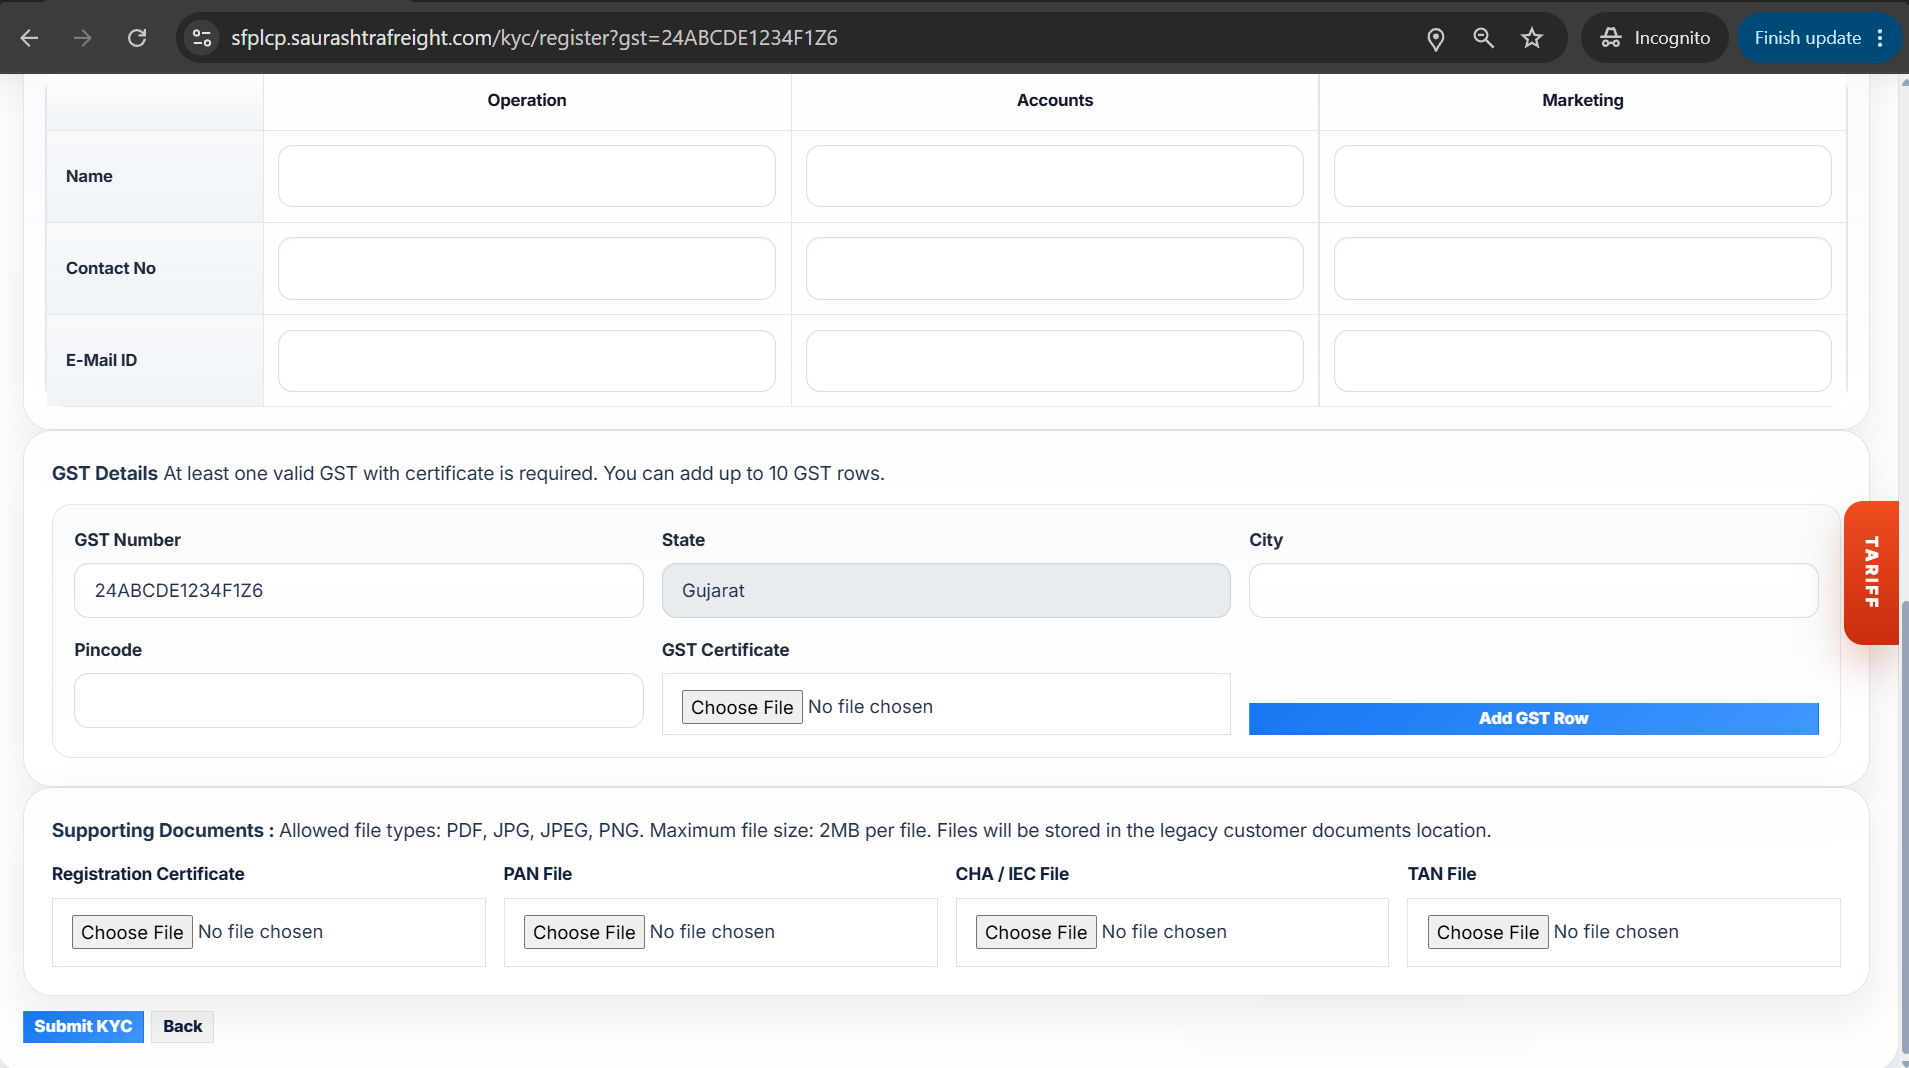
Step 2: Registration Form (Part 2)
How to Complete KYC
- Navigate to KYC — Click on the KYC button in the top navigation bar or sidebar.
- Enter GST Number — Type your 15-digit GST number in the input field (Step 1).
- Validate GST — Click the Validate GST button. The system will verify your GST number against the ERP customer master database.
- Fill KYC Registration Form — If your GST is valid, you will be presented with the registration form (Step 2). Fill in the required details including contact information and department selection.
- Submit KYC — Click the Submit button to complete the KYC registration.
- Email Verification — A verification email will be sent to your registered email address. Click the verification link to activate your KYC record.
KYC is a one-time process. Once your KYC is verified, you can proceed to register and access the full portal.
Sign-Up (Registration)
Public
The Sign-Up module allows new customers to create their portal account. Registration requires a valid GST number and goes through an email verification process to ensure secure access.
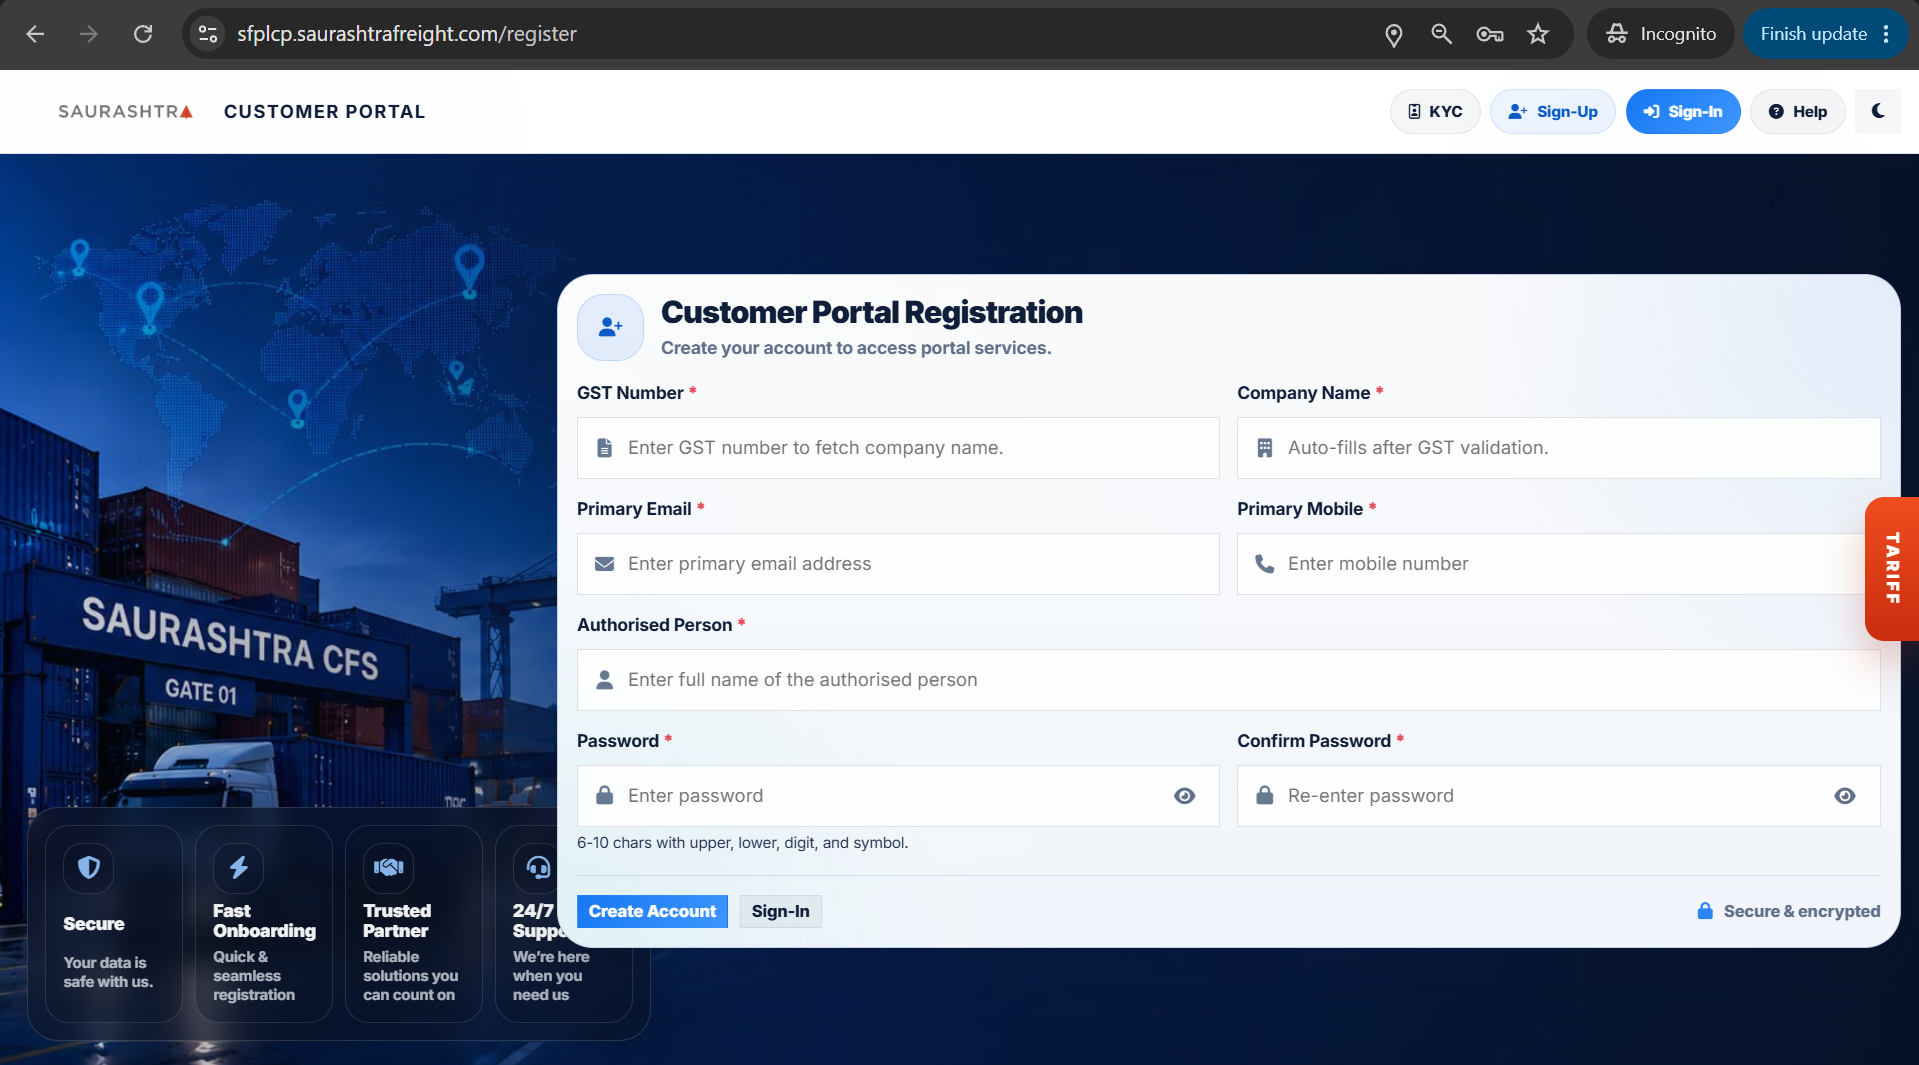
Click image to view full size
How to Register
- Click Sign-Up — From the landing page, click the Sign-Up button in the navigation bar.
- Enter GST Number — Provide your 15-digit GST number and click Validate. The system checks if the GST exists in the ERP customer master.
- Fill Registration Details — Enter your name, email address, mobile number, and set a password.
- Submit Registration — Click Register to submit your application.
- Email Verification — You will receive a verification email. Click the link inside the email to verify your account.
- Account Activated — Once verified, you can use your credentials to sign in to the portal.
Your GST number must be registered in the SFPL ERP system. If your GST is not recognized, please contact Customer Care at customercare@sfplcorp.com.
Sign-In (Login)
Public
The Sign-In page allows registered customers to access their portal workspace. Use the credentials you set during registration to log in.
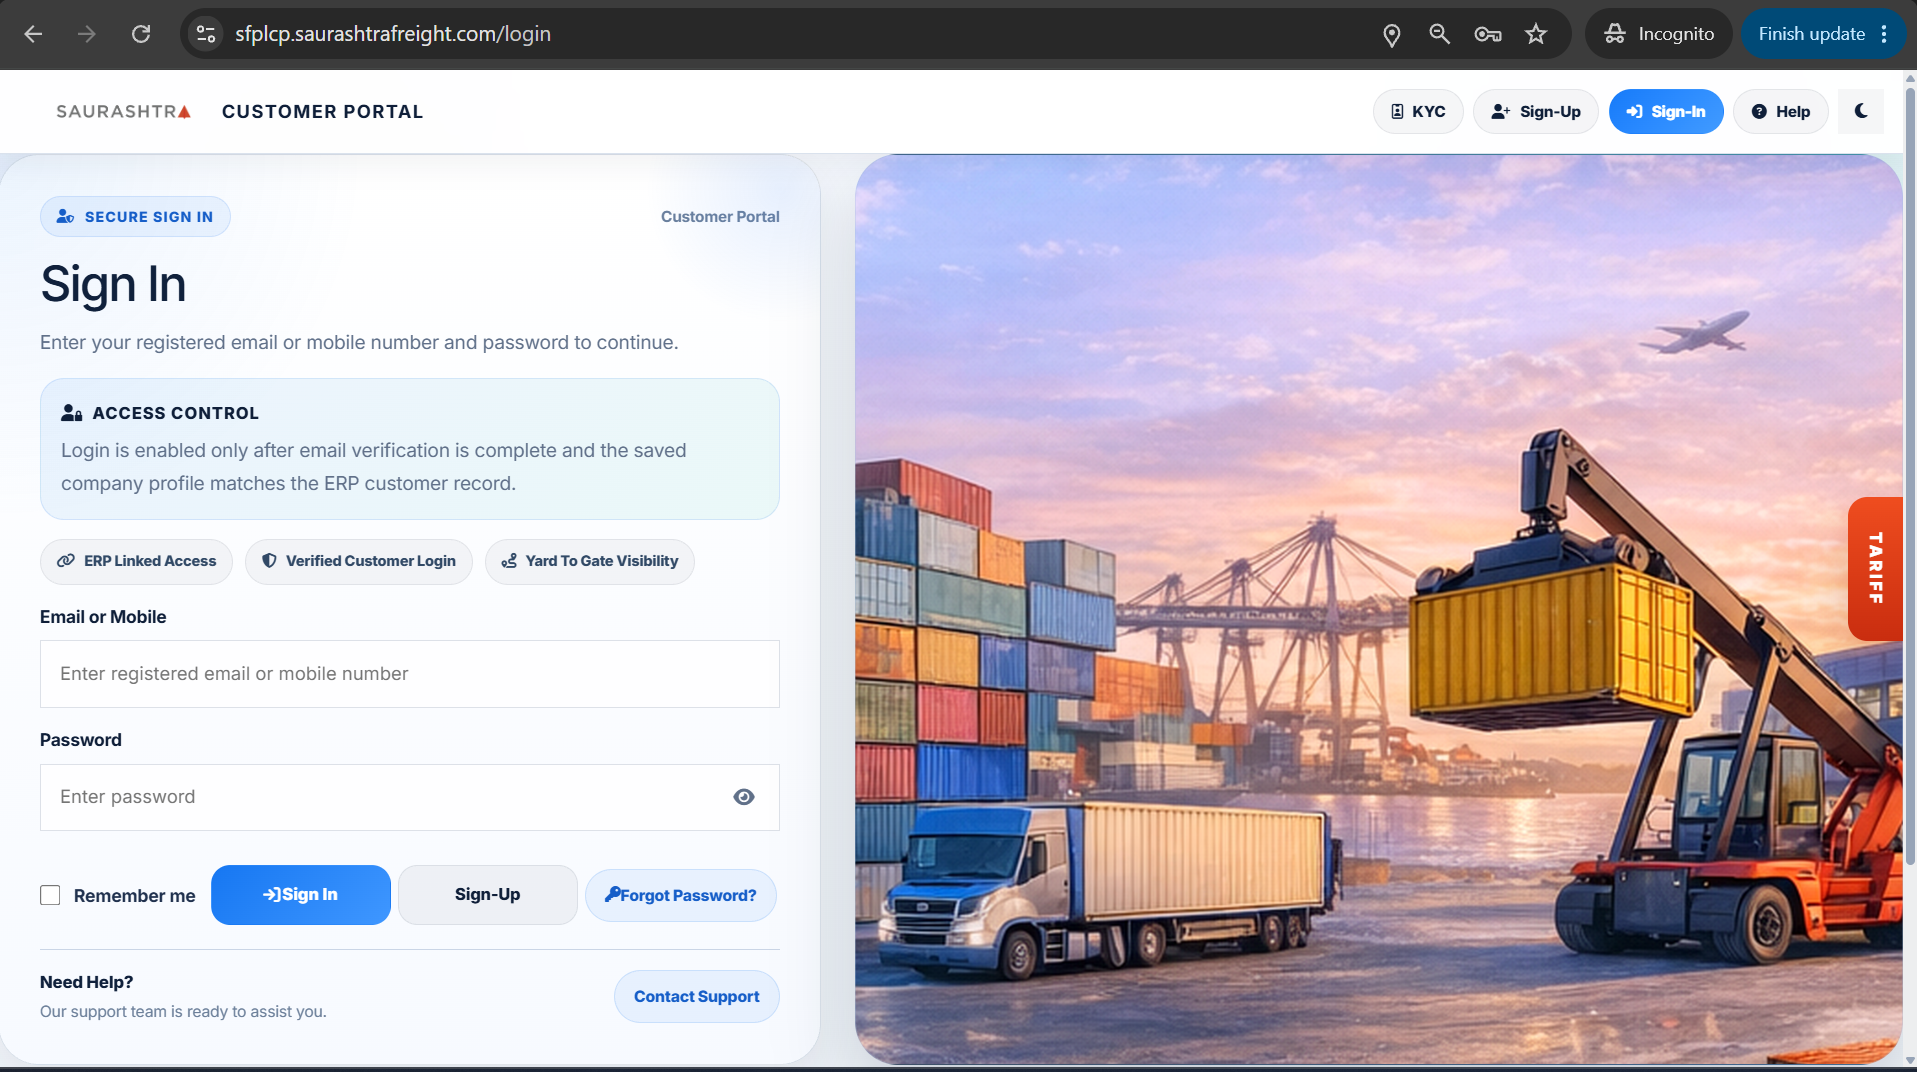
Click image to view full size
How to Sign In
- Navigate to Sign-In — Click the Sign-In button on the landing page.
- Enter Credentials — Type your registered email/username and password.
- Click Login — Press the Login button to access your dashboard.
- Dashboard Access — On successful login, you will be redirected to your personalized dashboard showing shipment summary, TEU statistics, and recent activity.
Forgot Password
Public
If you have forgotten your login password, you can reset it using the email-based verification code process. A 6-digit code will be sent to your registered email address.
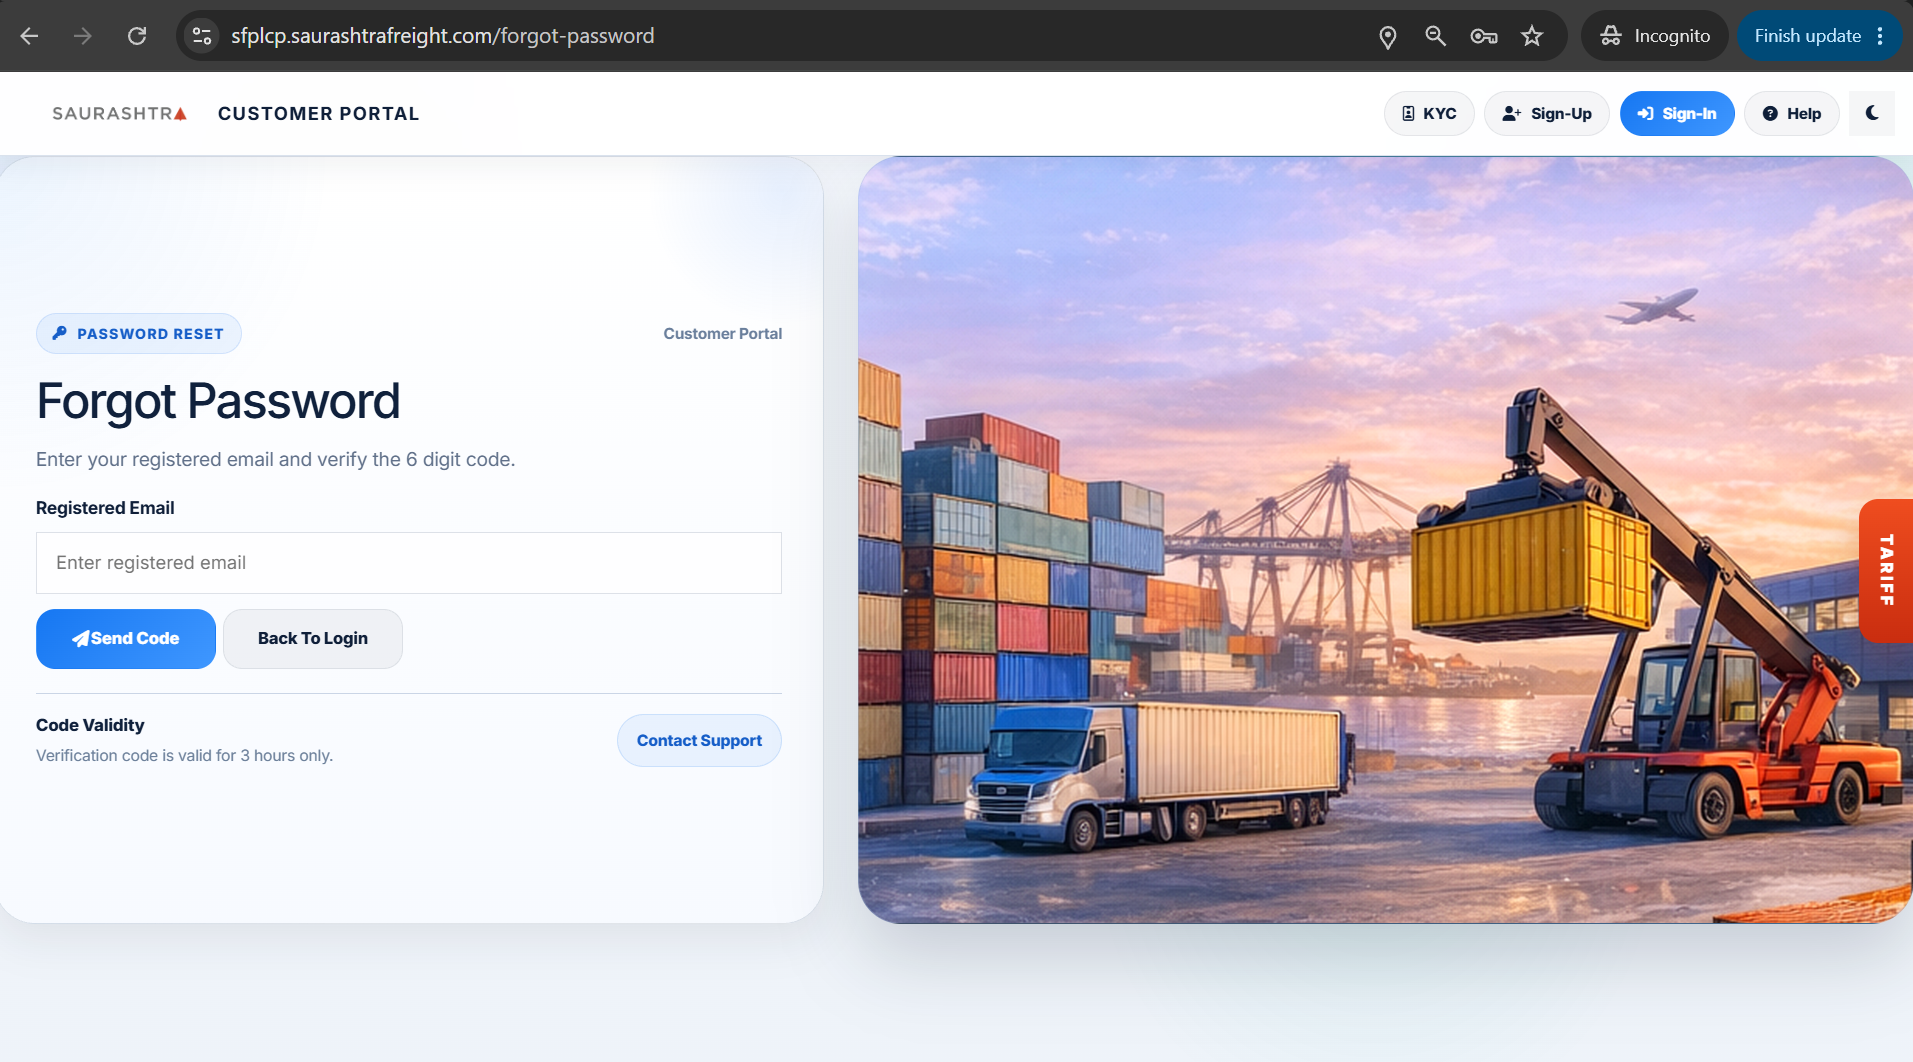
Click image to view full size
How to Reset Password
- Click Forgot Password — On the Sign-In page, click the Forgot Password link.
- Enter Email — Provide your registered email address.
- Send Verification Code — Click Send Code. A 6-digit verification code will be emailed to you.
- Enter Code — Type the 6-digit code you received in your email.
- Set New Password — Enter and confirm your new password.
- Submit — Click Reset Password to save your new password. You can now sign in with the new credentials.
The verification code is valid for 3 hours only. If it expires, you can request a new code by clicking Resend.
Change Password
Authenticated
Logged-in customers can update their account password anytime from the user profile dropdown. Changing password requires email-based OTP verification for security.
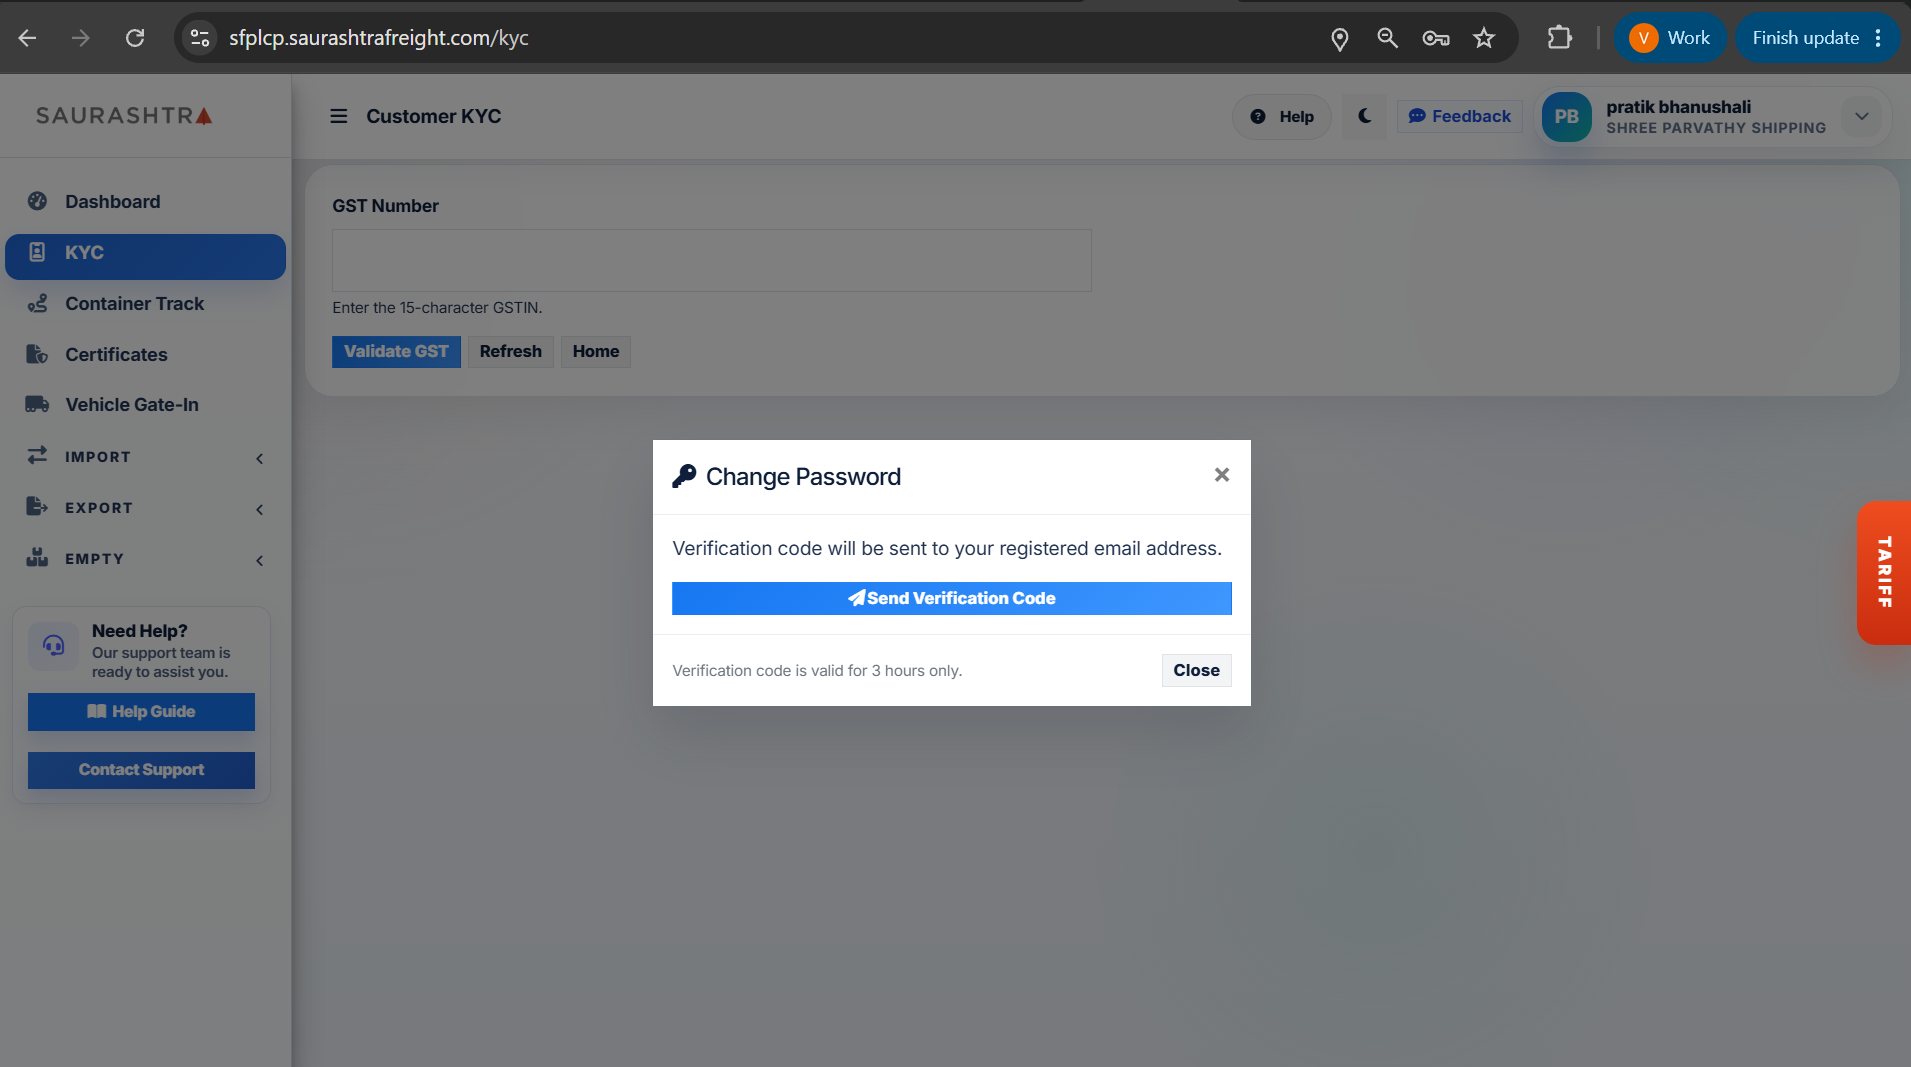
Click image to view full size
How to Change Password
- Open Profile Menu — Click your initials/name avatar in the top-right corner of the header.
- Select Change Password — Click Change Password from the dropdown menu.
- Request Verification Code — Click Send Code to receive a 6-digit OTP on your primary email address.
- Enter New Password & OTP — Type your current password, your new password, and the 6-digit email code.
- Save Changes — Click Update Password to complete the password update.
New passwords must be 6–10 characters long and contain a mix of uppercase, lowercase, digit, and symbol.
Dashboard
Authenticated
The Dashboard is your personalized workspace that appears after login. It provides a quick overview of your business activity, including TEU statistics, export/import movements, and container in-yard counts.
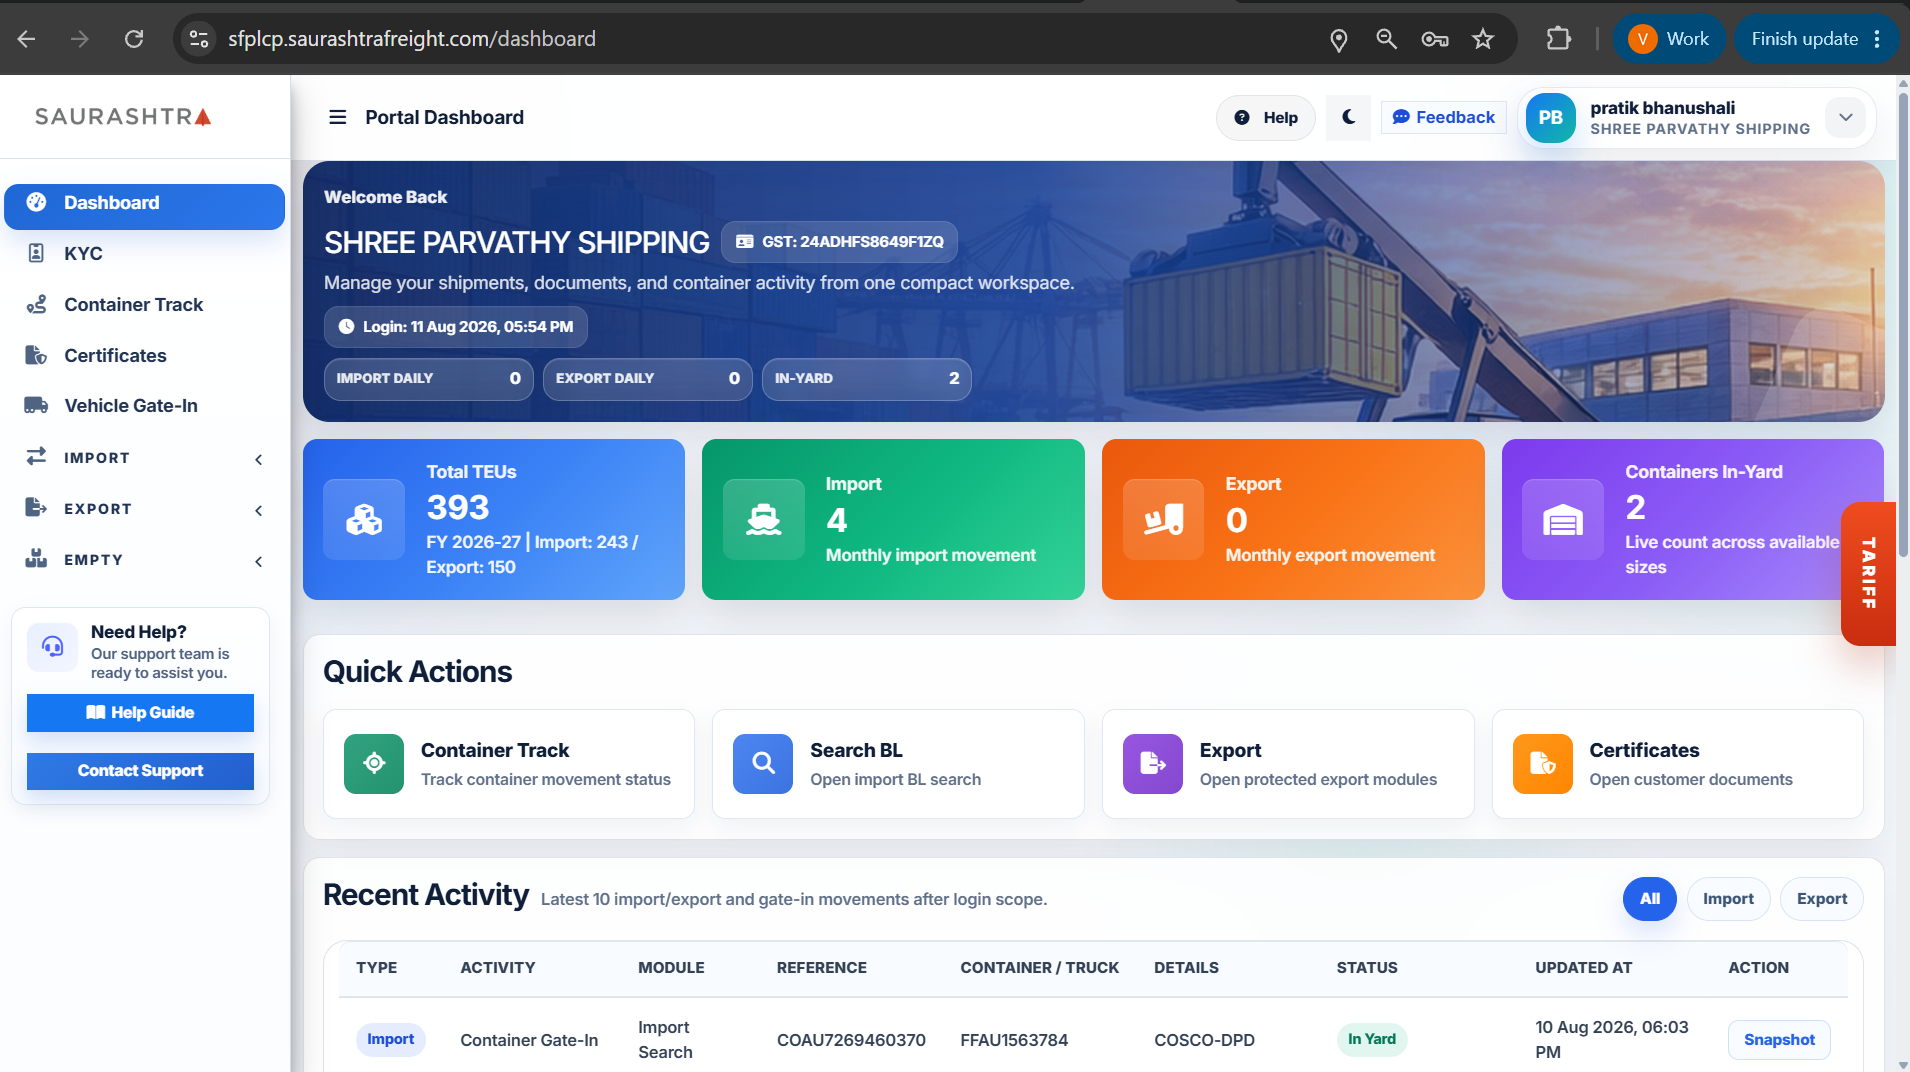
Screen 1: Dashboard Overview
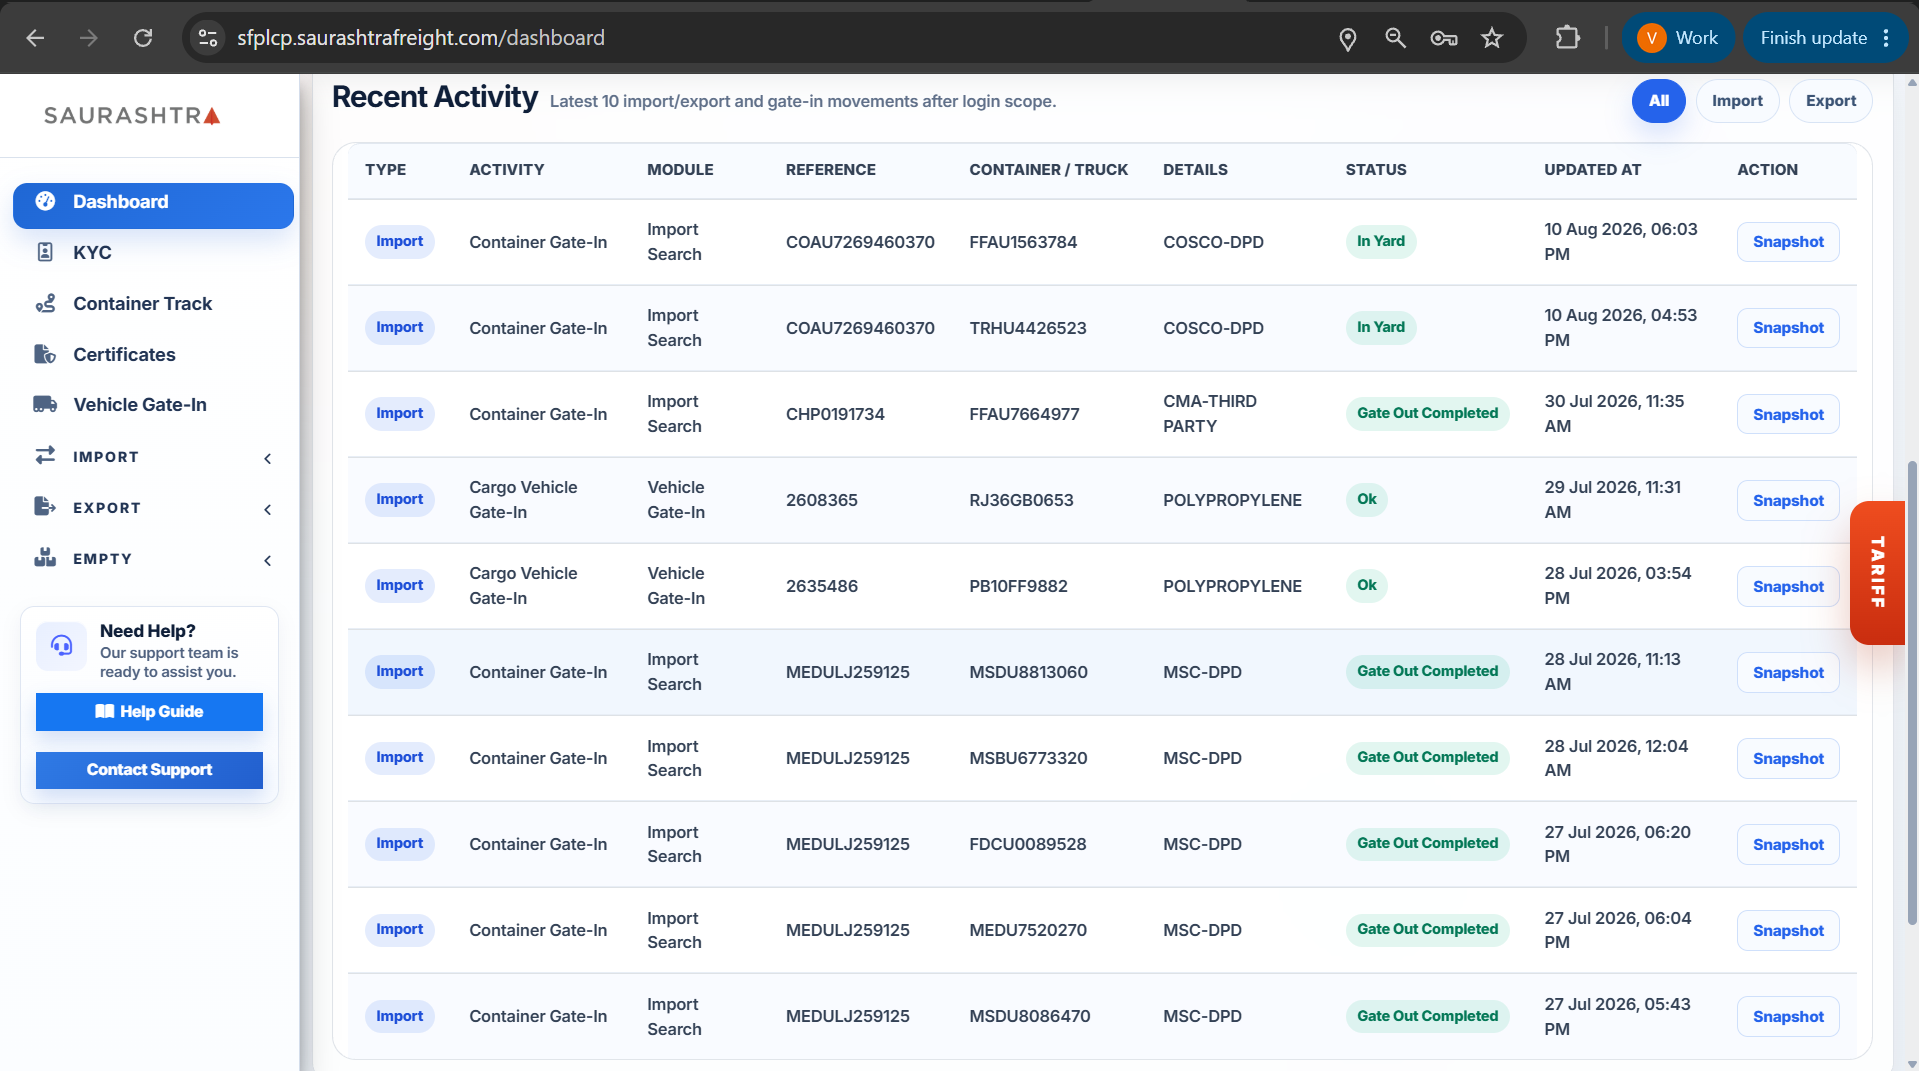
Screen 2: Activity Snapshot
Dashboard Components
Total TEUsCombined yearly export + import TEUs for the current financial year
Recent Activity FeedReal-time log of recent container tracking actions and document uploads
Export & Import MovementsLive monthly movement tracking & status cards
Containers In-YardLive count of containers across available sizes in yard
Container Track
Authenticated
The Container Track module provides real-time visibility into any container's current status, yard location, stack position, GPS coordinates, and live interactive map view.
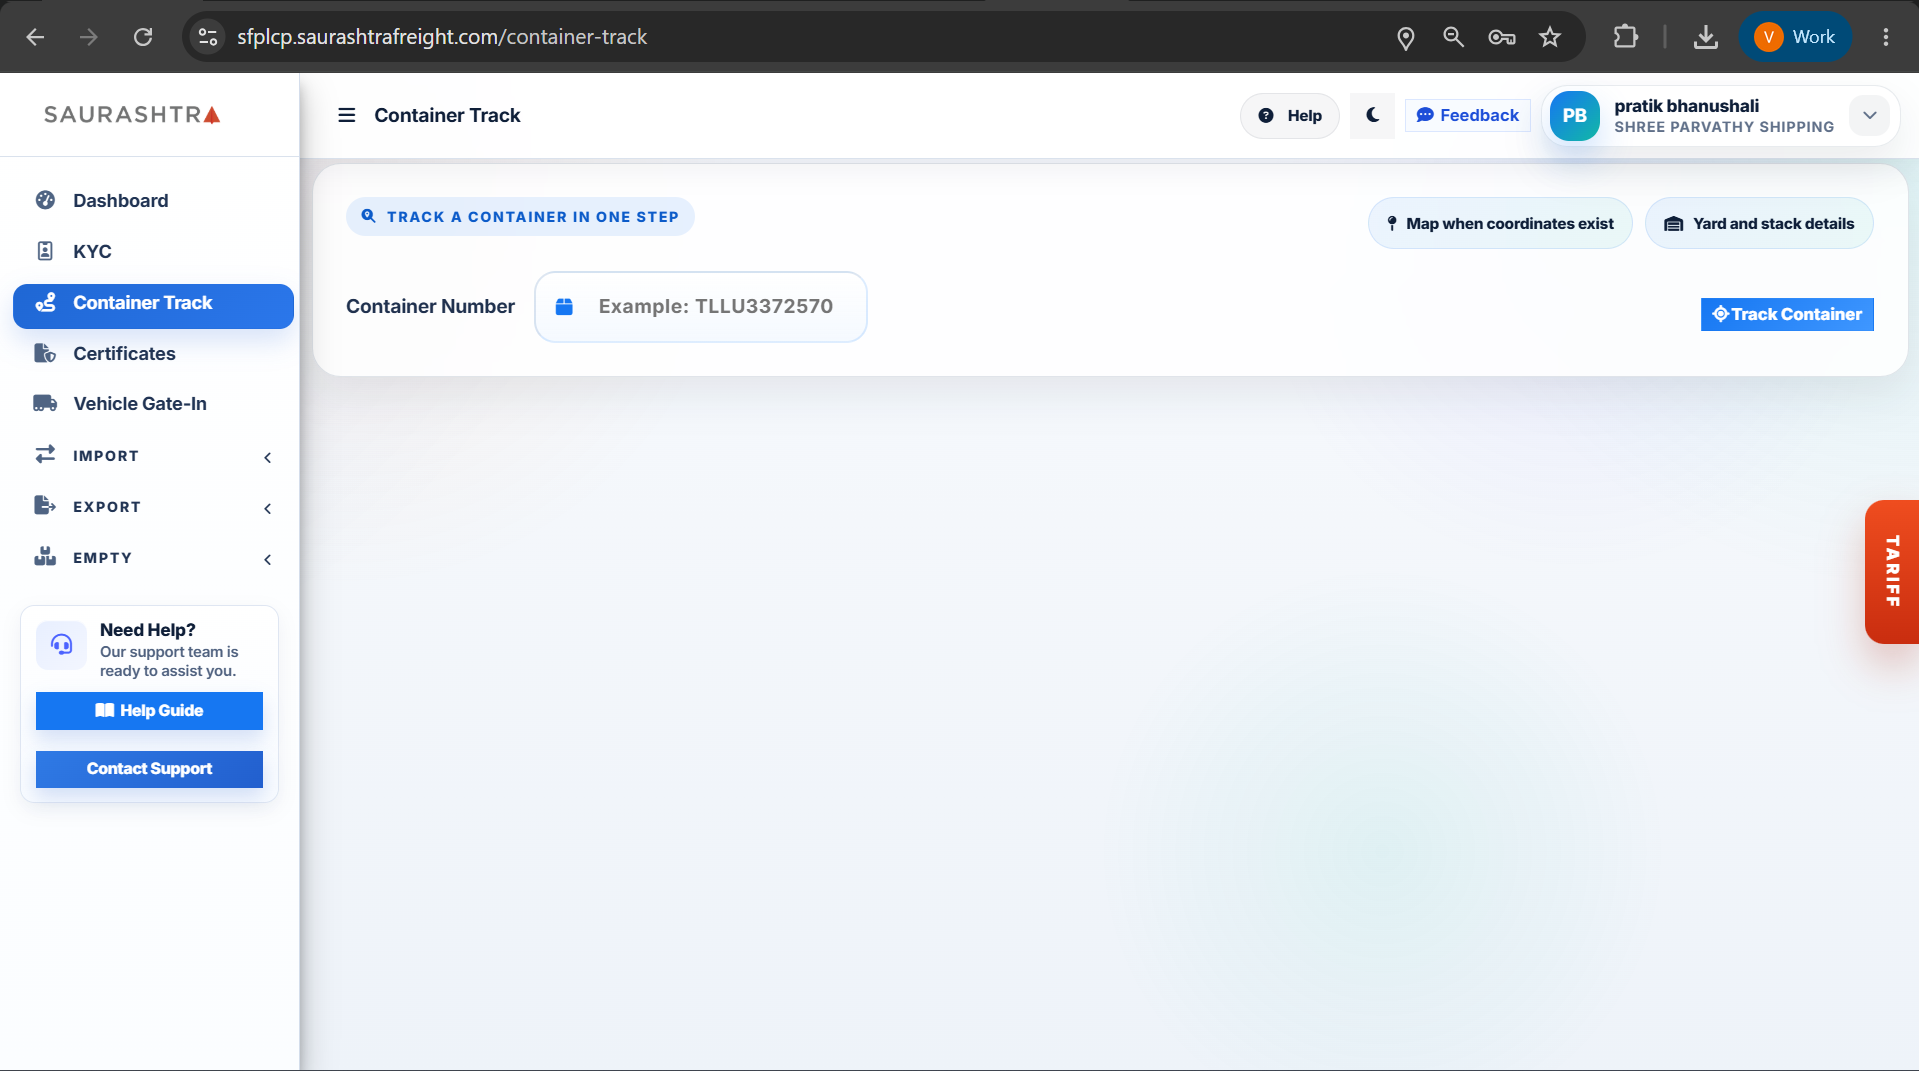
Screen 1: Container Search
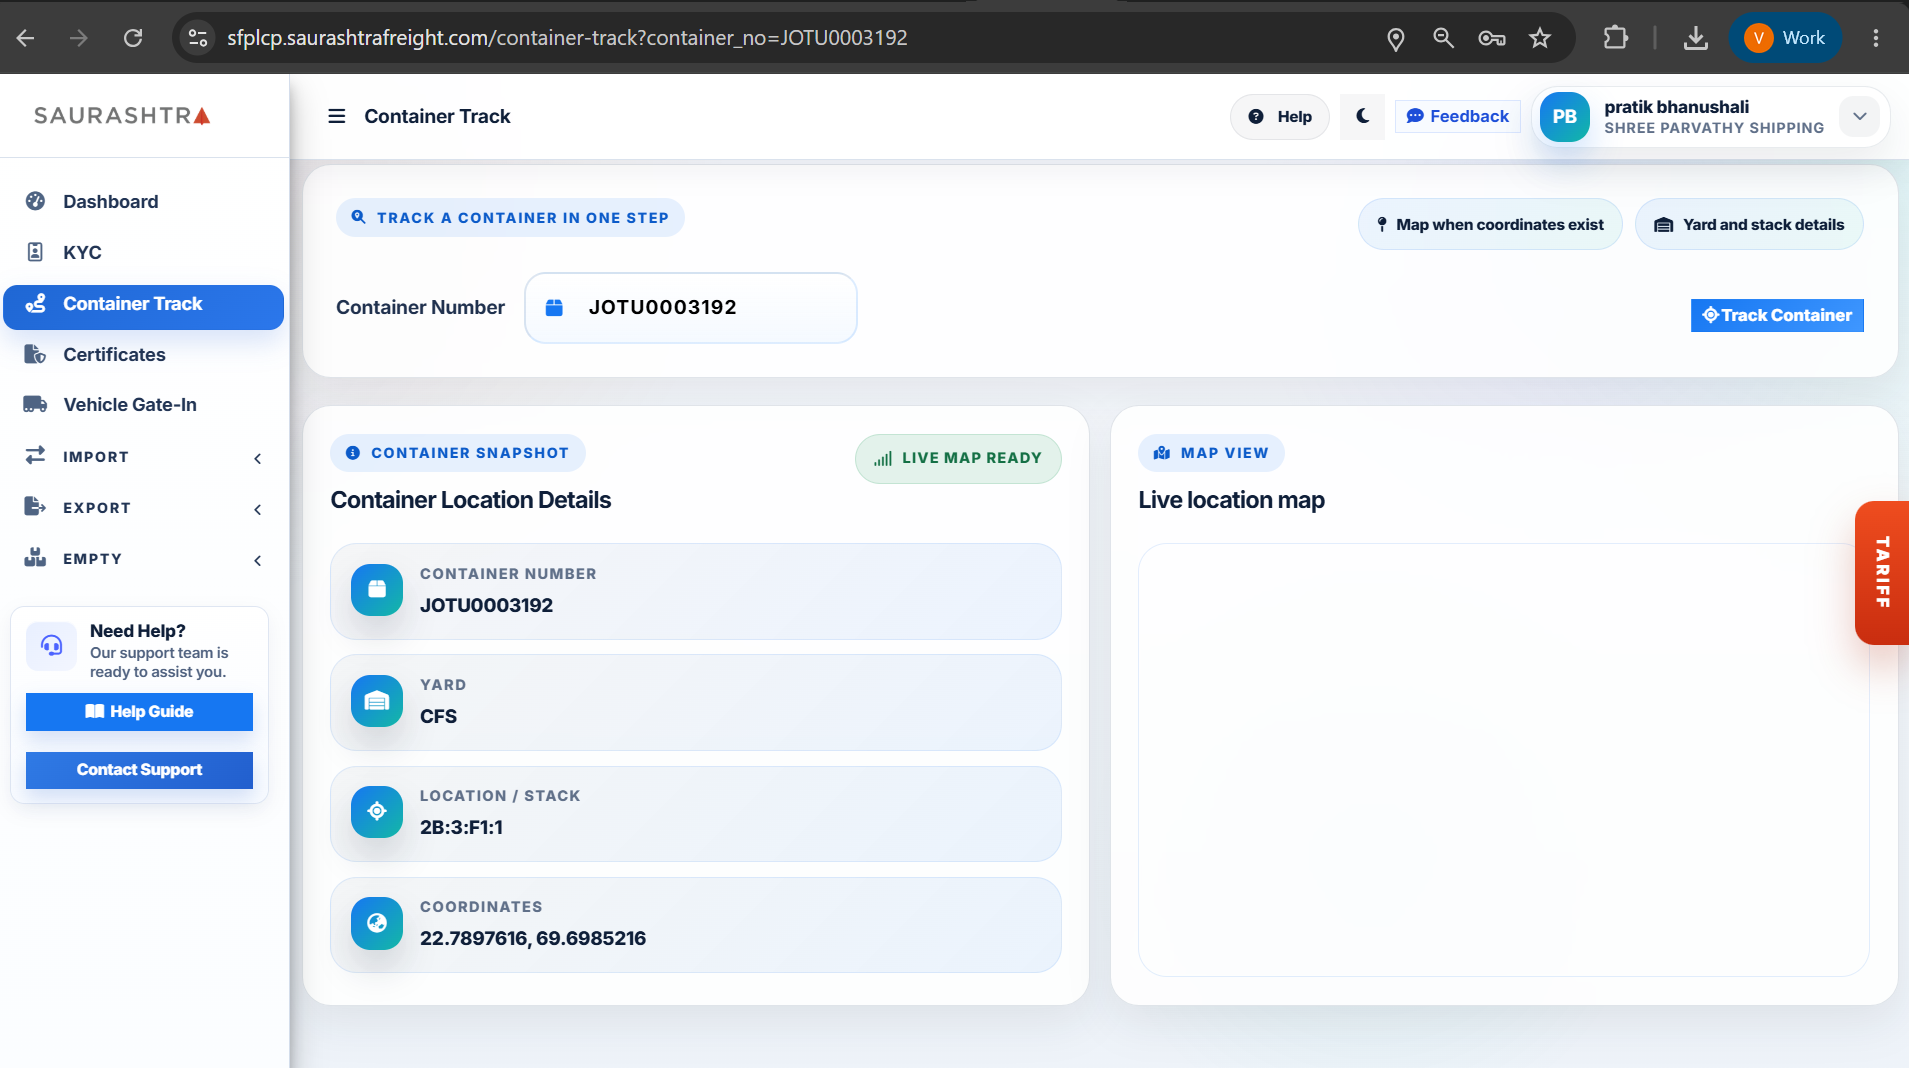
Screen 2: Location & Live Map View
How to Track a Container
- Navigate to Container Track — Click Container Track in the left sidebar navigation menu.
- Enter Container Number — Type the 11-character container number (e.g.,
JOTU0003192) into the search field. - Click Track Container — Press the blue Track Container button to fetch real-time location data.
- View Container Snapshot — Inspect key location metrics including Yard (e.g. CFS), Location / Stack (e.g.
2B:3:F1:1), and exact GPS Coordinates. - Inspect Live Map — View the container's pin position on the interactive live map when GPS coordinates exist for the yard stack.
Yard stack details and live map rendering are automatically displayed as soon as container placement coordinates are synced from the CFS yard management system.
Certificates
Authenticated
The Document Center allows authenticated customers to view, search, and access official company certificates, weighbridge calibration reports, statutory compliance files, and Mundra Tariff schedules.
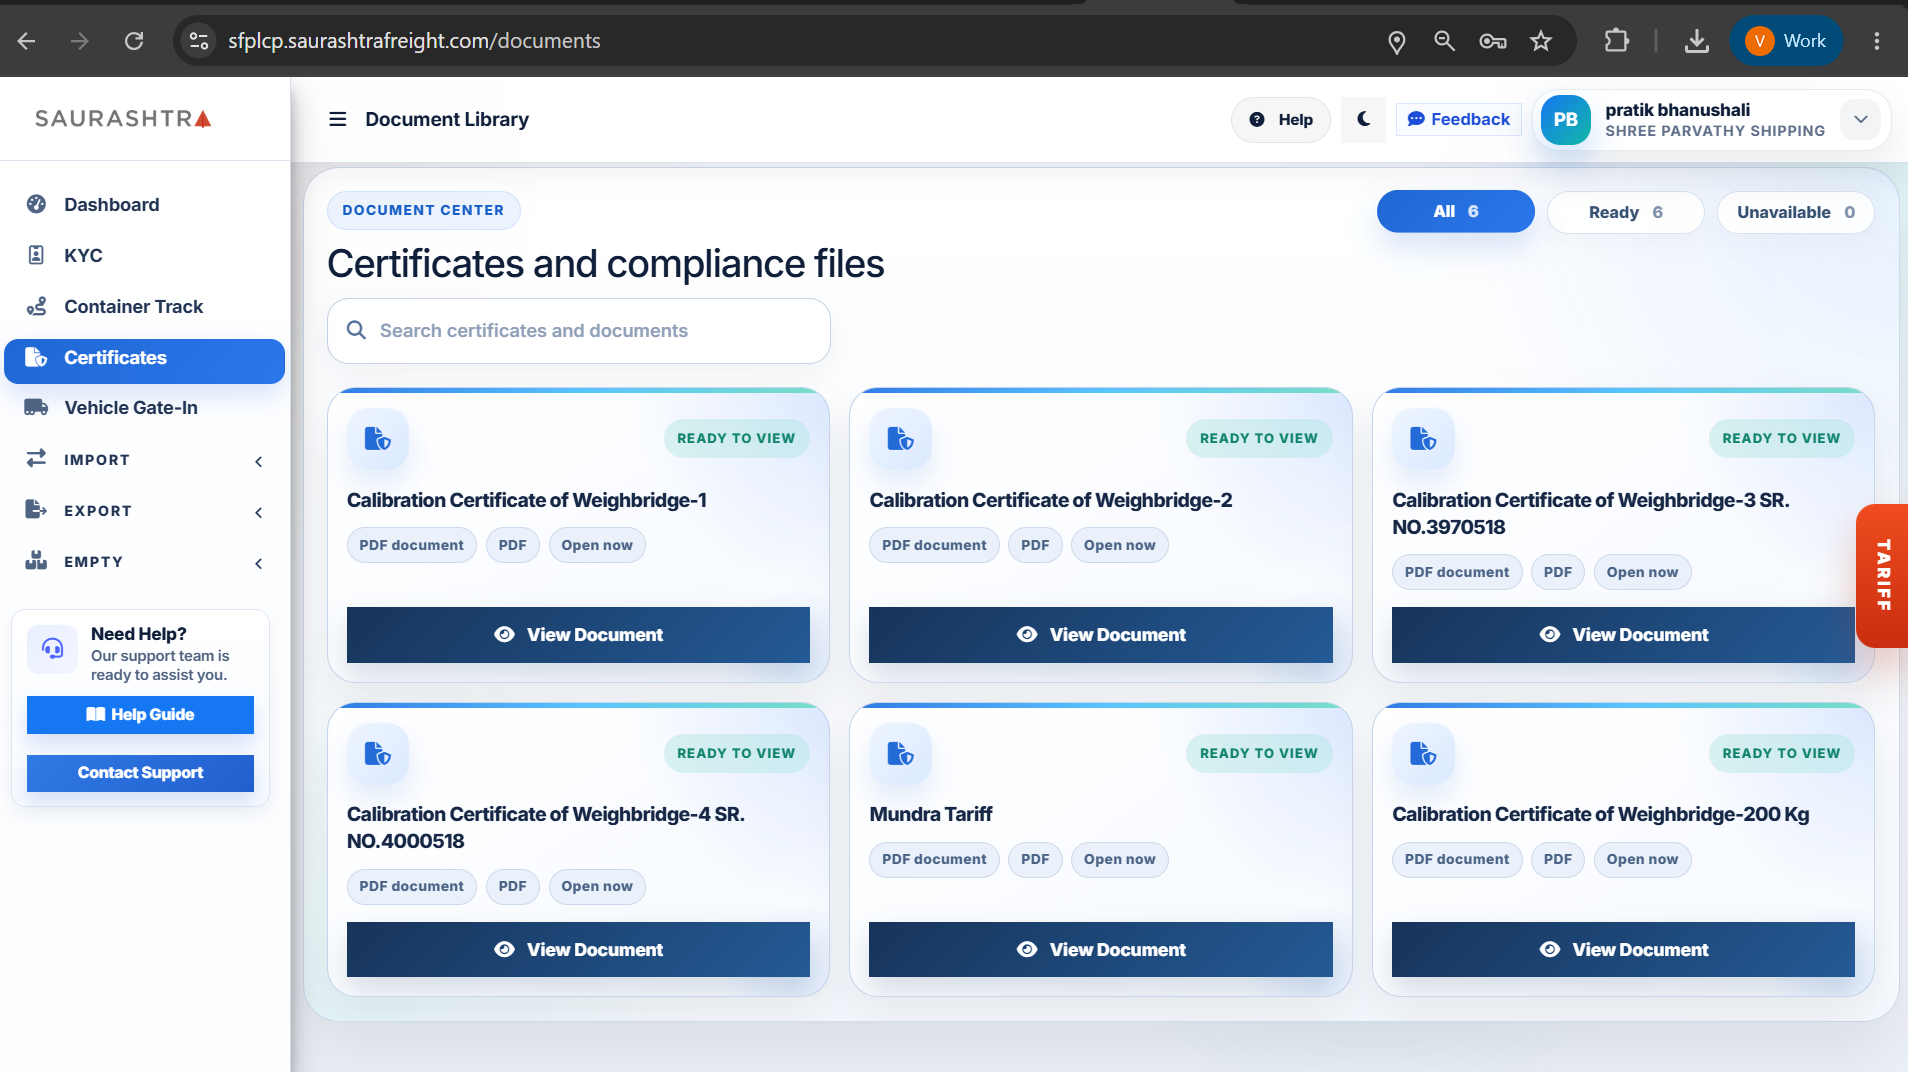
Screen 1: Document Center Library
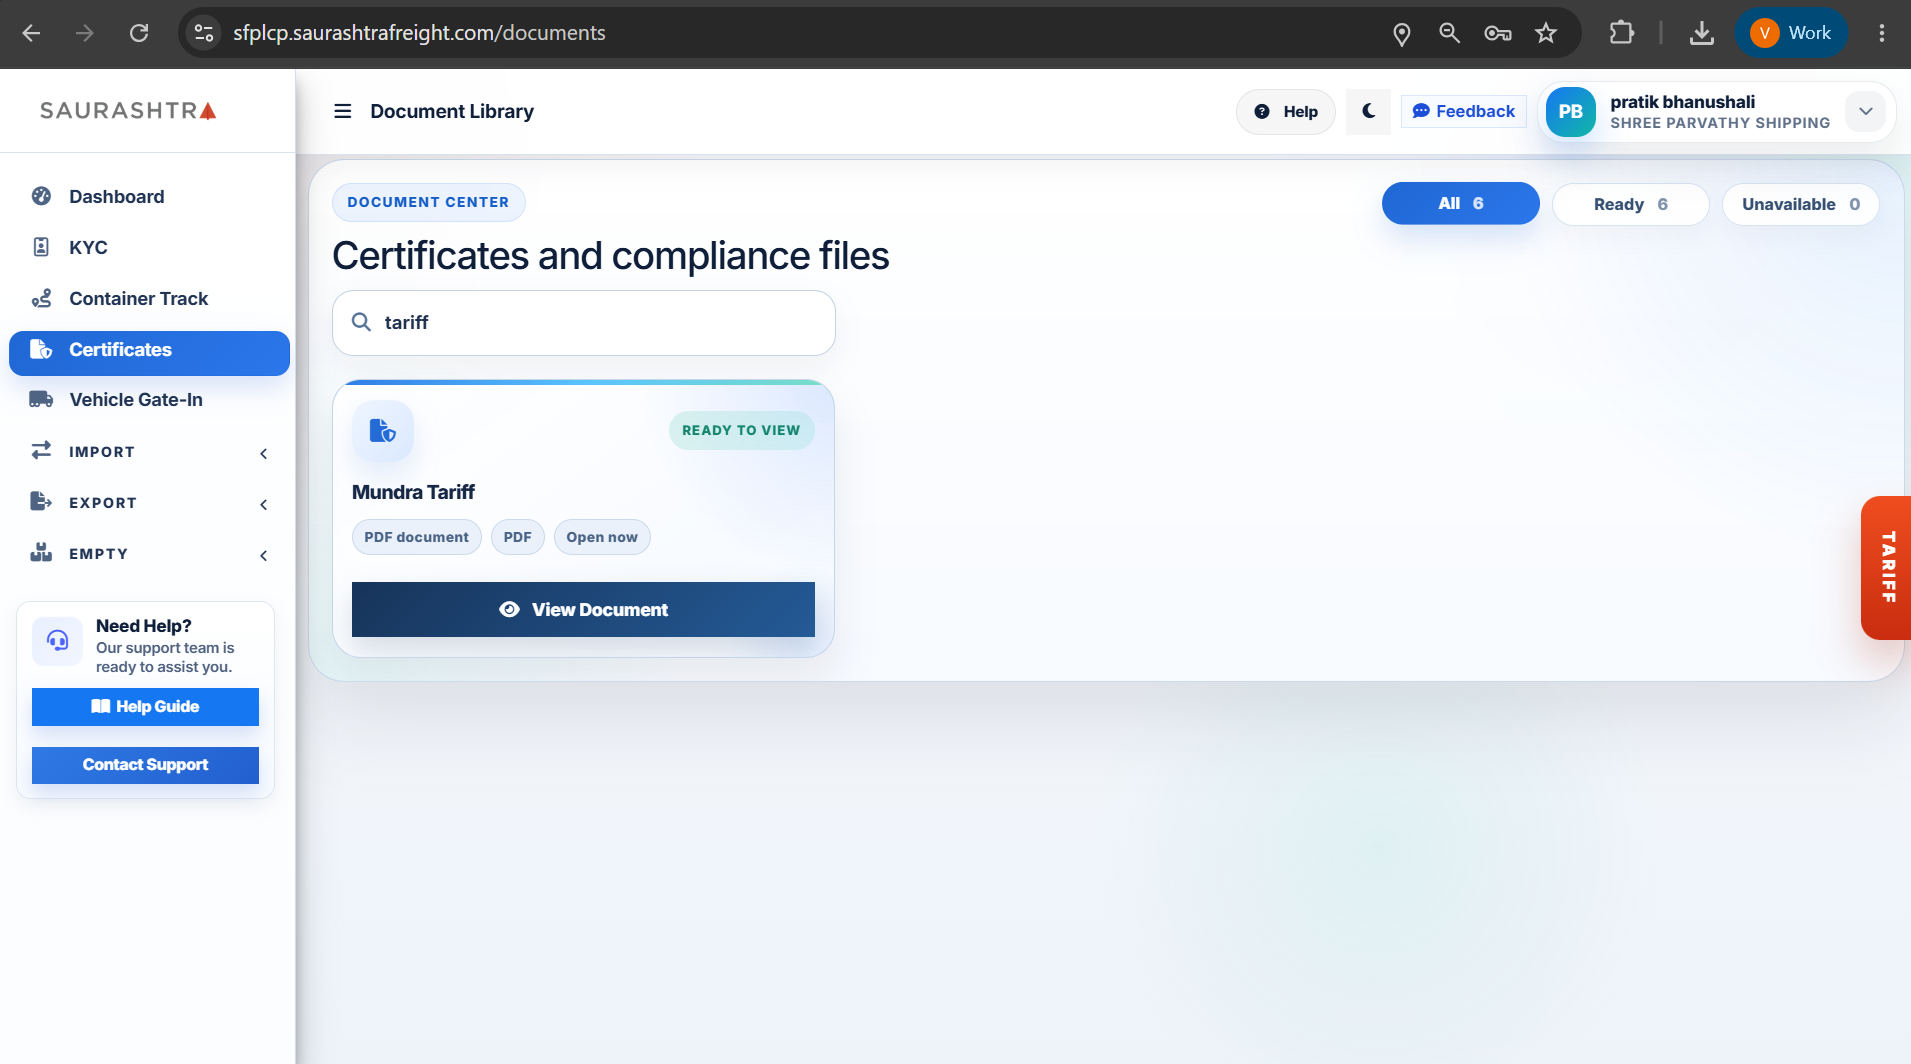
Screen 2: Search & Keyword Filter
How to Access Certificates
- Navigate to Certificates — Click Certificates in the left sidebar menu to open the Document Center.
- Filter & Search Documents — Use the status pills (All, Ready, Unavailable) or type keywords in the search bar (e.g.
WeighbridgeorTariff) to locate specific documents. - View Document — Click the blue View Document button on any document card (e.g., Calibration Certificate of Weighbridge, Mundra Tariff) to view or download the PDF file online.
- Quick Tariff Access — Alternatively, click the orange TARIFF side tab fixed on the right edge of any page for quick access to current CFS rates.
All compliance documents and weighbridge calibration certificates are verified and updated regularly in accordance with port authority and statutory requirements.
Vehicle Gate-In
Authenticated
The Vehicle Gate-In module allows logistics operators and customers to log, track, and manage vehicle gate entries across Import, Export, and Empty operational cycles.
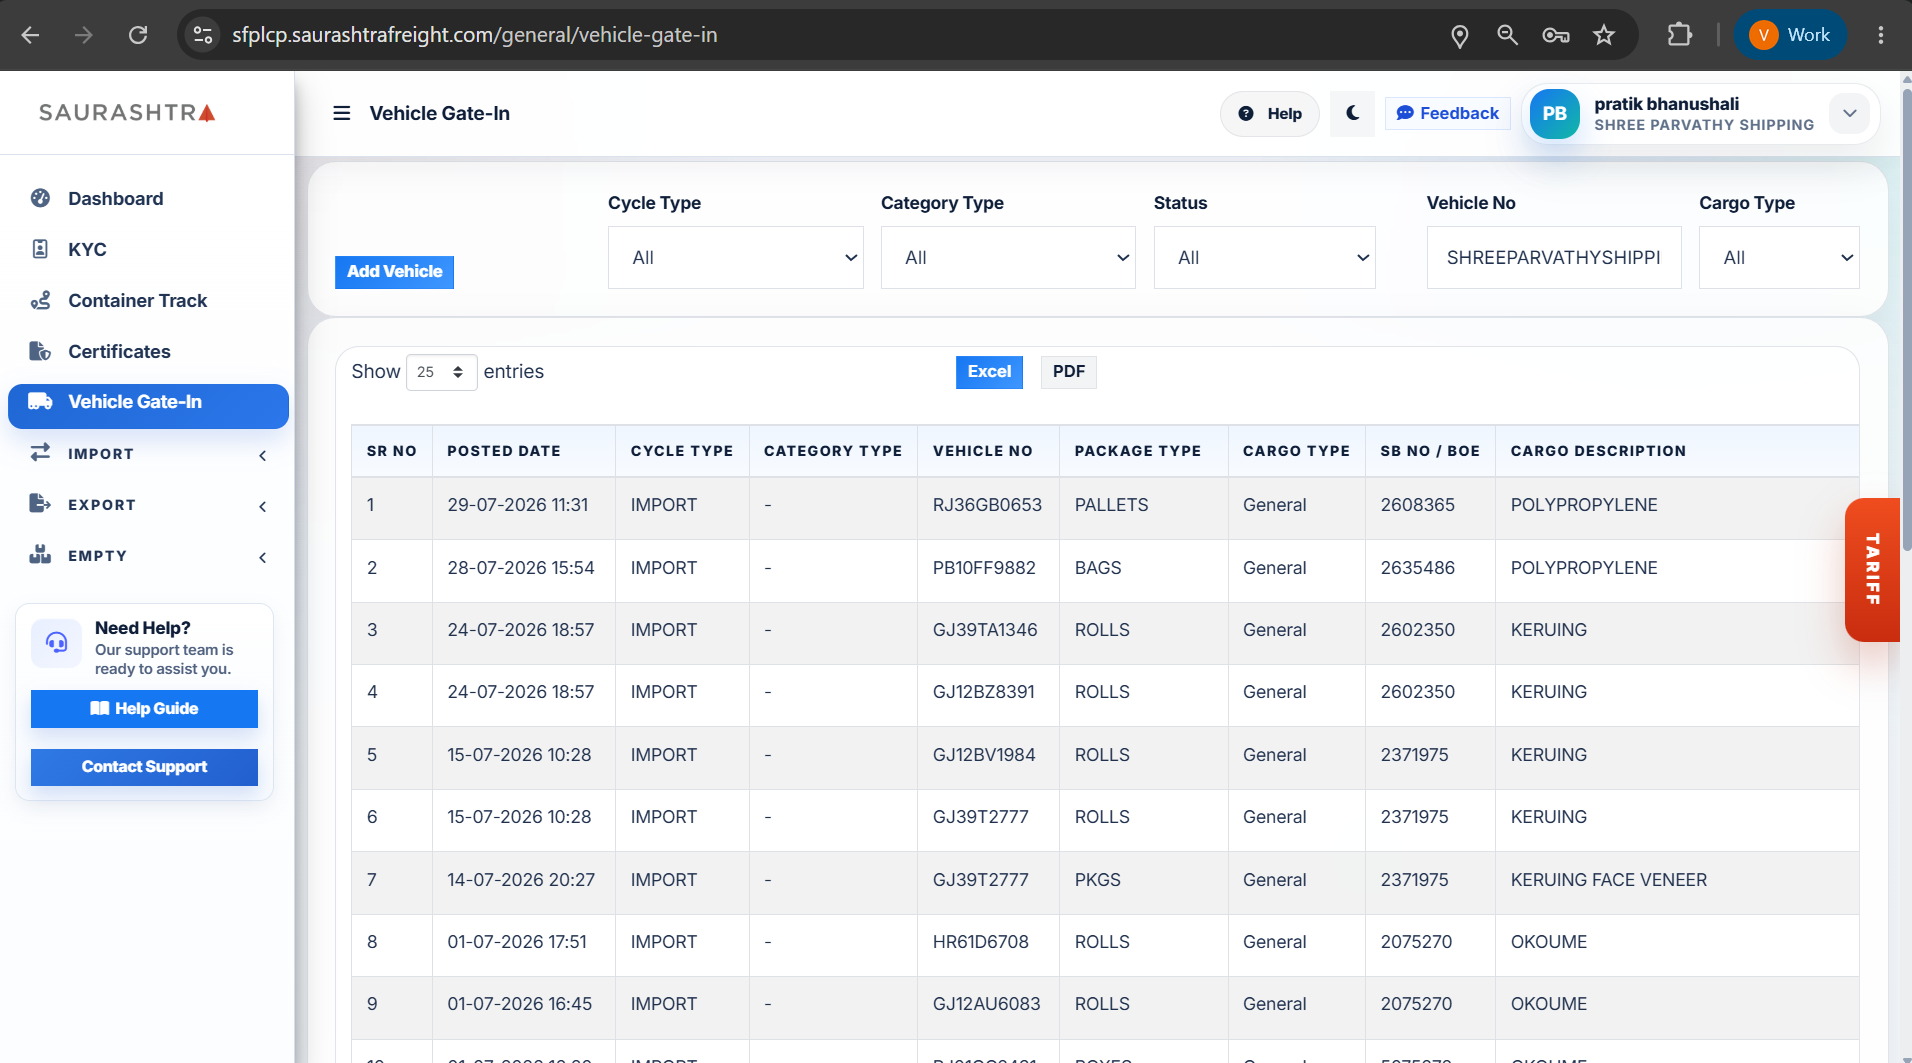
Screen 1: Log Index & Filters
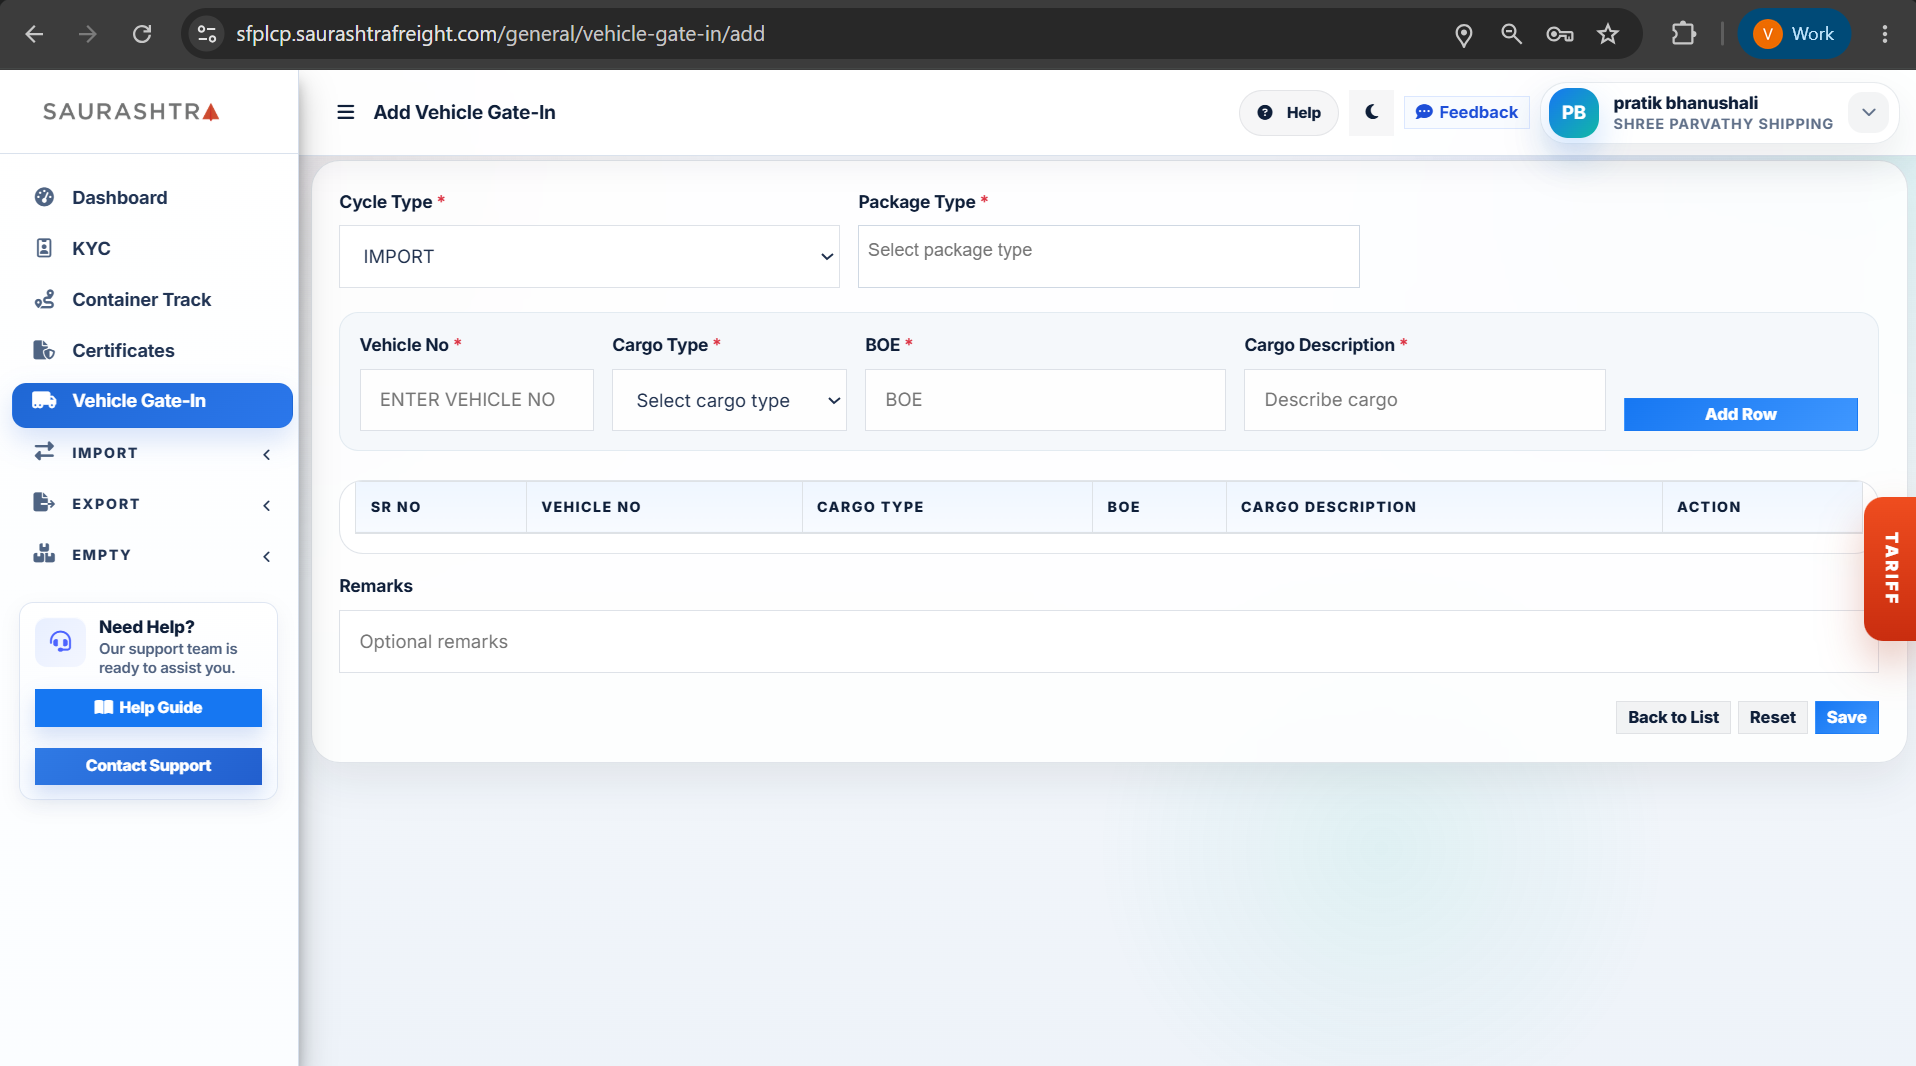
Screen 2: Add Entry (Import BOE)
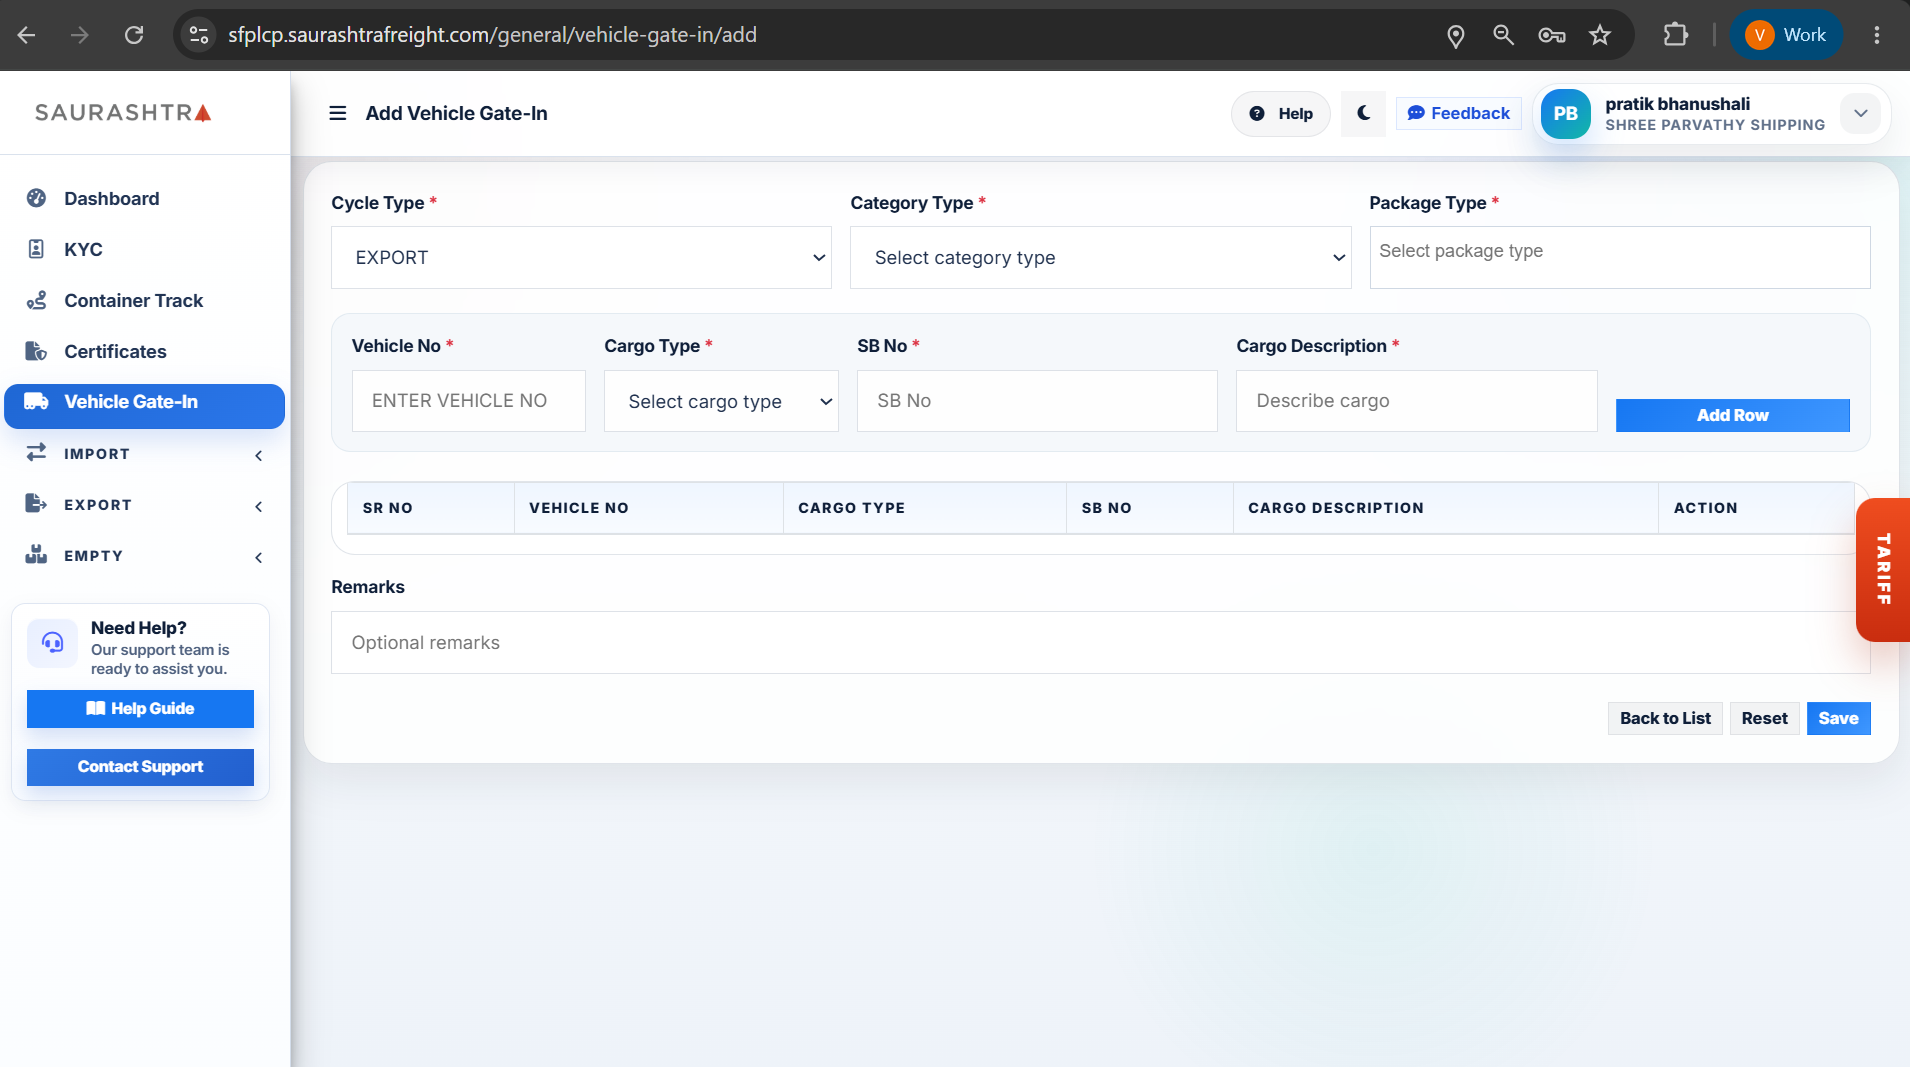
Screen 3: Add Entry (Export SB No)
How to View & Search Gate-In Logs
- Navigate to Vehicle Gate-In — Click Vehicle Gate-In in the left navigation sidebar menu.
- Apply Filters — Filter entry logs by Cycle Type (
All,IMPORT,EXPORT,EMPTY), Category Type, Status, Vehicle No, or Cargo Type. - Export Logs — Click the blue Excel or grey PDF button above the data table to download filtered gate entry records.
How to Add a Vehicle Gate-In Entry
- Click Add Vehicle — Press the primary blue Add Vehicle button on the top left of the logs index page.
- Select Cycle Type — Choose IMPORT or EXPORT from the dropdown:
- Import Cycle — Requires selecting Package Type, entering Vehicle No, Cargo Type, BOE Number (Bill of Entry), and Cargo Description.
- Export Cycle — Requires selecting Category Type and Package Type, entering Vehicle No, Cargo Type, SB No (Shipping Bill), and Cargo Description.
- Add Row to Table — Click Add Row to add the vehicle record to the draft table. Repeat for multi-vehicle requests if needed.
- Add Remarks & Save — Type any optional remarks and click Save to submit the vehicle gate-in entry.
Submitting accurate BOE numbers for Import vehicles and SB numbers for Export vehicles ensures automatic validation and faster processing at the CFS main gate.
Import Module Group
Authenticated
The Import module covers the entire import workflow from container search to BOE generation, online payment, and rebate claim submission.
Search Container
Search import shipments by Bill of Lading (BL) number or container number to view live movement details, container size & type, arrival timestamps, seal numbers, and scan status.
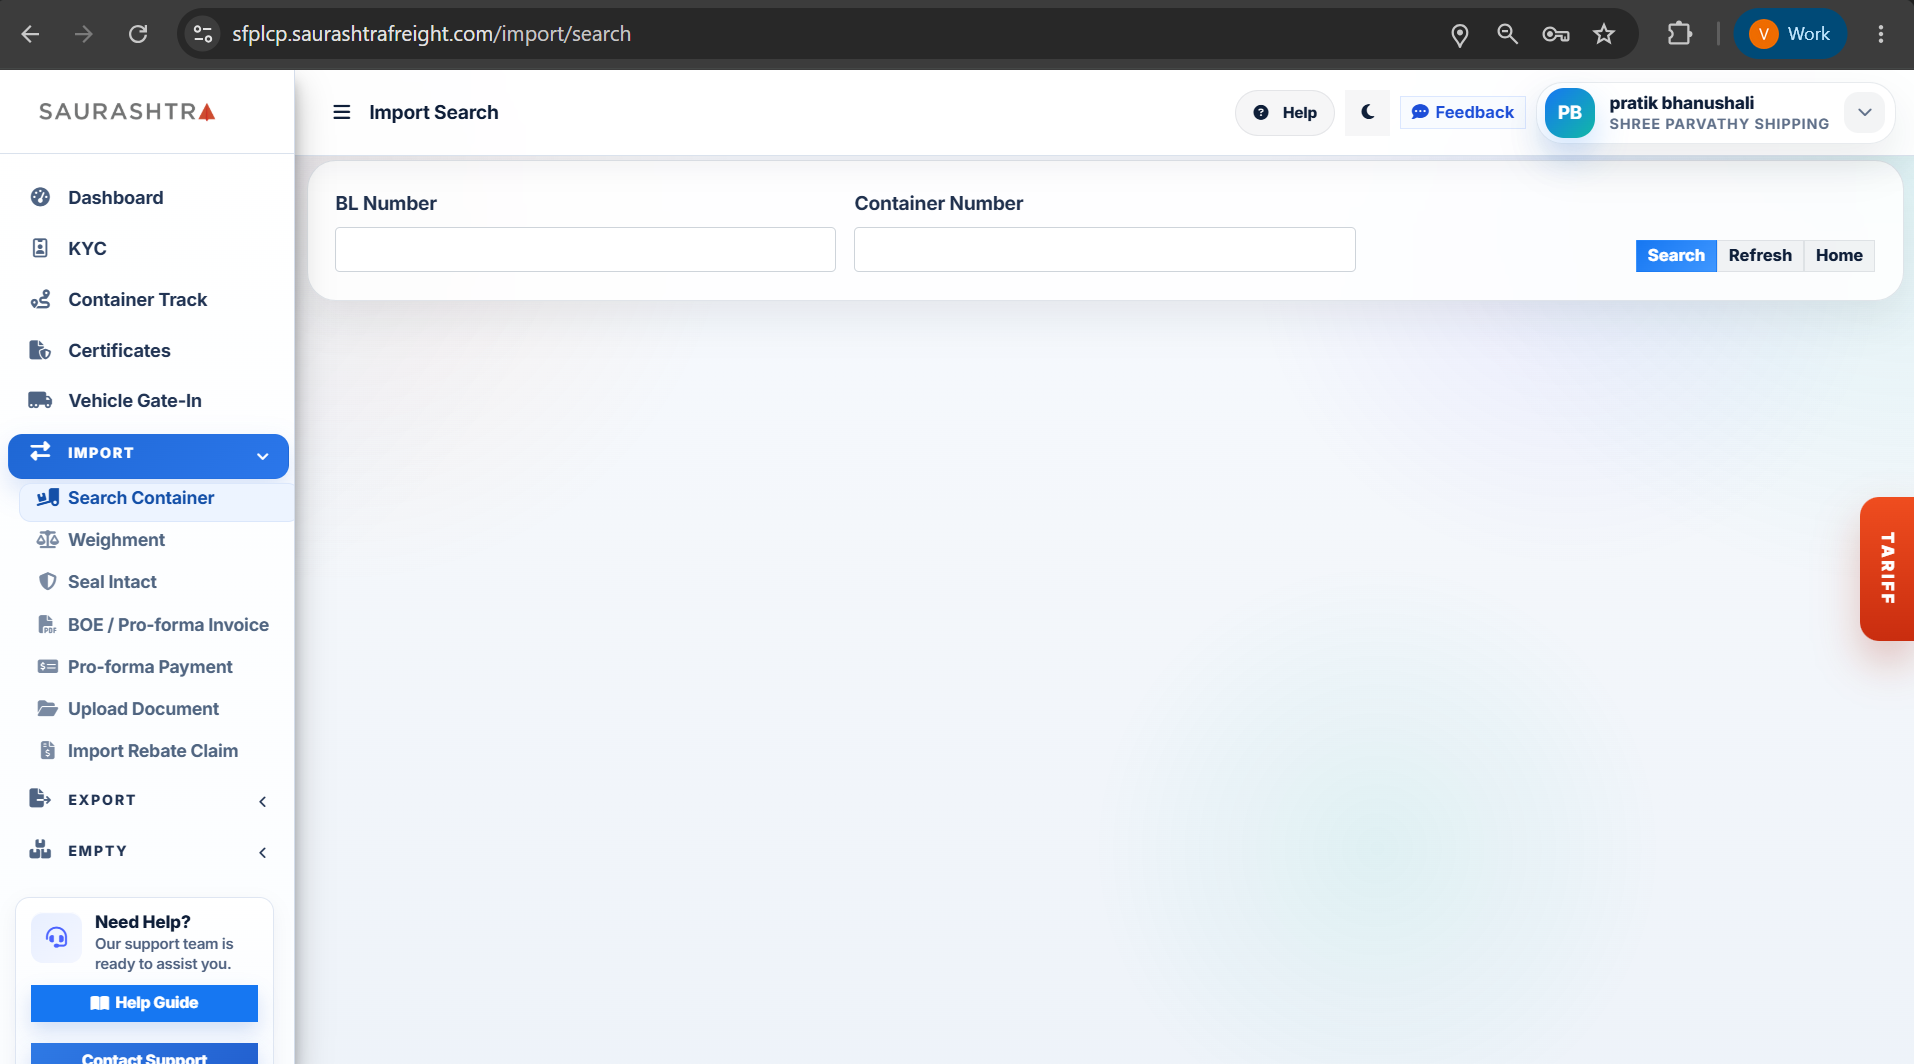
Screen 1: Search Form
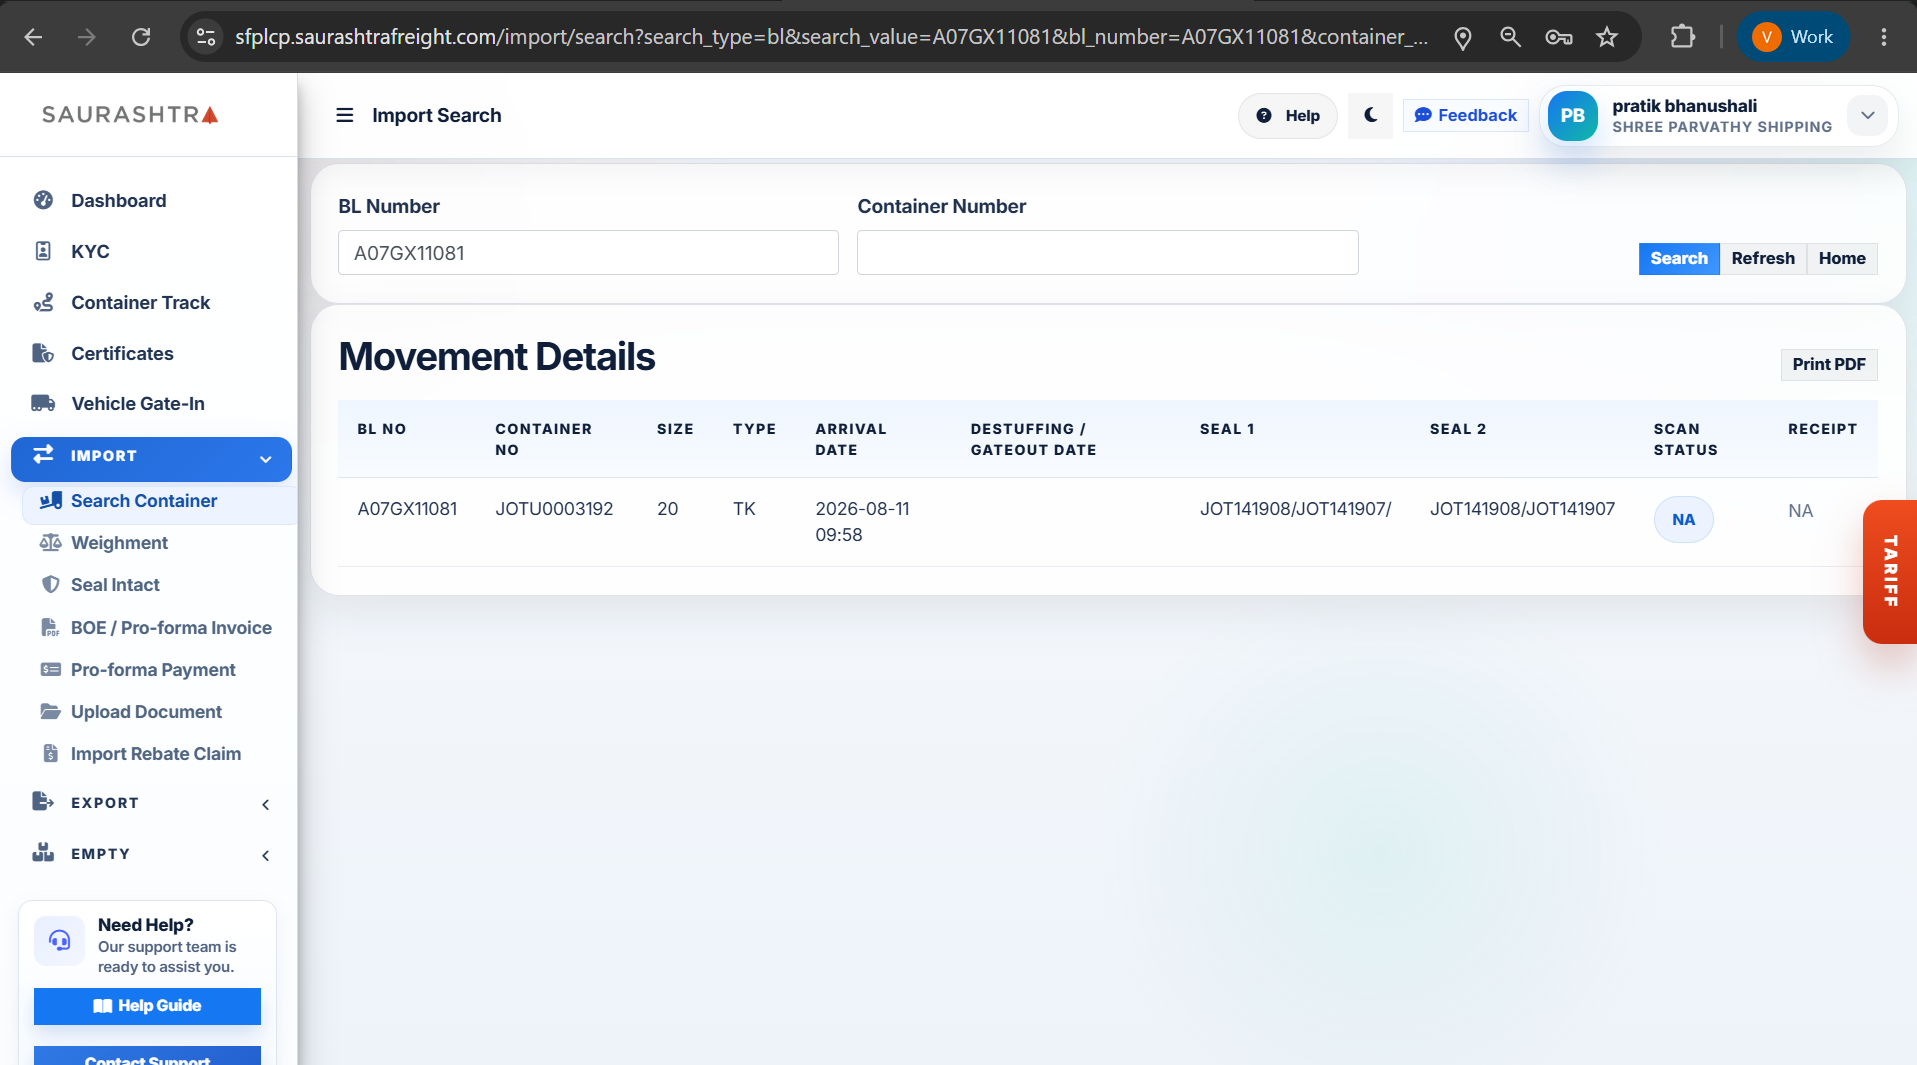
Screen 2: Search by BL Number
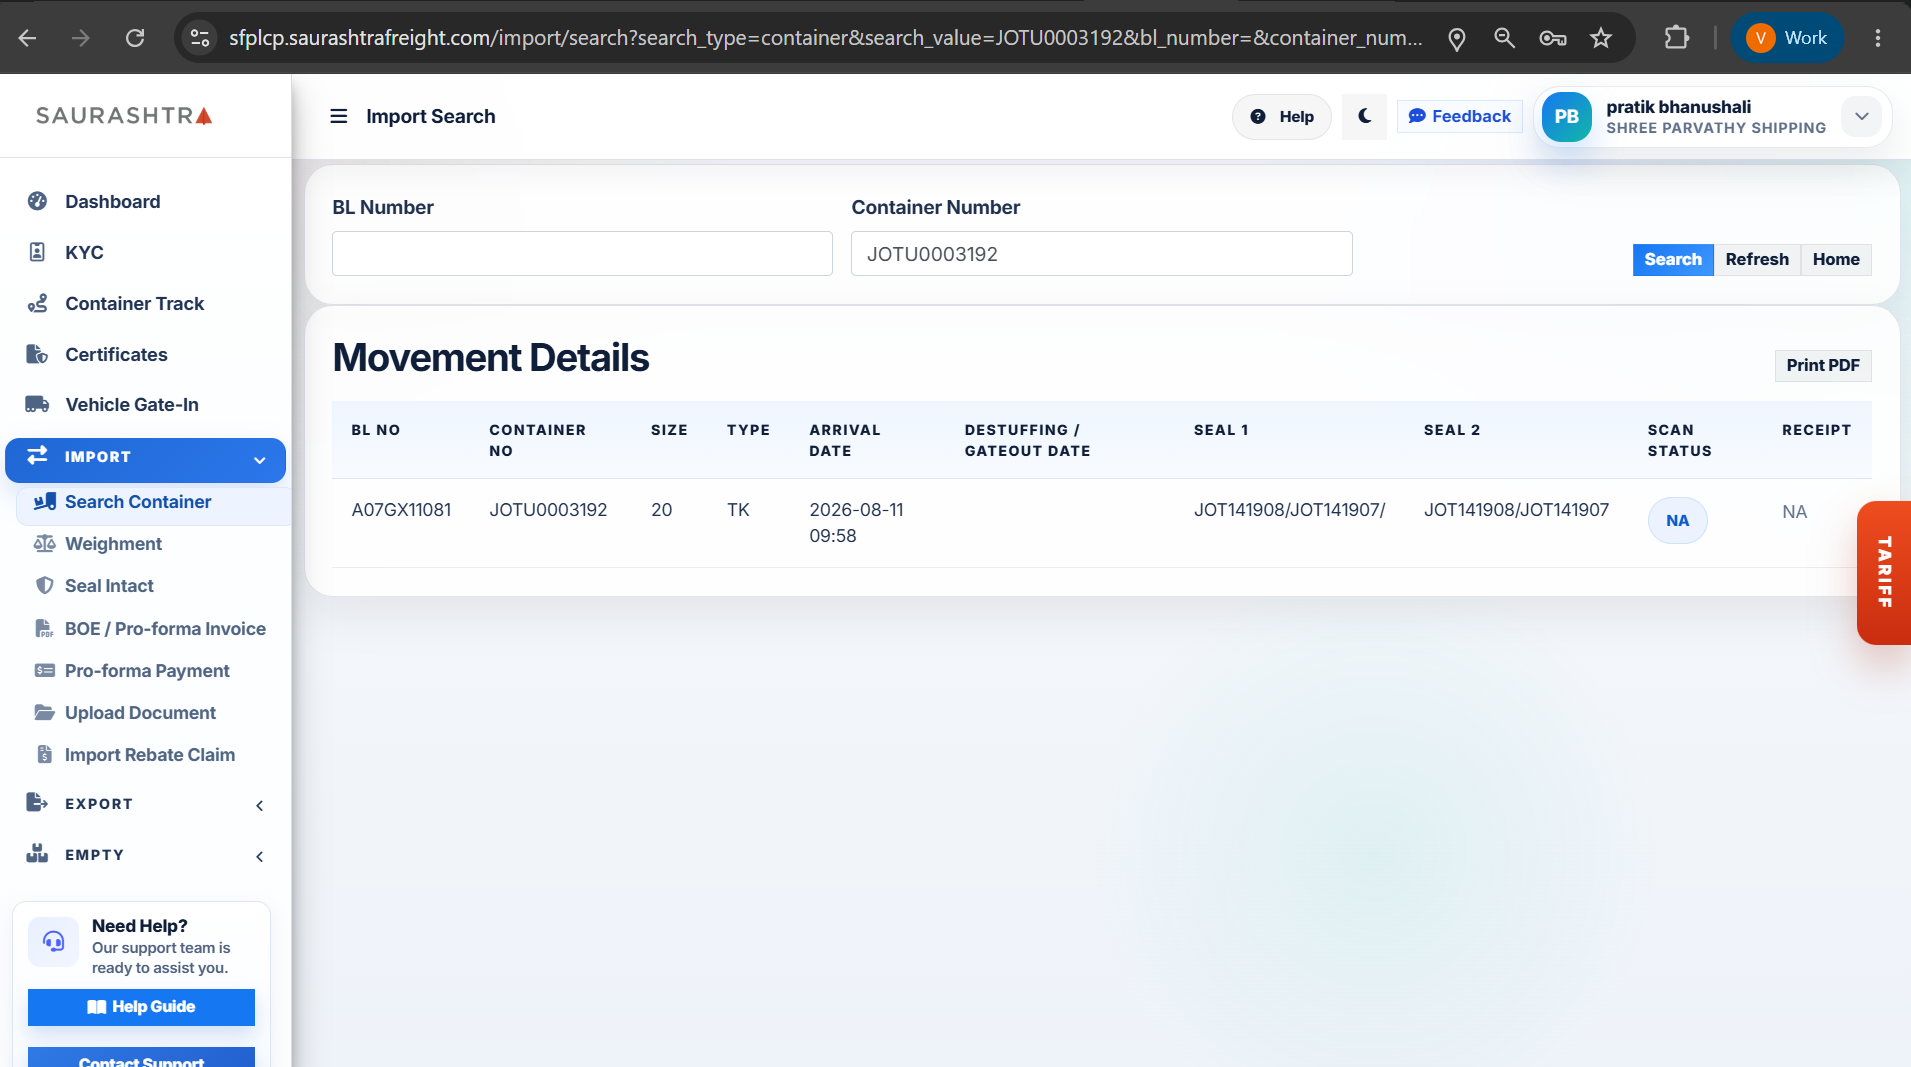
Screen 3: Search by Container No
How to Search Import Containers
- Navigate to Import Search — Expand IMPORT in the sidebar and click Search Container.
- Choose Search Criteria — Enter your query into either input field:
- BL Number Field — Enter the Bill of Lading reference (e.g.
A07GX11081) to retrieve all containers linked under that BL. - Container Number Field — Enter a specific container number (e.g.
JOTU0003192) for direct container tracking.
- BL Number Field — Enter the Bill of Lading reference (e.g.
- Execute Search — Click the blue Search button. Use Refresh to clear input fields.
- Review Movement Details Table — View key operational data including Container No, Size (e.g. 20ft/40ft), Type (TK/GP), Arrival Date & Time, Destuffing / Gate-Out Date, Custom & Agent Seals, and Scan Status.
- Print PDF Report — Click the Print PDF button on the top right of the Movement Details card to export the container movement report.
Weighment
Search and view certified weighbridge measurement records for import containers by BL Number or Container Number, including gross weight, tare weight, net cargo weight, vehicle details, and weighment timestamps.
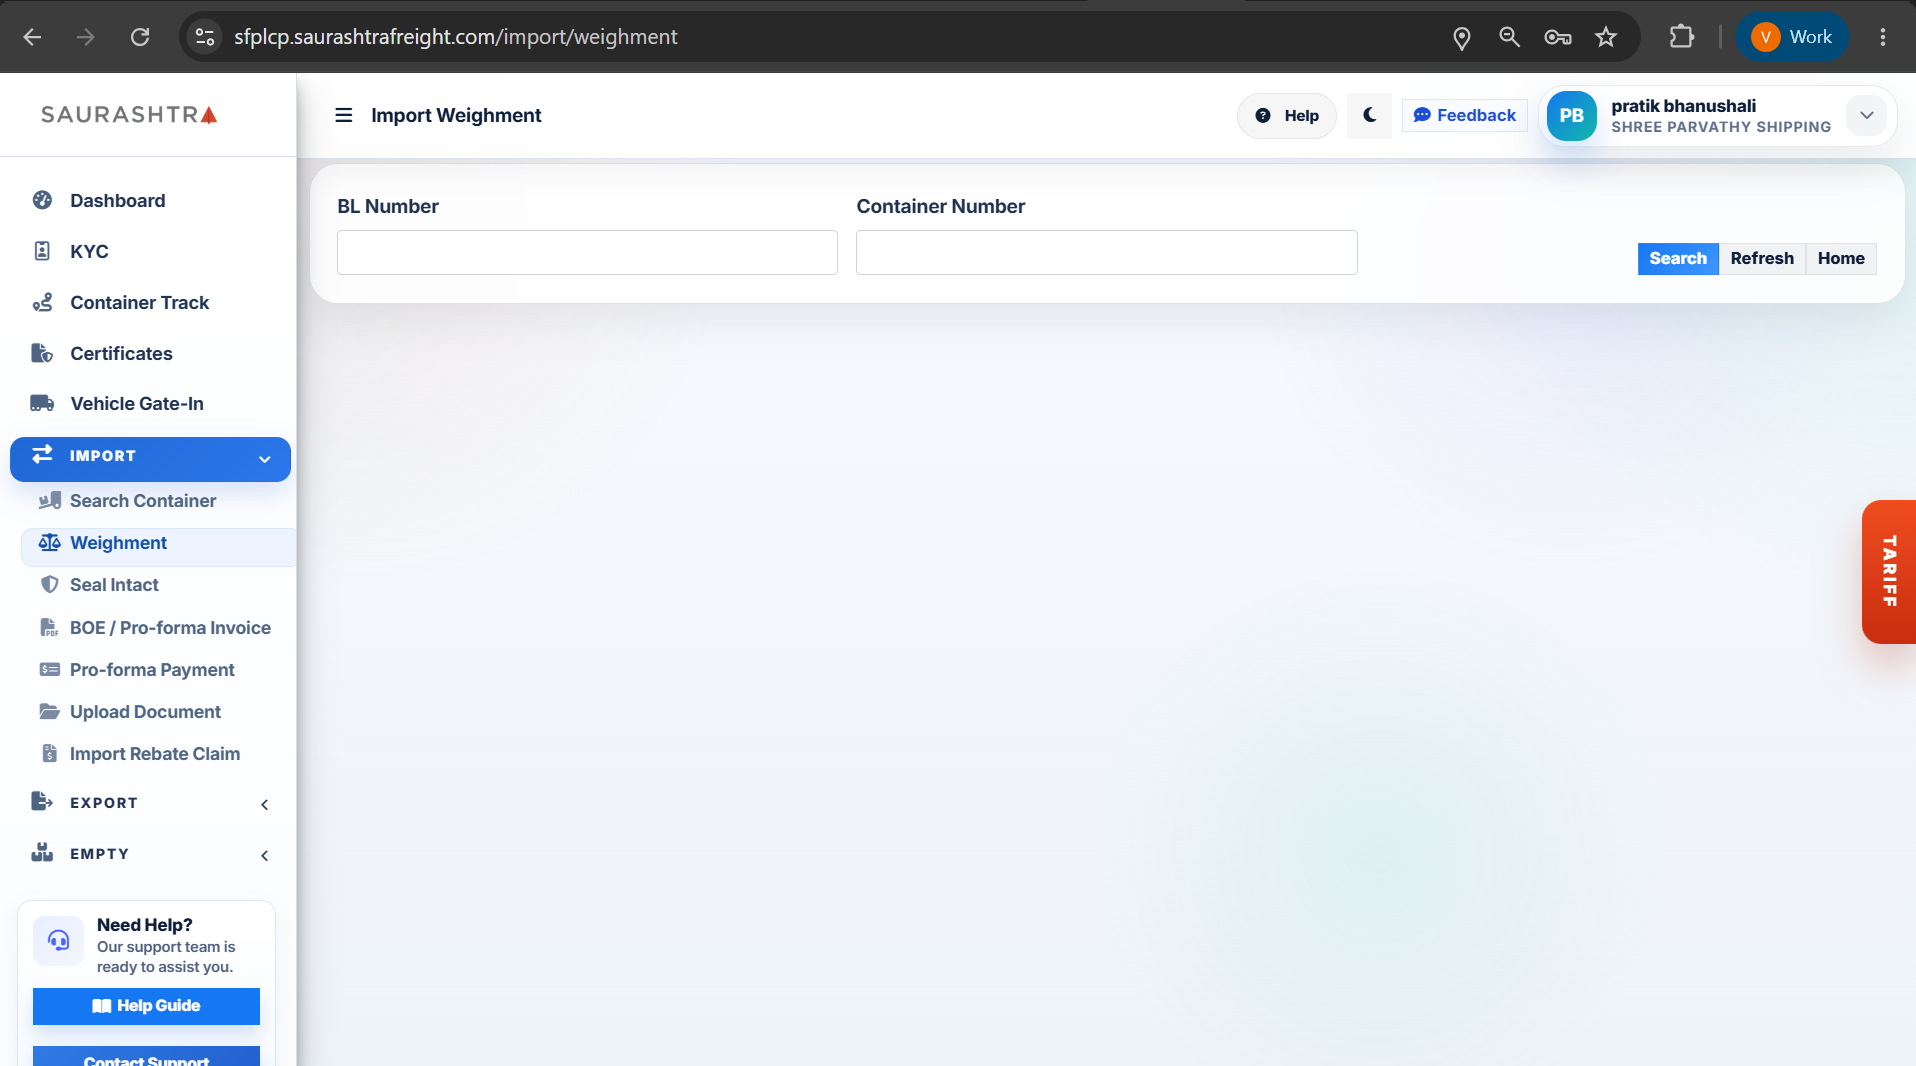
Screen 1: Search Form
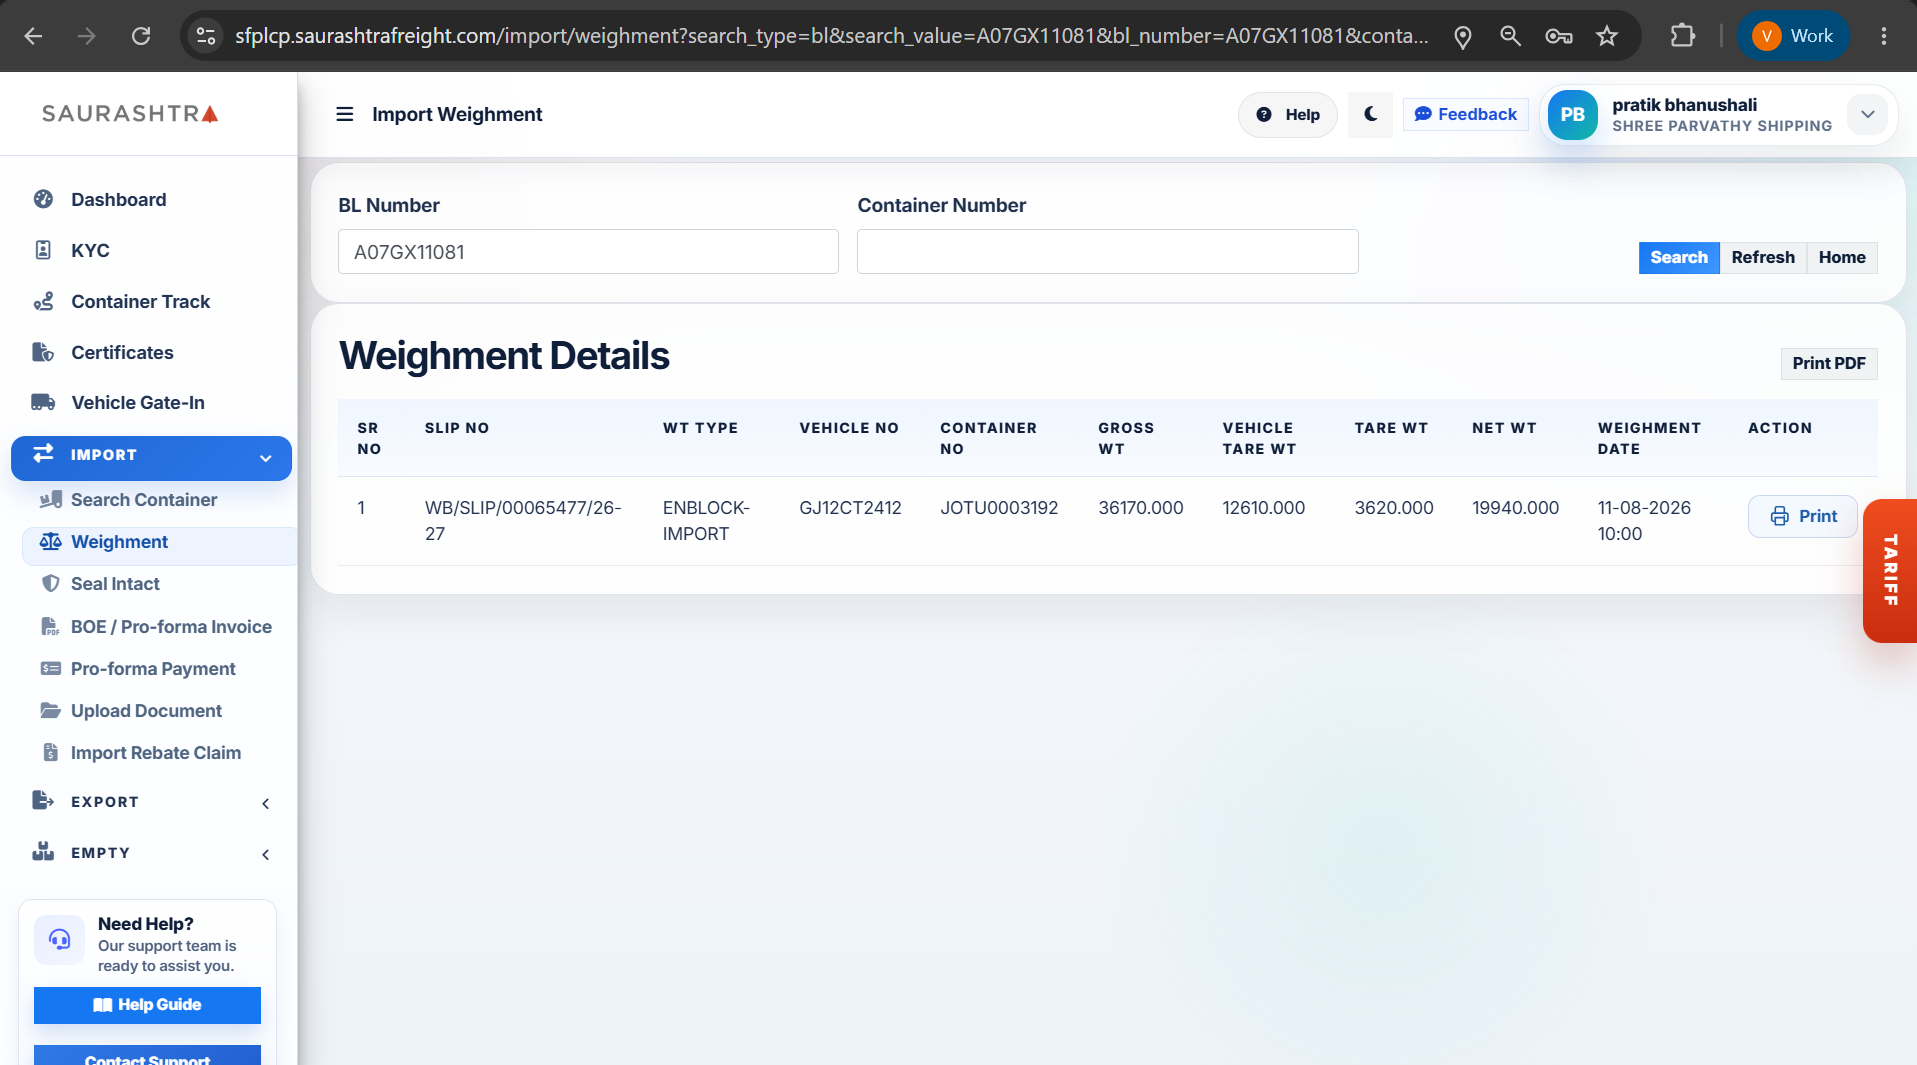
Screen 2: Search by BL Number
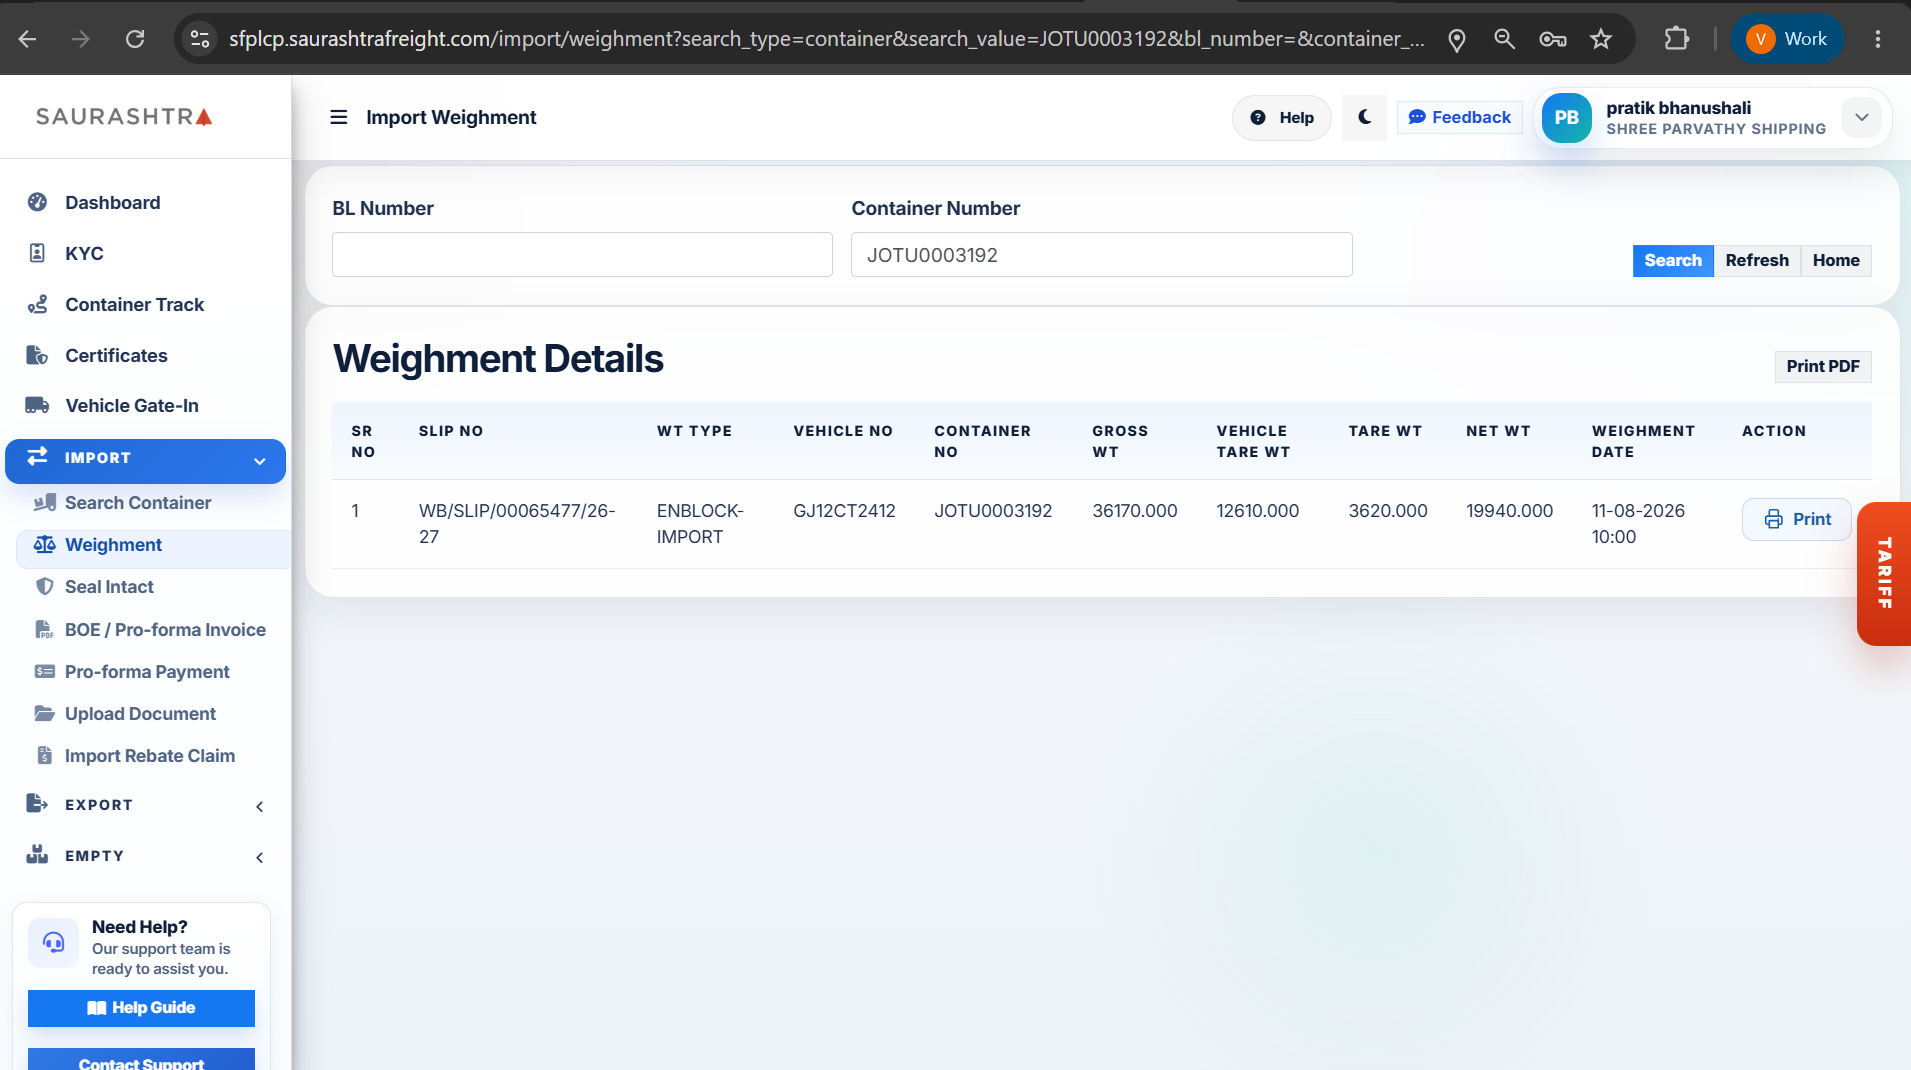
Screen 3: Search by Container No
How to Search Import Gate-In Weighment Records
- Navigate to Gate-In Weighment — Expand IMPORT in the left sidebar menu and click Gate-In Weighment.
- Choose Search Criteria — Enter your query into either search field:
- BL Number Field — Enter the Bill of Lading reference (e.g.
A07GX11081) to retrieve weighbridge records for all containers under that BL. - Container Number Field — Enter a specific container number (e.g.
JOTU0003192) for direct container weighment lookup.
- BL Number Field — Enter the Bill of Lading reference (e.g.
- Execute Search — Click the blue Search button. Click Refresh to clear input fields and reset the search form.
- Review Weighment Details Table — Inspect certified weighbridge data including Container No, Container Size & Type, Gross Weight (KG), Tare Weight (KG), Net Cargo Weight (KG), Vehicle No, and Weighment Date & Time.
Weighbridge weight measurements are automatically captured and recorded at the CFS weighbridge station upon container vehicle gate entry.
Seal Intact Verification
Search and verify seal condition reports for import containers by BL Number or Container Number to confirm custom seal & agent seal status, container size, arrival timestamps, and physical seal integrity upon yard gate-in.
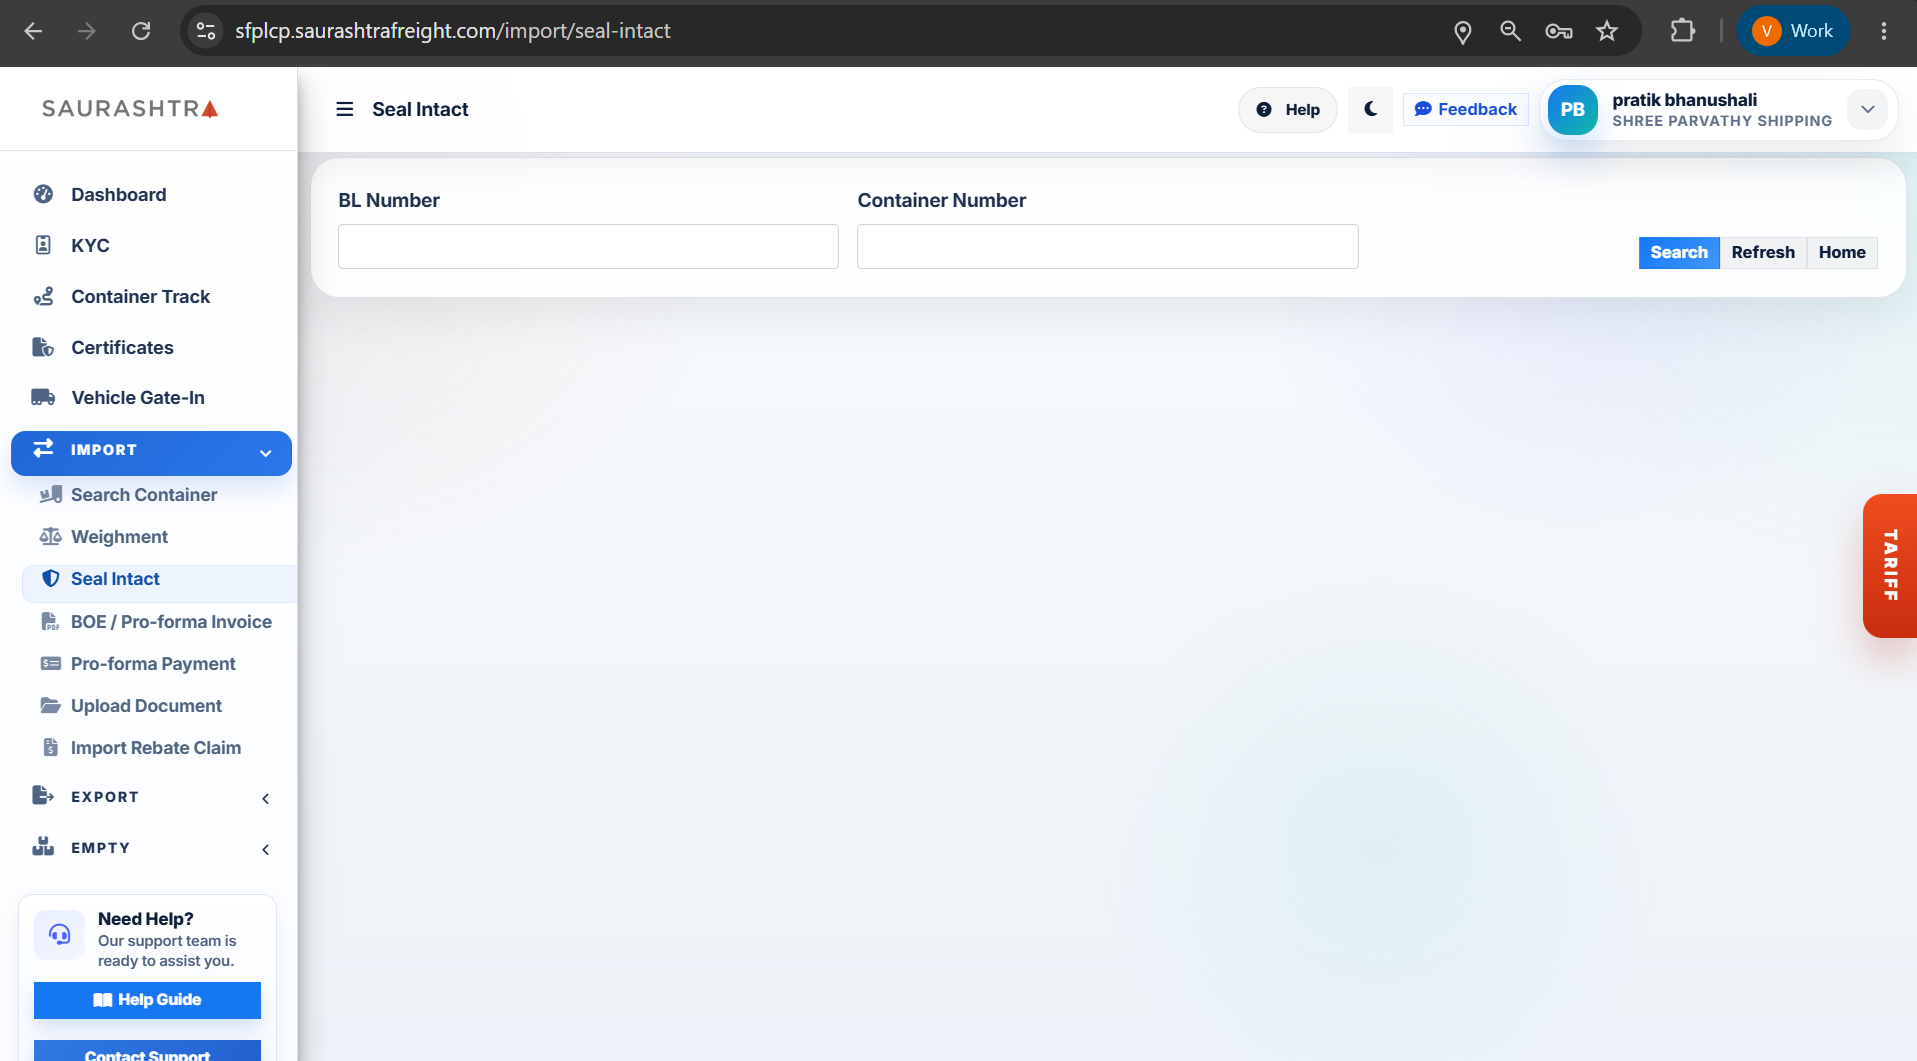
Screen 1: Search Form
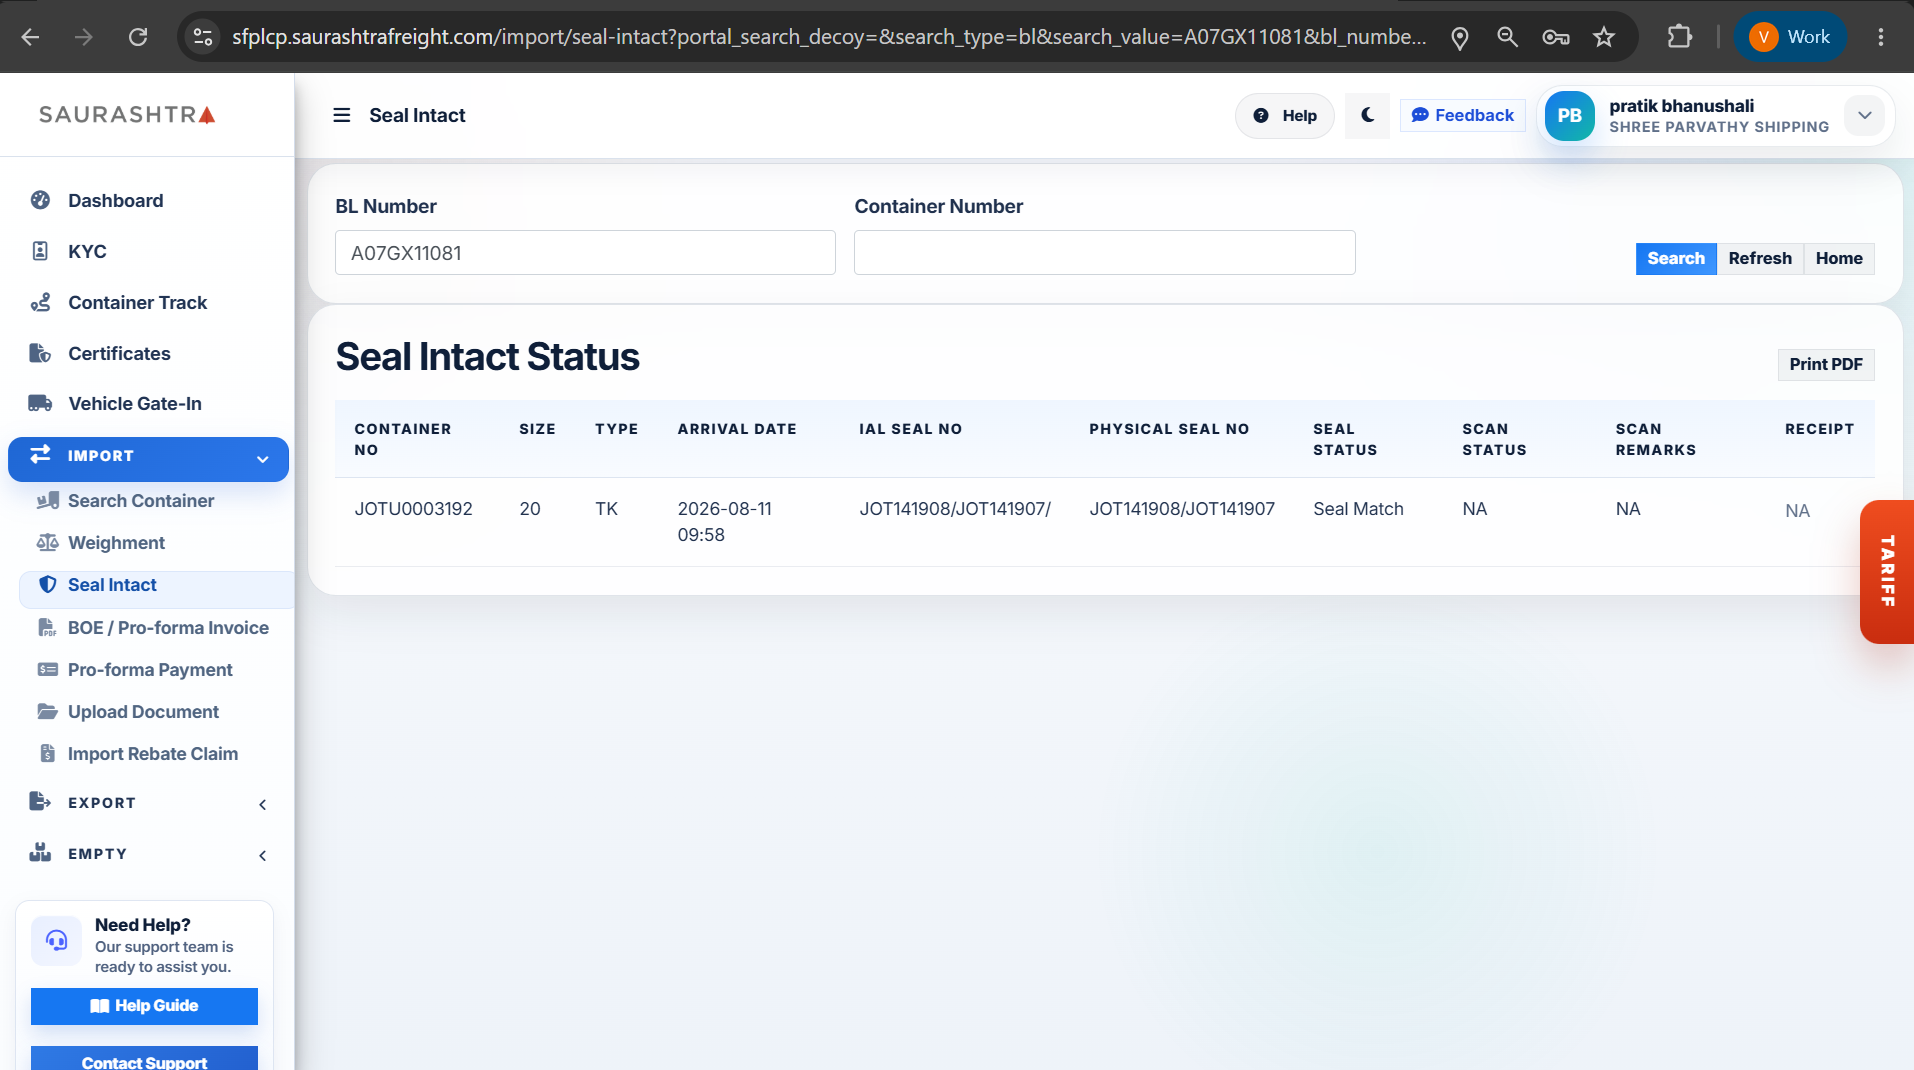
Screen 2: Search by BL Number
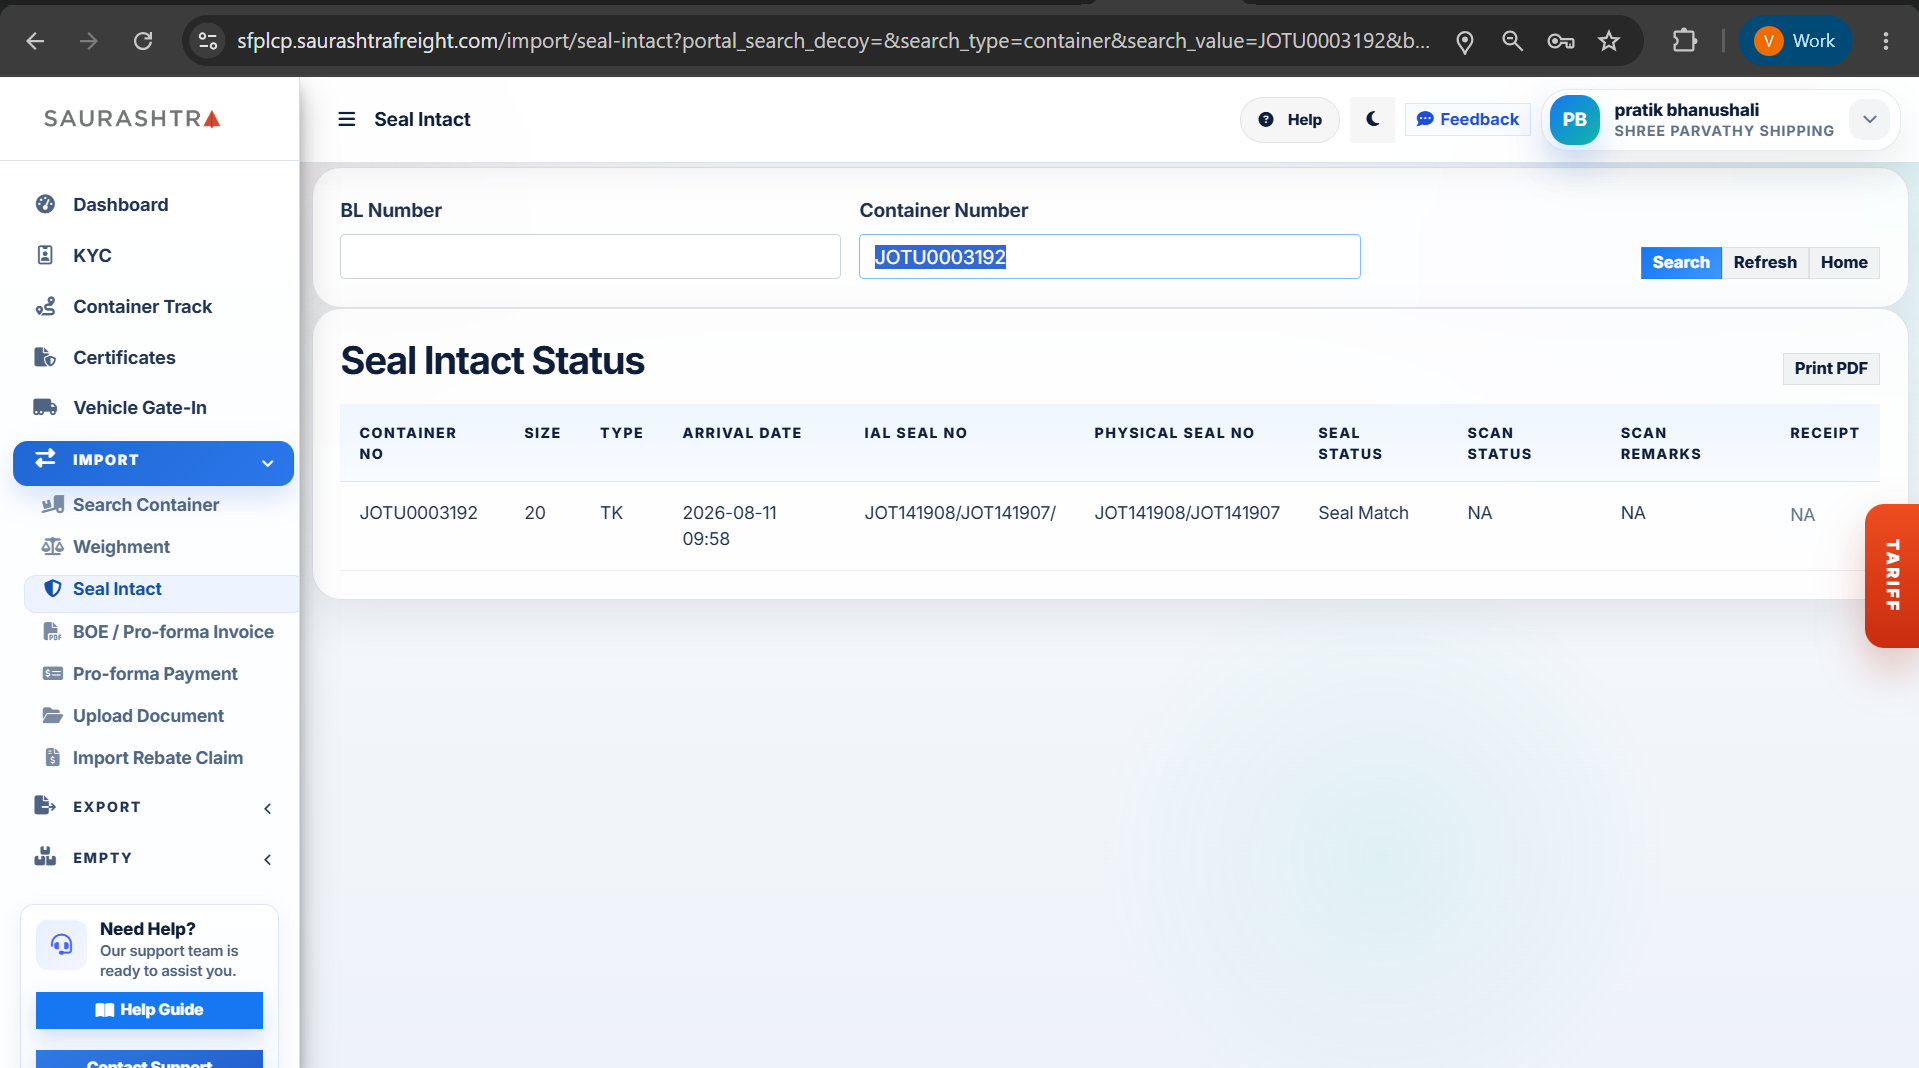
Screen 3: Search by Container No
How to Verify Seal Intact Status
- Navigate to Seal Intact — Expand IMPORT in the left navigation sidebar and click Seal Intact.
- Choose Search Reference — Enter your query into either search field:
- BL Number Field — Enter the Bill of Lading reference (e.g.
A07GX11081) to check seal integrity records for all containers linked under that BL. - Container Number Field — Enter a specific container number (e.g.
JOTU0003192) for direct container seal verification.
- BL Number Field — Enter the Bill of Lading reference (e.g.
- Execute Search — Click the blue Search button. Press Refresh to clear search inputs.
- Review Seal Verification Table — Inspect operational seal details including Container No, Size & Type, Custom Seal No, Agent Seal No, Arrival / Gate-In Date, and Seal Intact Status.
Seal condition and verification checks are conducted by CFS yard inspectors during container unloading and joint customs inspection.
BOE / Pro-forma Invoice
Upload Bill of Entry (BOE) PDF documents for automated data extraction, review importer & container details, configure billing account holder / GST details, generate instant pro-forma import invoices, and download official PDF invoice copies online.
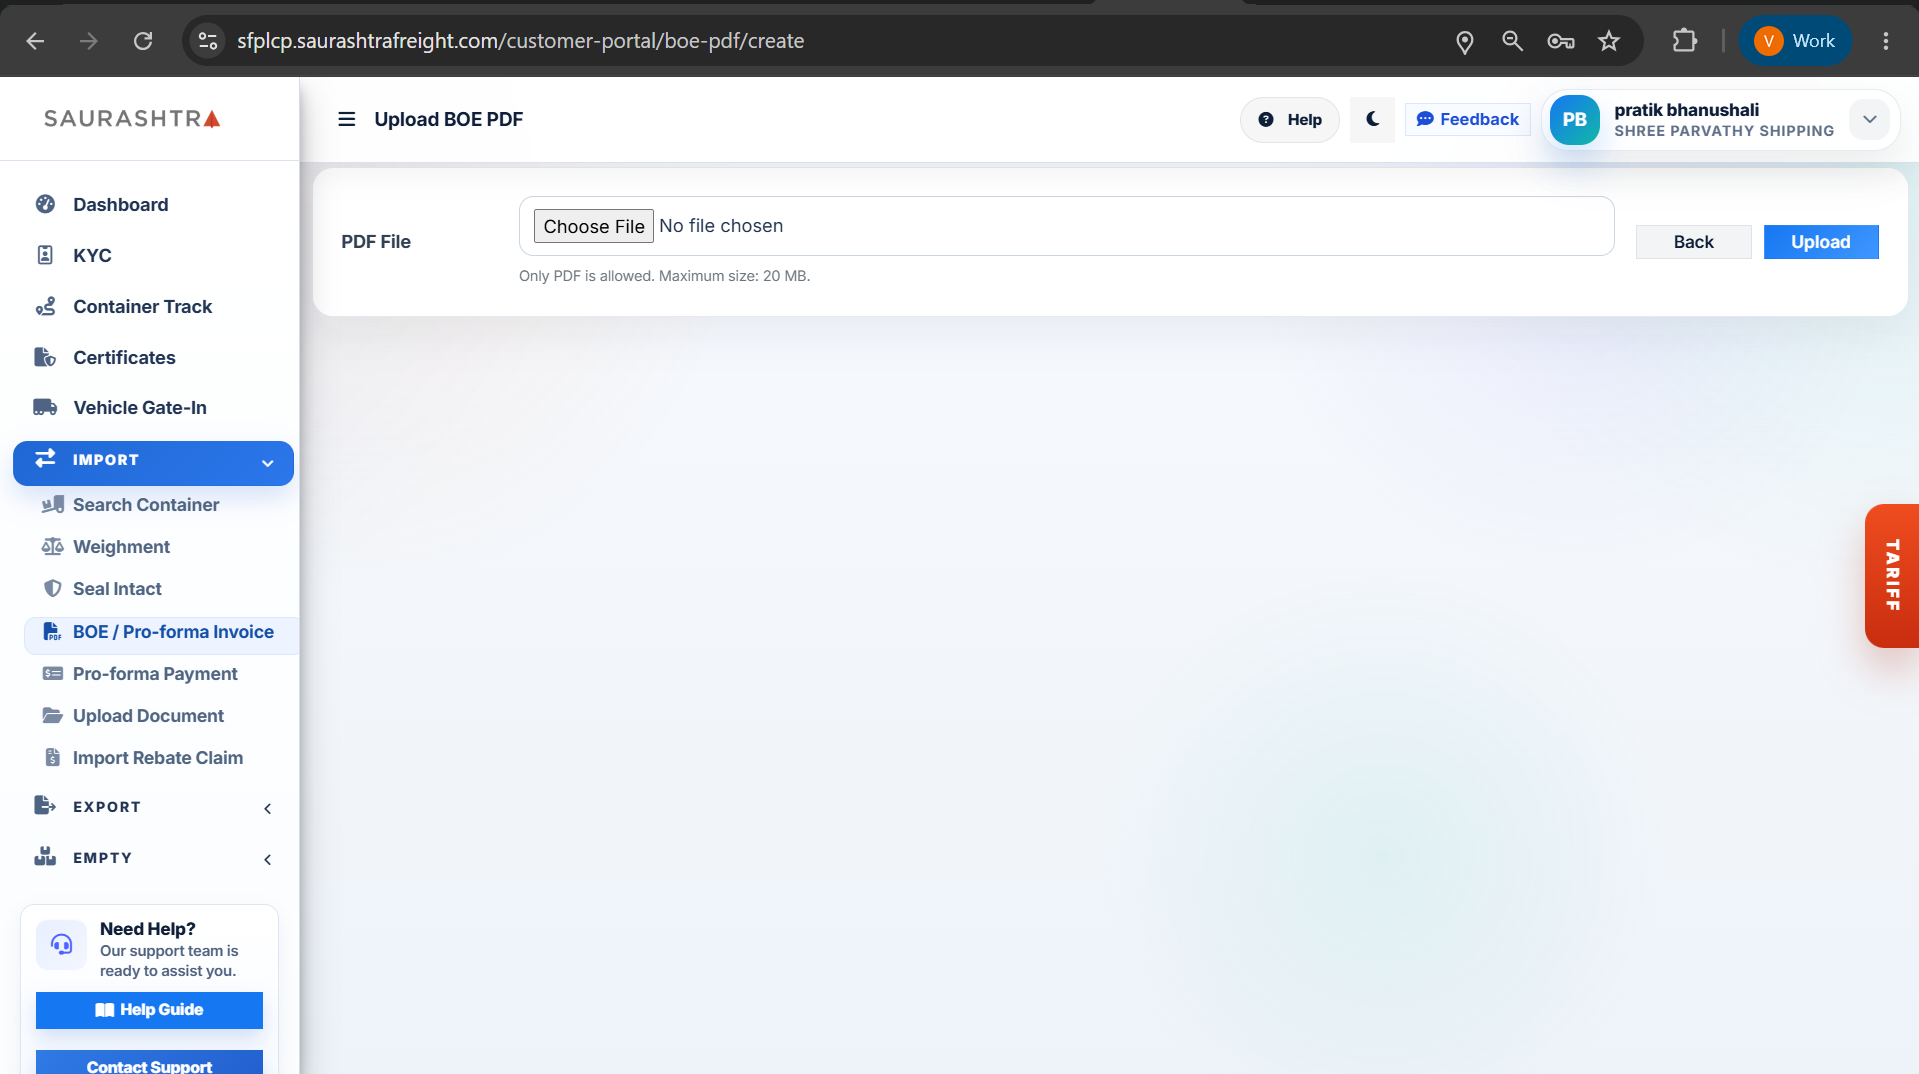
Screen 1: Upload BOE PDF
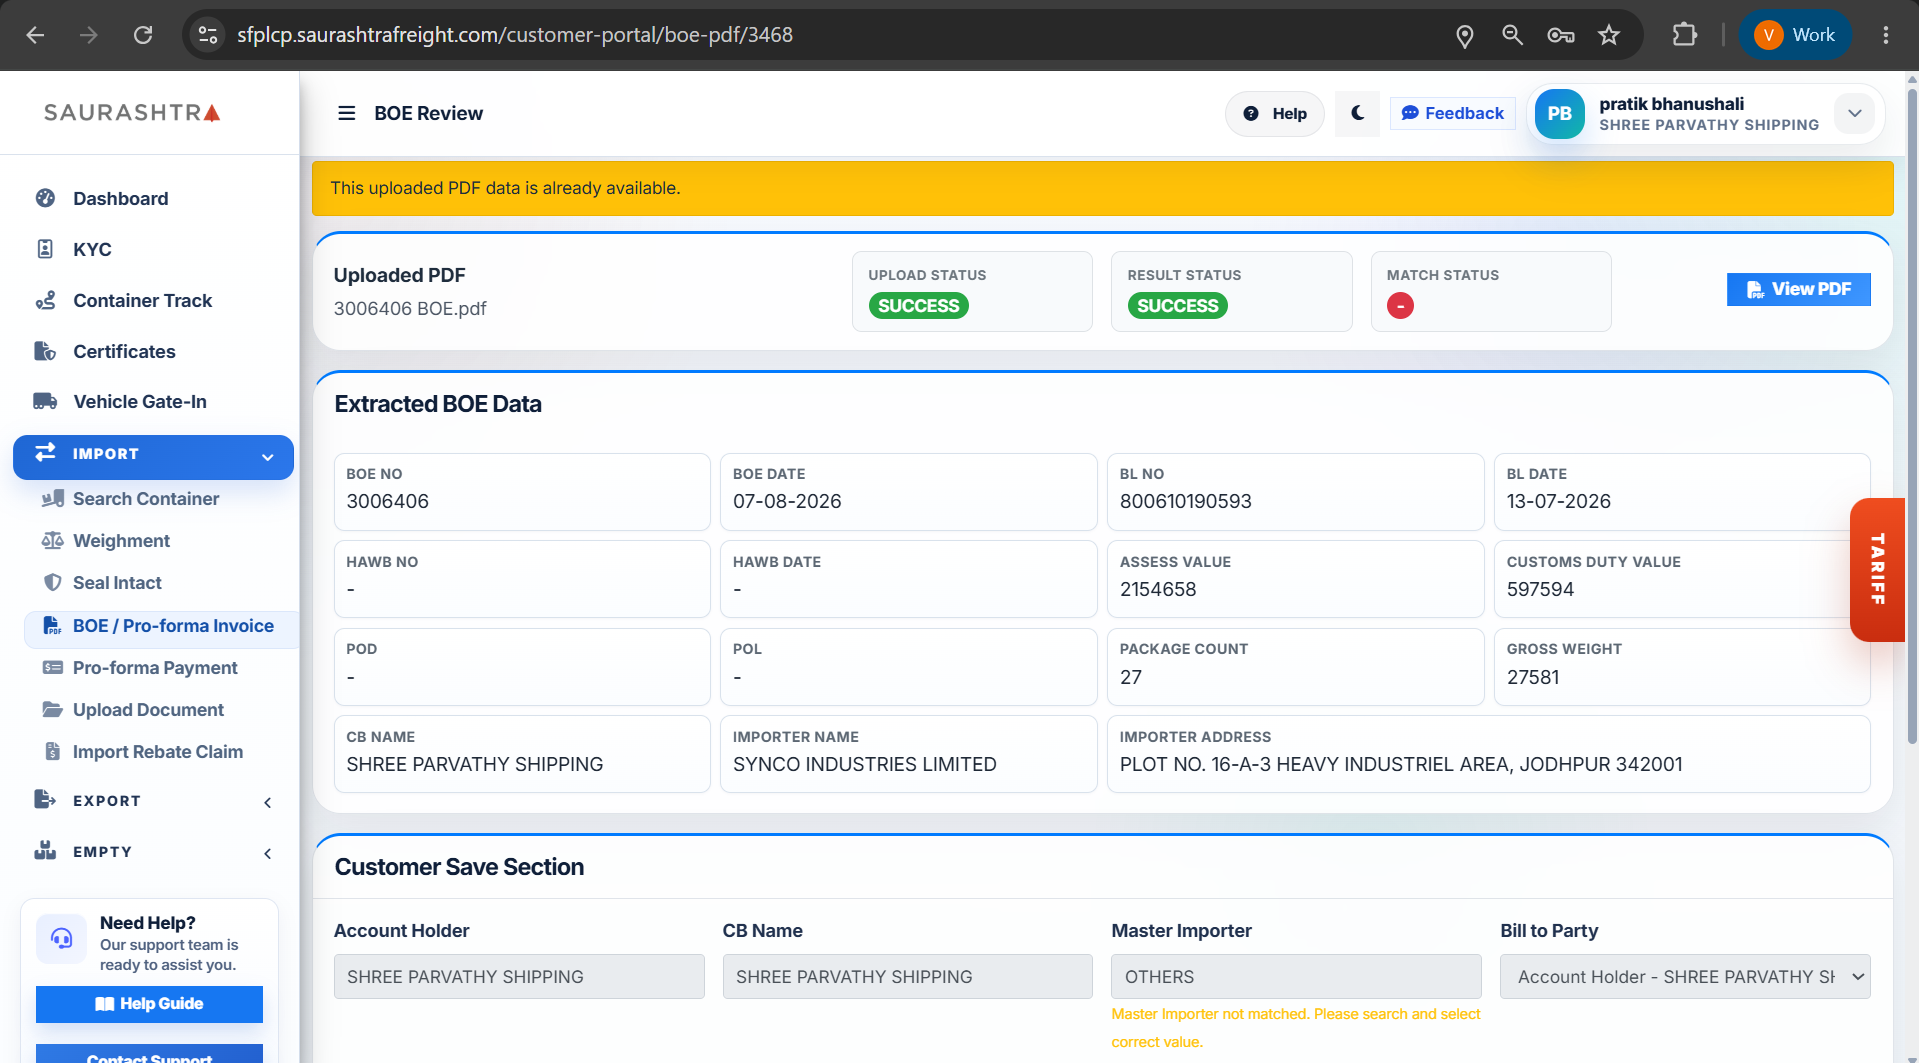
Screen 2: Parsed BOE Data
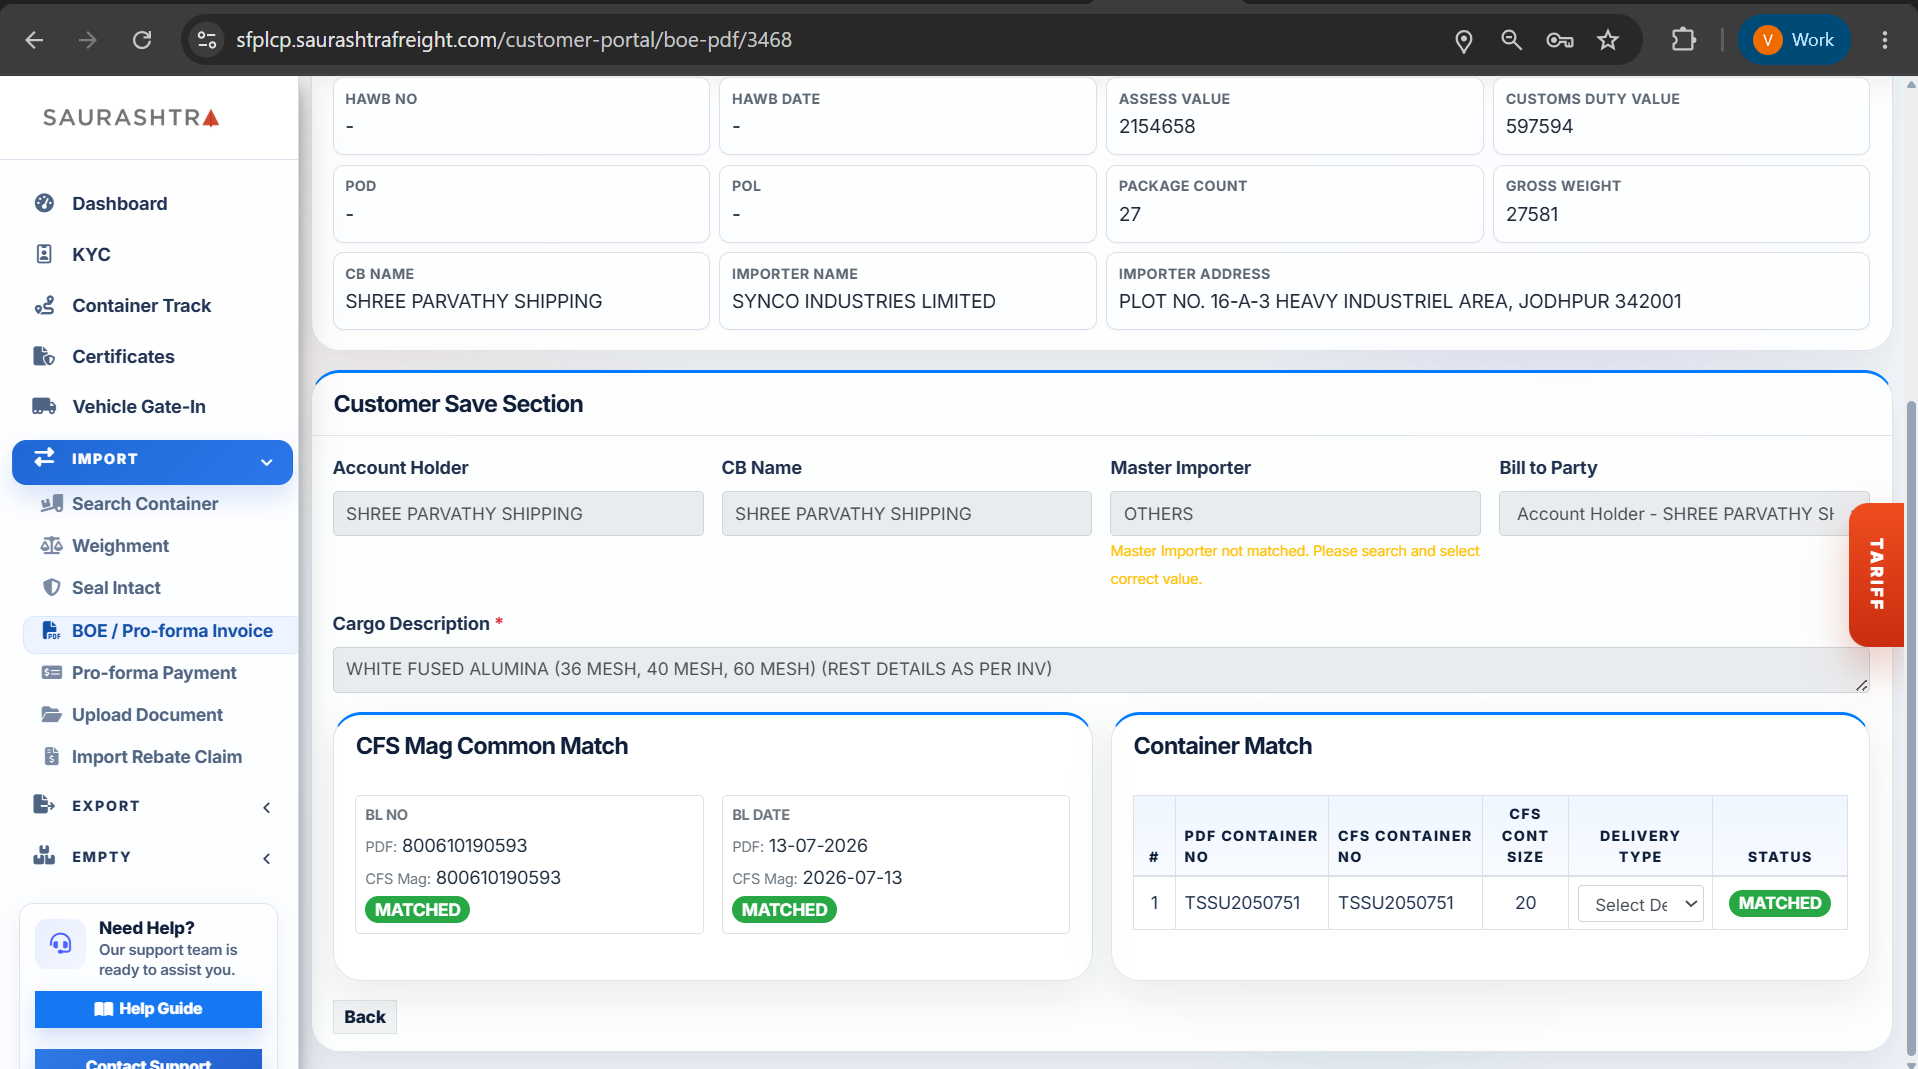
Screen 3: Billing & GST Setup
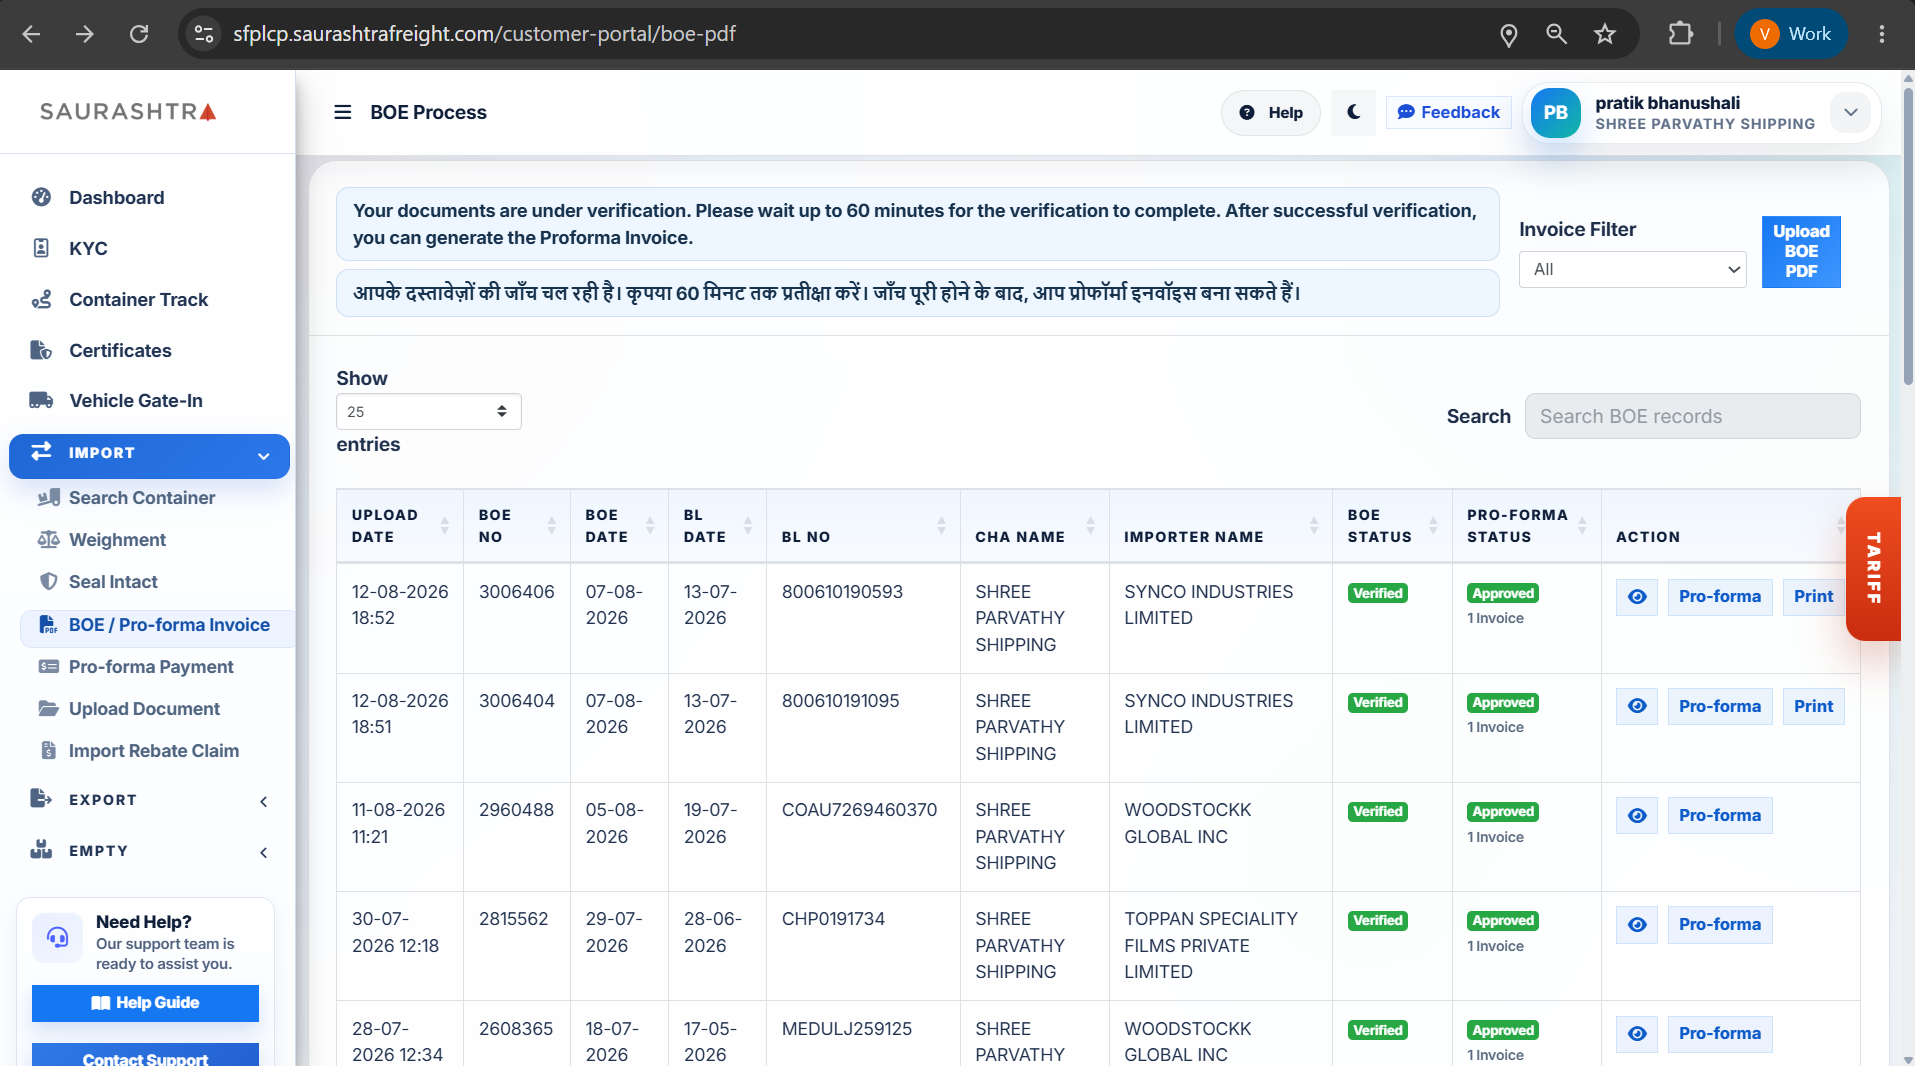
Screen 4: BOE Processed Index
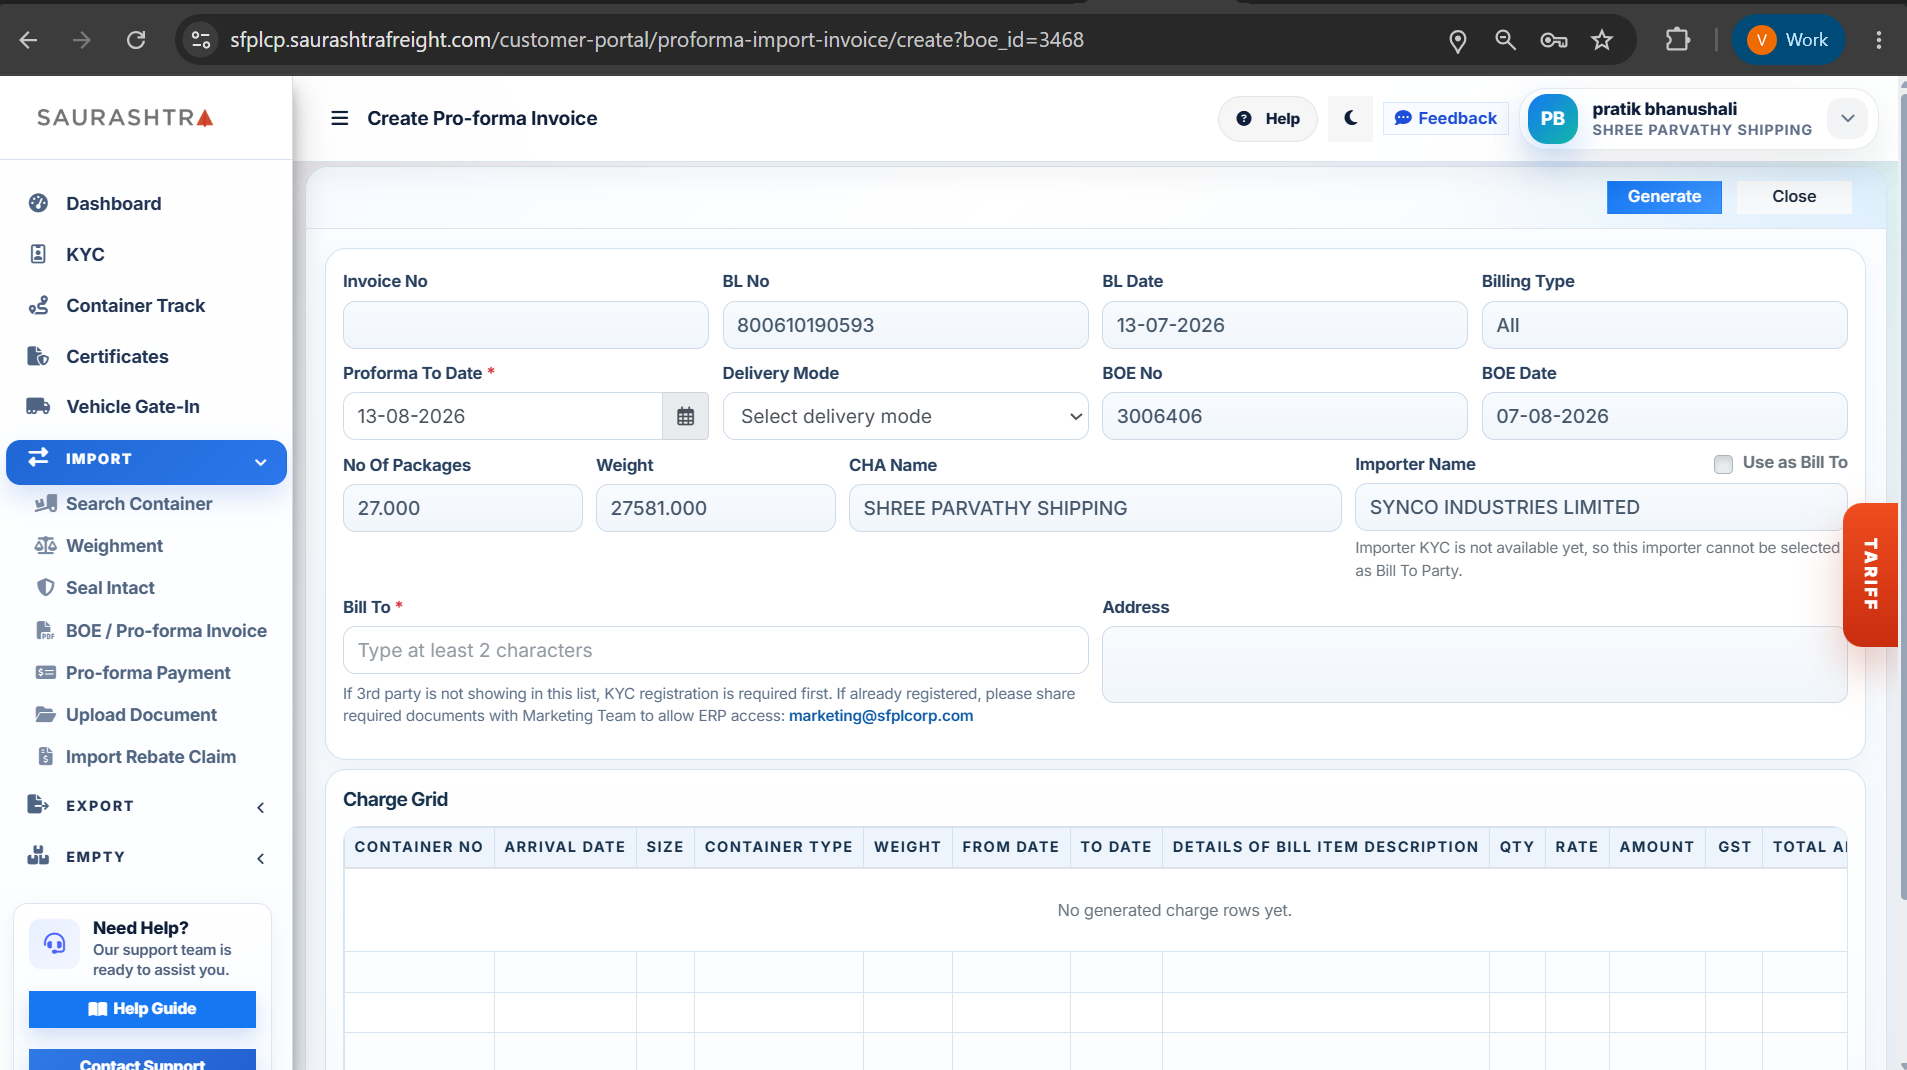
Screen 5: Container Selection
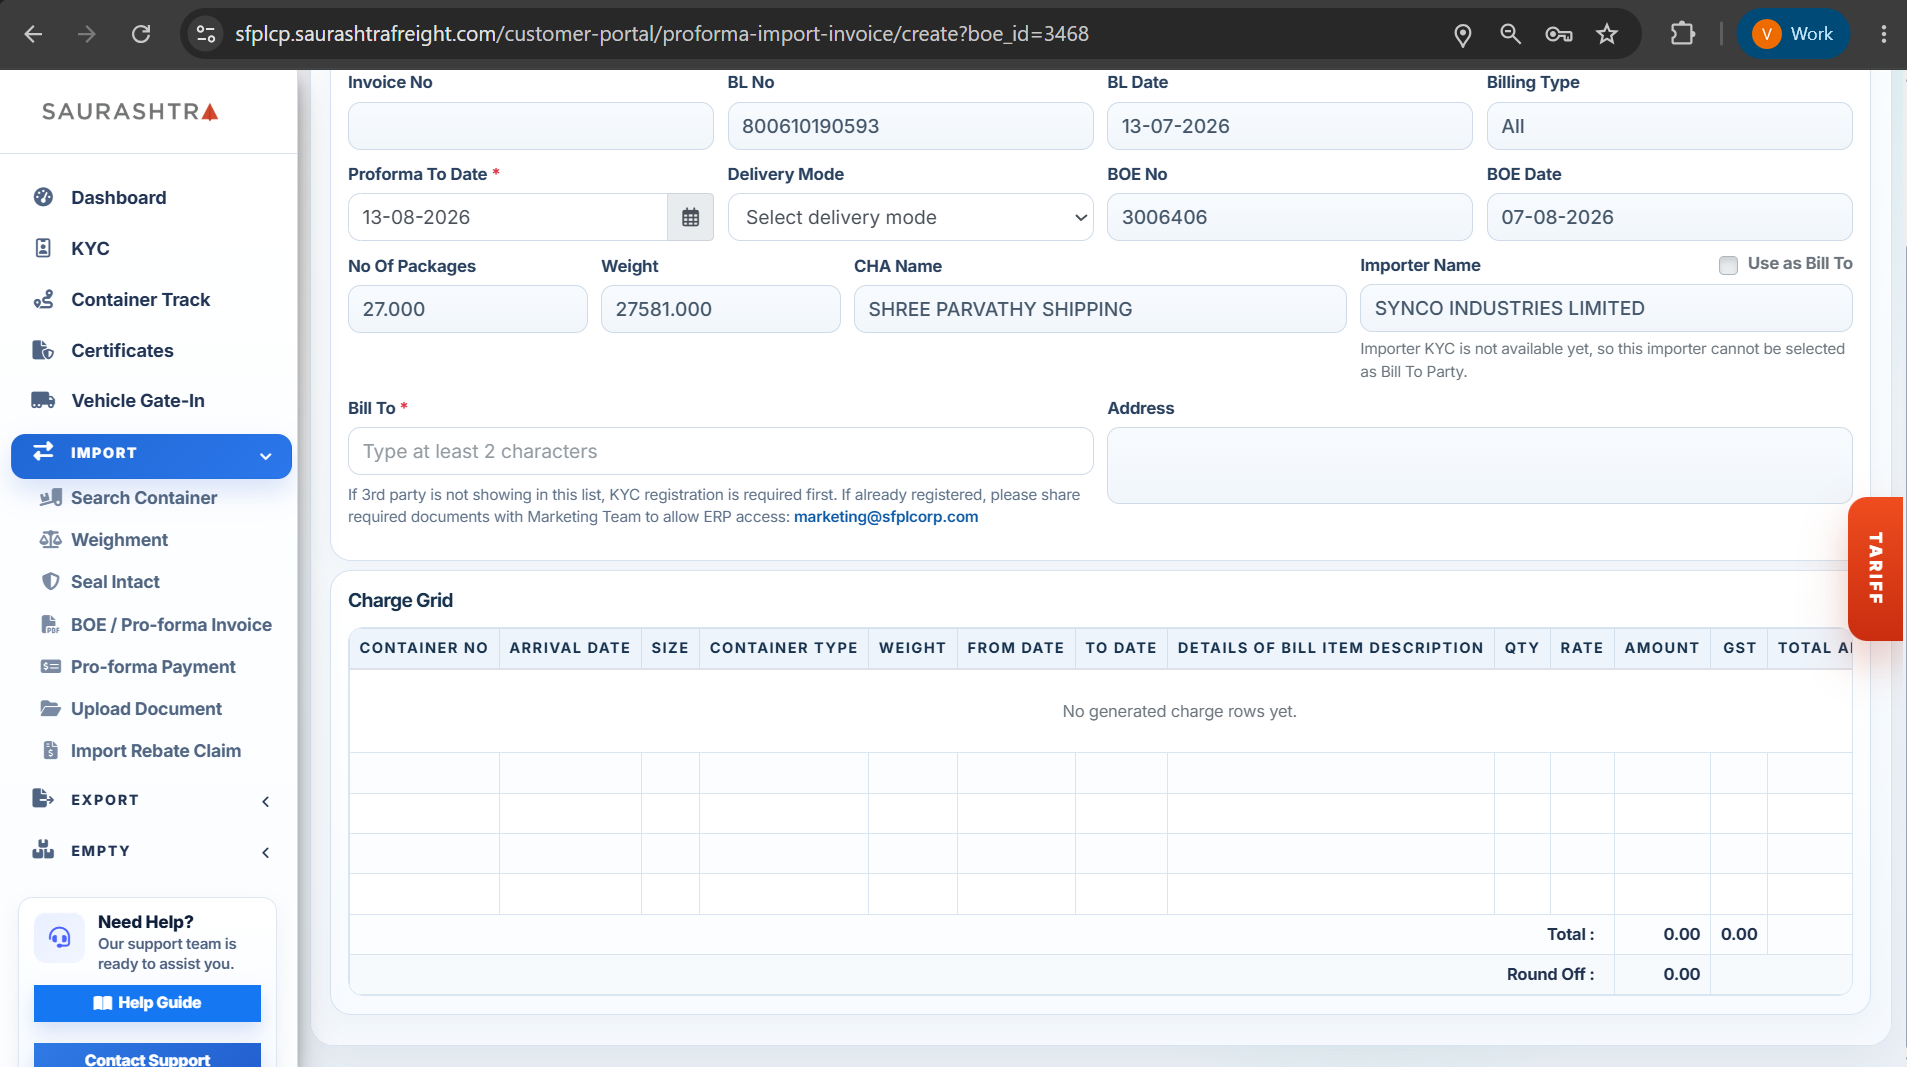
Screen 6: Charges & Tax Calculation
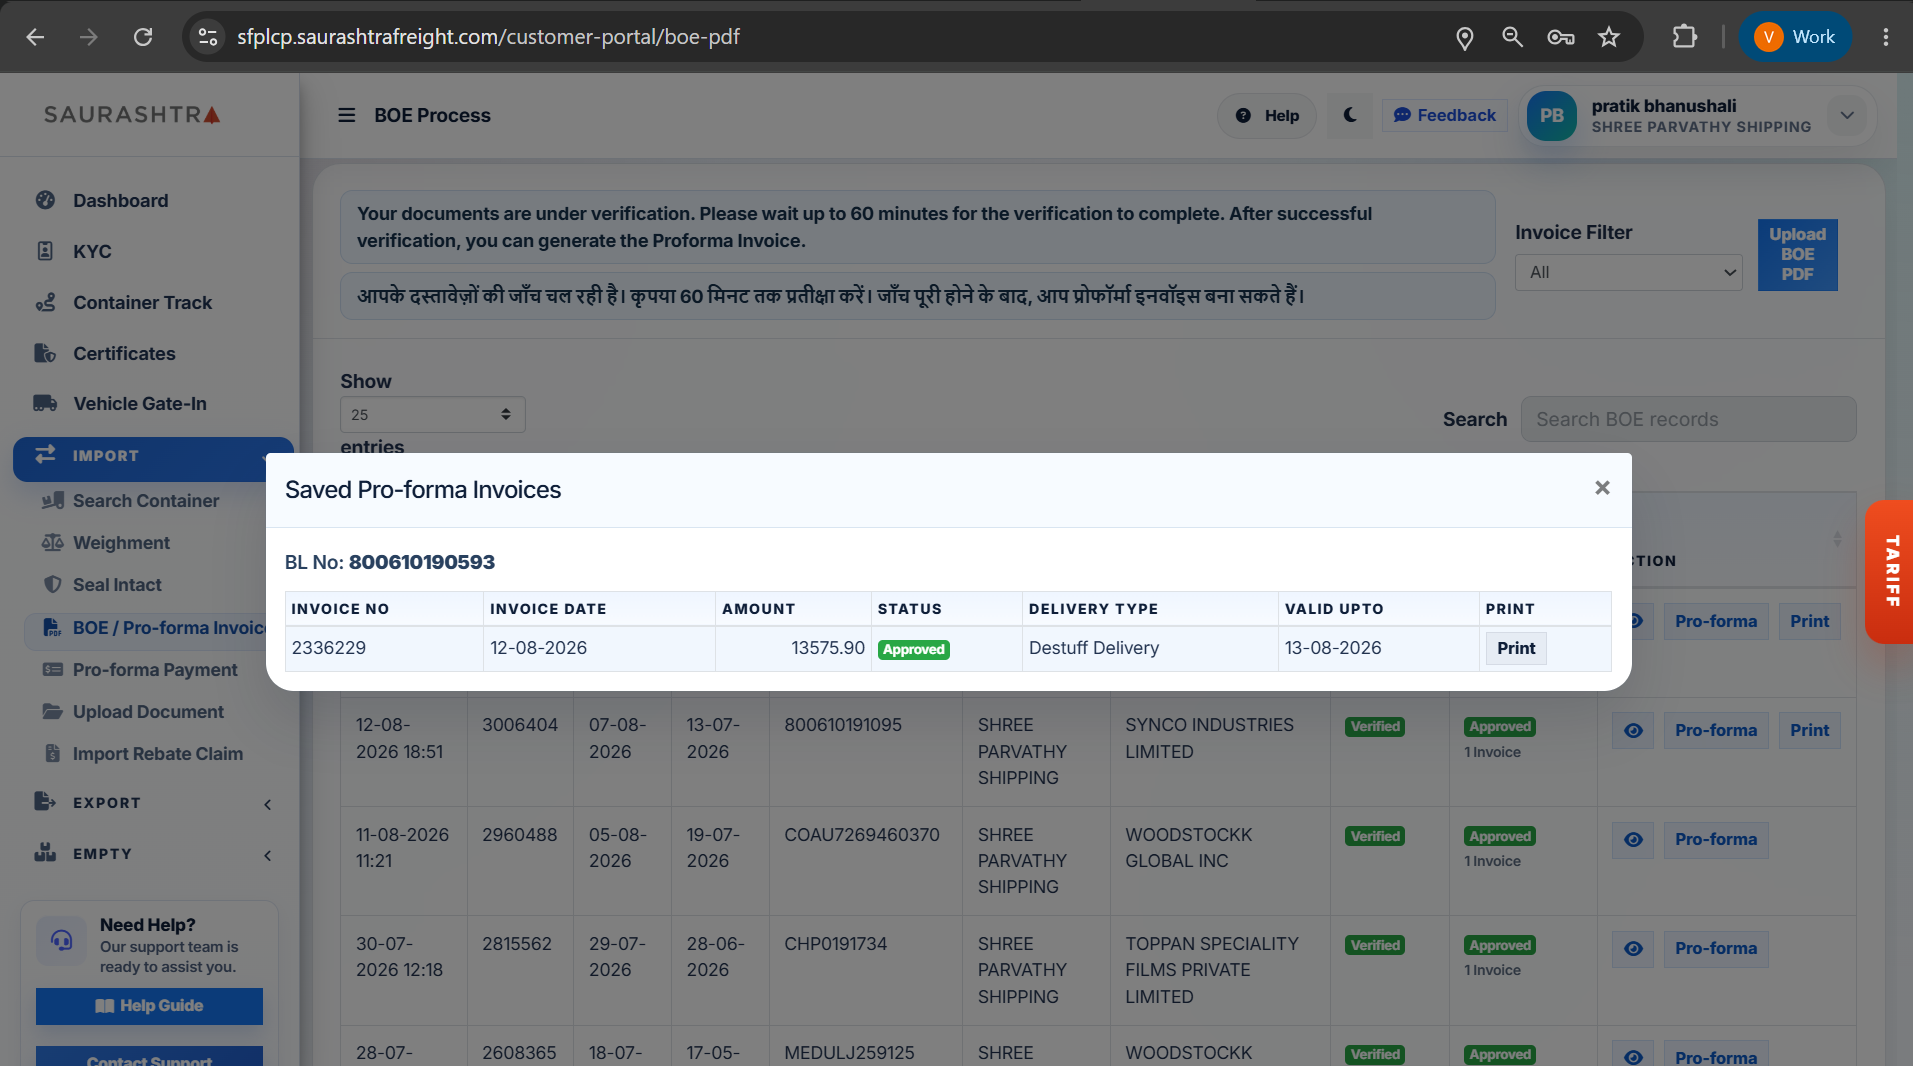
Screen 7: Invoice PDF View
How to Upload BOE & Generate Pro-forma Invoice
- Navigate to BOE / Pro-forma Invoice — Expand IMPORT in the left sidebar menu and click BOE / Pro-forma Invoice.
- Upload Bill of Entry PDF — Click the upload area or drag and drop your official Bill of Entry (BOE) PDF file. The system will automatically parse and extract shipment details.
- Review Extracted BOE Information — Validate extracted fields including BOE Number, BOE Date, Importer Name, Custom House Agent (CHA) Name, and Container Numbers with Sizes.
- Configure Billing & GST Details — Choose whether billing applies to Self Account Holder or an Alternate Account Holder. Use the master search tool if updating importer GST details.
- Save BOE Record — Click Save / Submit to save the parsed BOE entry into the BOE Processed List.
- Generate Pro-forma Invoice — Click the Create Pro-forma Invoice button next to any processed BOE:
- Select Validity Date & Containers — Choose the target invoice validity date and select containers to include.
- Review Tariff Charges Breakdown — Inspect itemized ground handling, storage charges, CFS tariffs, and applicable GST (CGST/SGST/IGST).
- Confirm & Generate — Click Generate Invoice to finalize the pro-forma calculation.
- Print & Download PDF — Click Print Invoice to open or download the official Pro-forma Invoice PDF report.
Automated BOE PDF parsing reduces manual entry errors and allows instant generation of pro-forma invoices directly aligned with official CFS tariff structures.
Pro-forma Payment
Manage payment processing for generated pro-forma import invoices, upload bank transfer payment proofs (NEFT / RTGS / UTR details), track payment verification status, and view approved invoice receipts online.
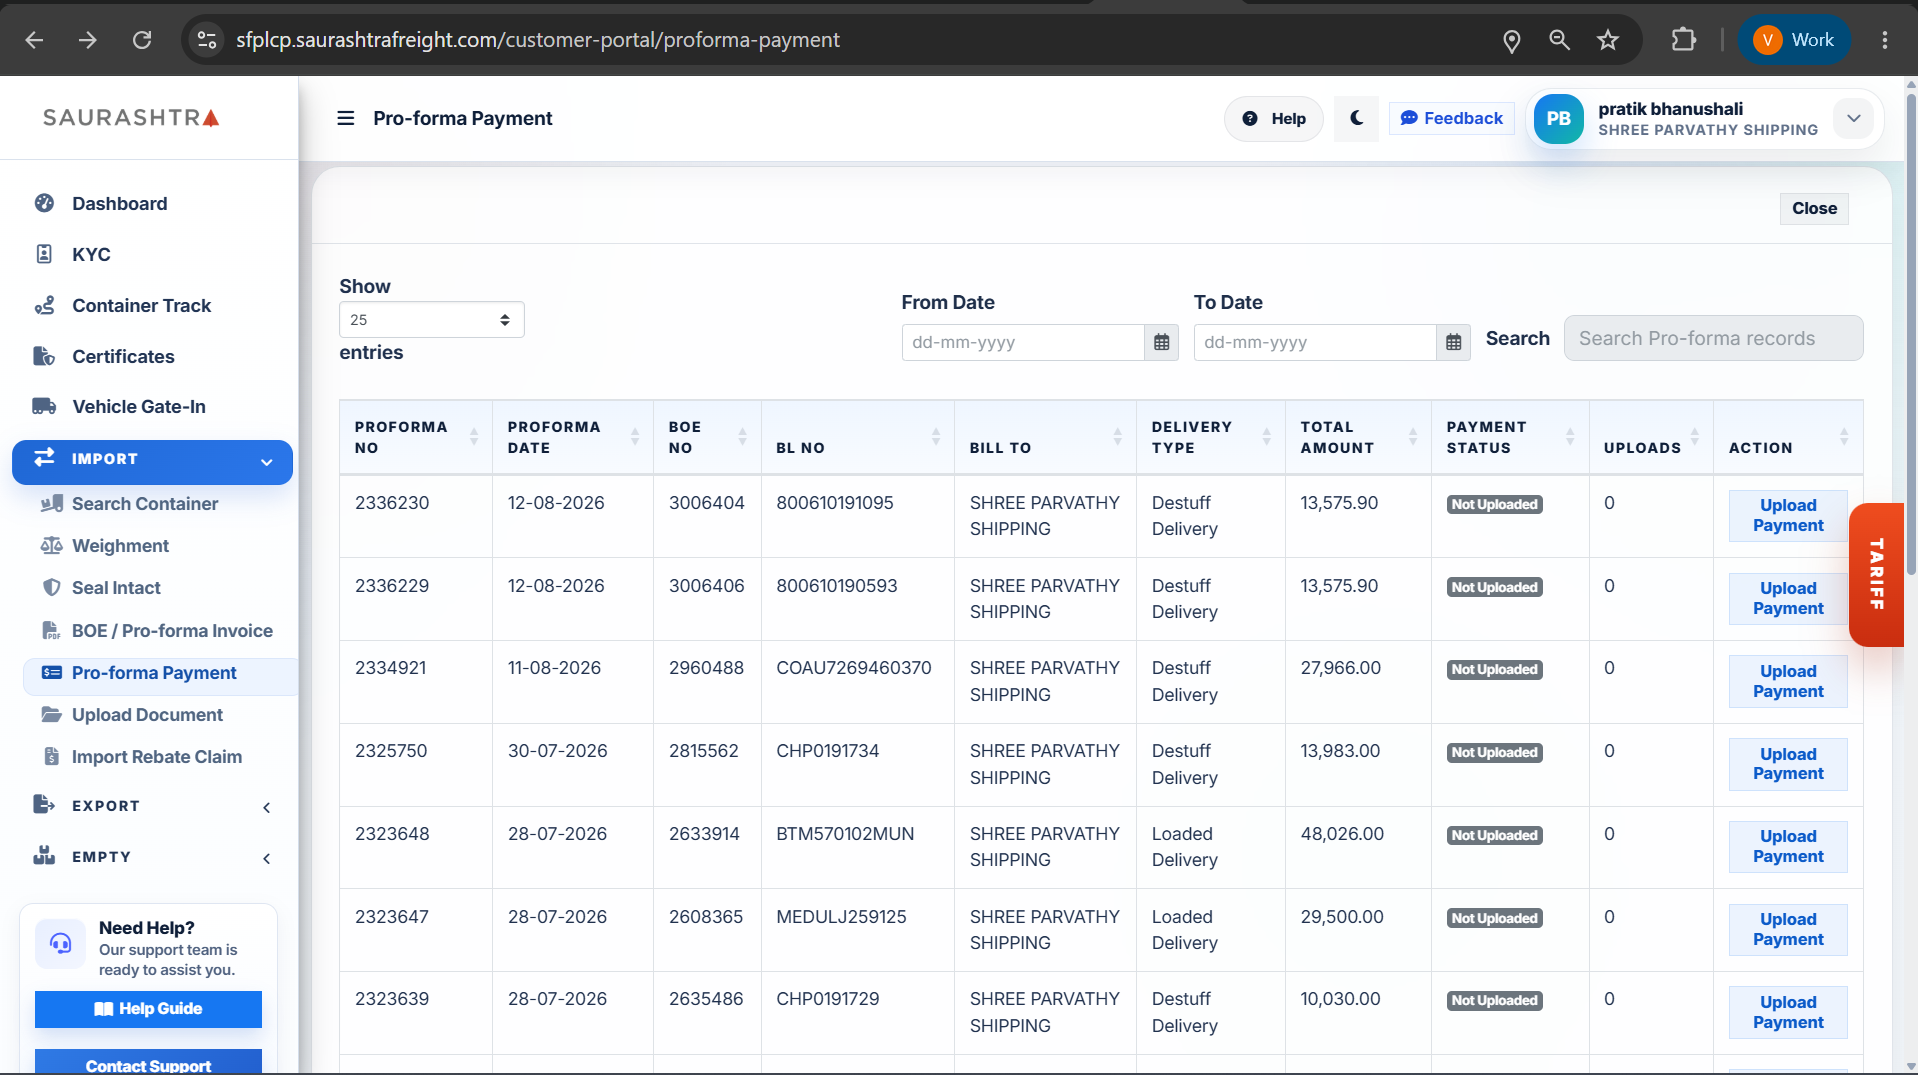
Screen 1: Payment List & Status
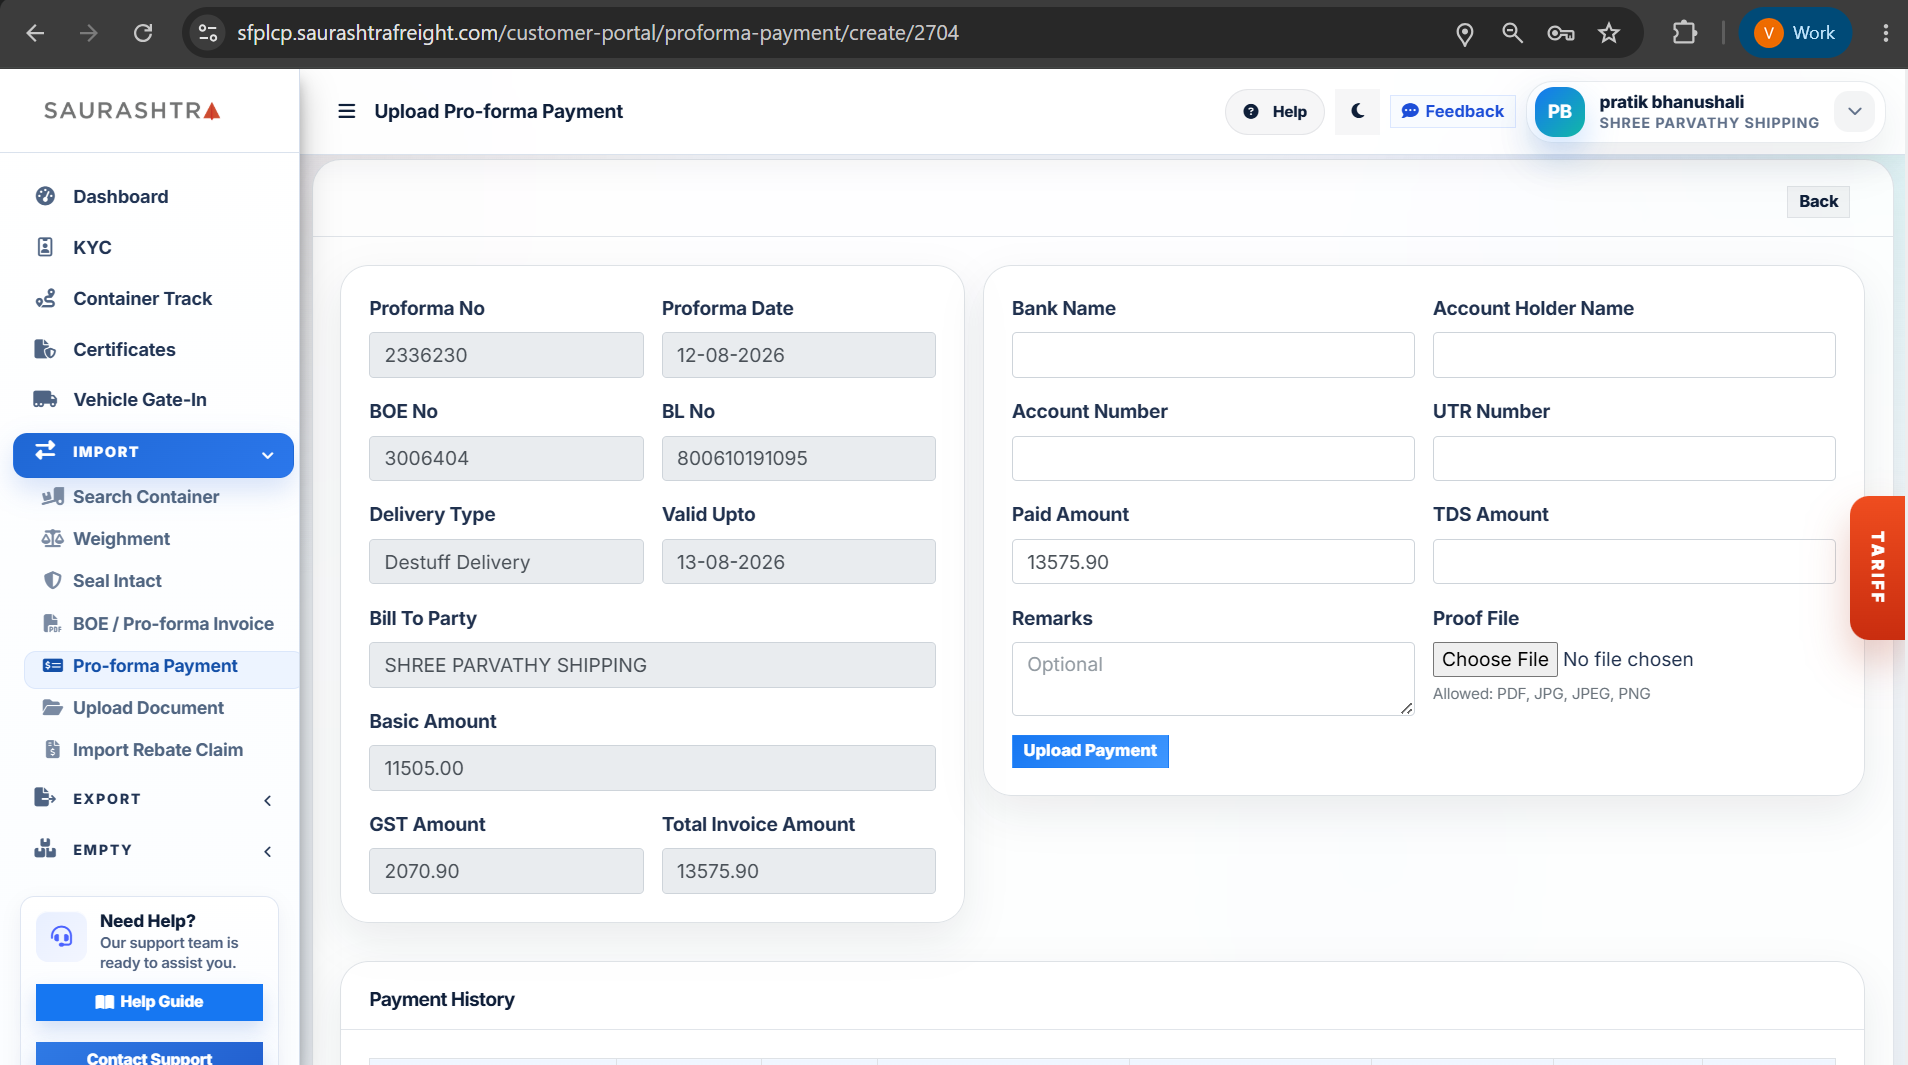
Screen 2: Payment & UTR Details
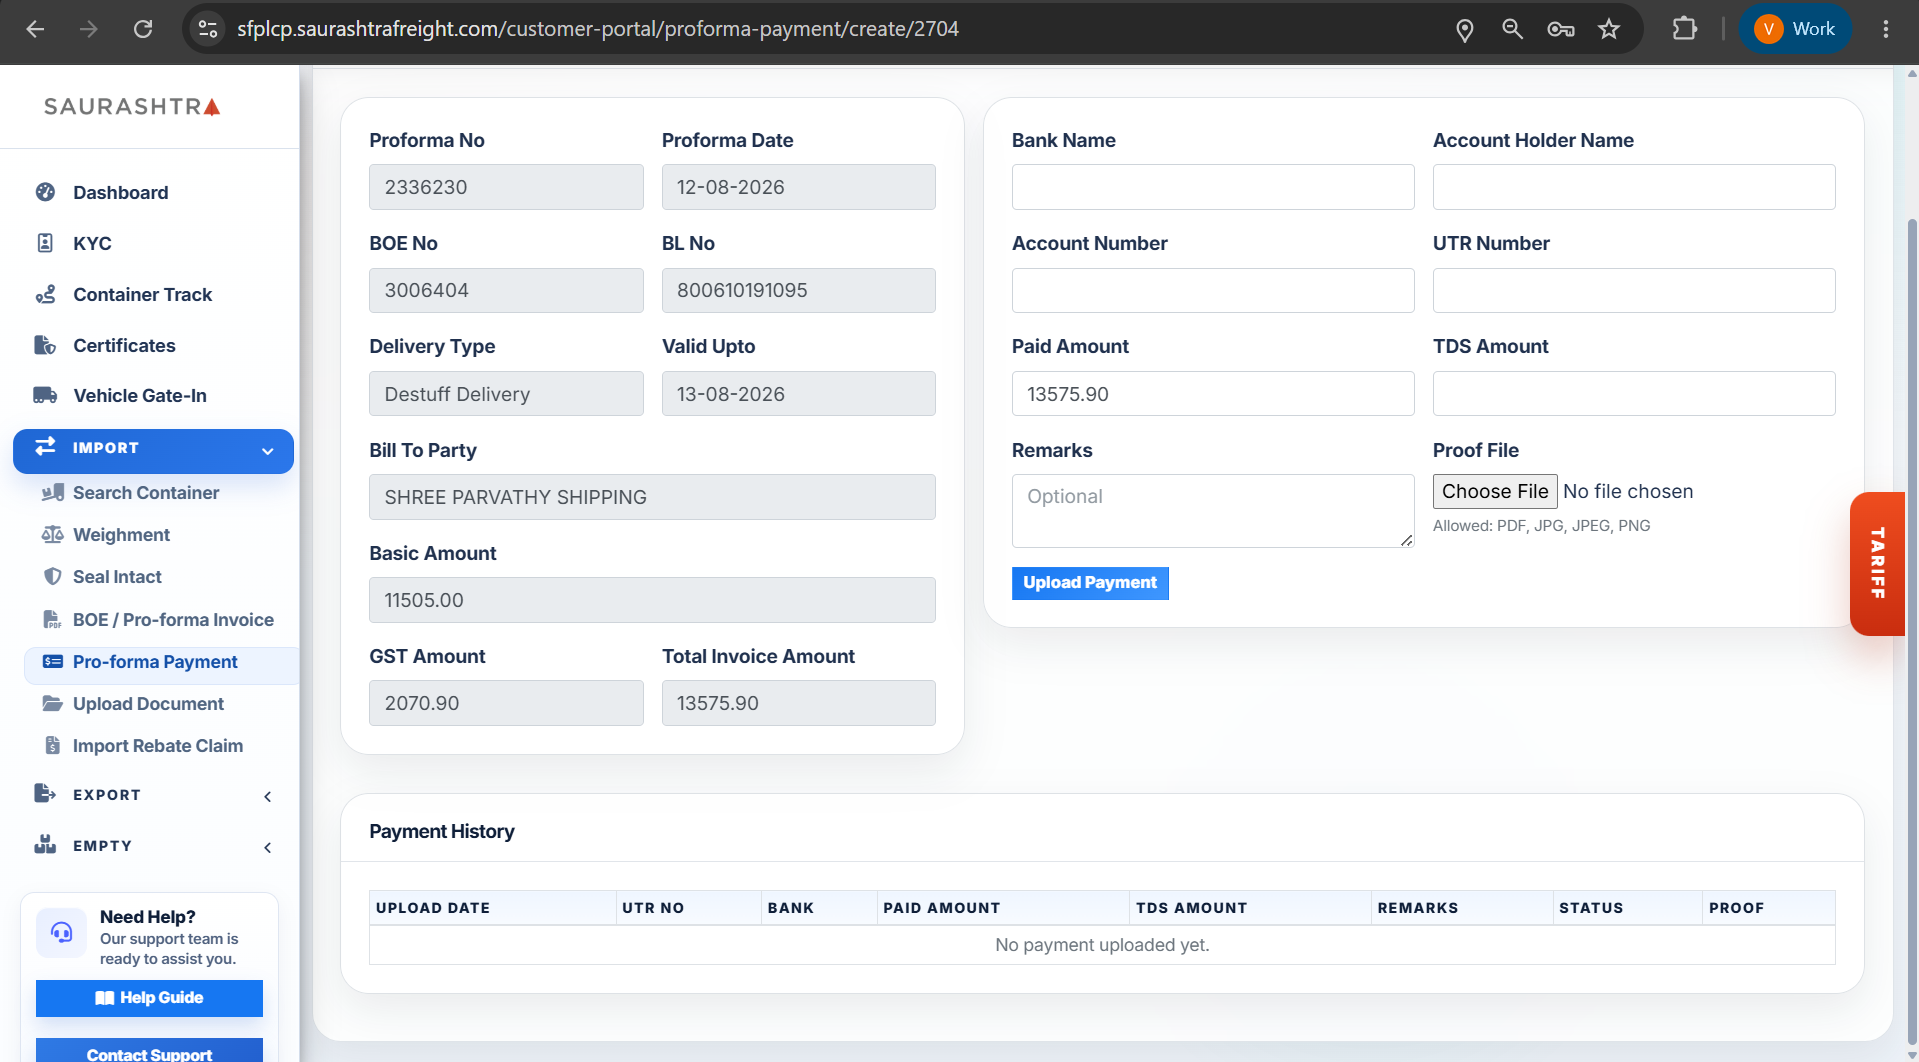
Screen 3: Bank Receipt Upload
How to Submit Payment Proof for Pro-forma Invoices
- Navigate to Pro-forma Payment — Expand IMPORT in the left navigation sidebar and click Pro-forma Payment.
- Locate Invoice — Review the Pro-forma Payment List table to find your target invoice number, BOE number, or container reference. Check the current status (e.g.
Pending Payment). - Click Upload Payment Proof — Click the blue Upload Payment button next to the relevant invoice entry to open the payment submission modal.
- Enter Payment Transaction Details — In the payment proof modal:
- Payment Mode — Select your transfer method (e.g.
NEFT,RTGS,IMPS, orOnline Gateway). - Transaction / UTR Number — Enter the unique bank UTR reference number.
- Transaction Date & Amount — Enter the payment transaction date and total paid amount.
- Payment Mode — Select your transfer method (e.g.
- Attach Payment Receipt File — Upload a clear PDF or image copy of your bank transaction receipt, bank counterfoil, or online payment screenshot.
- Submit Payment Proof — Type any optional remarks and click Submit Payment. The payment status will update to
Under Verificationfor finance team approval.
Submitting accurate UTR numbers and clear bank transaction receipts accelerates finance verification and automated Gate-Pass issuance.
Upload Document
Upload mandatory supporting documents such as Bill of Lading (BL), Delivery Orders (DO), or authority letters.
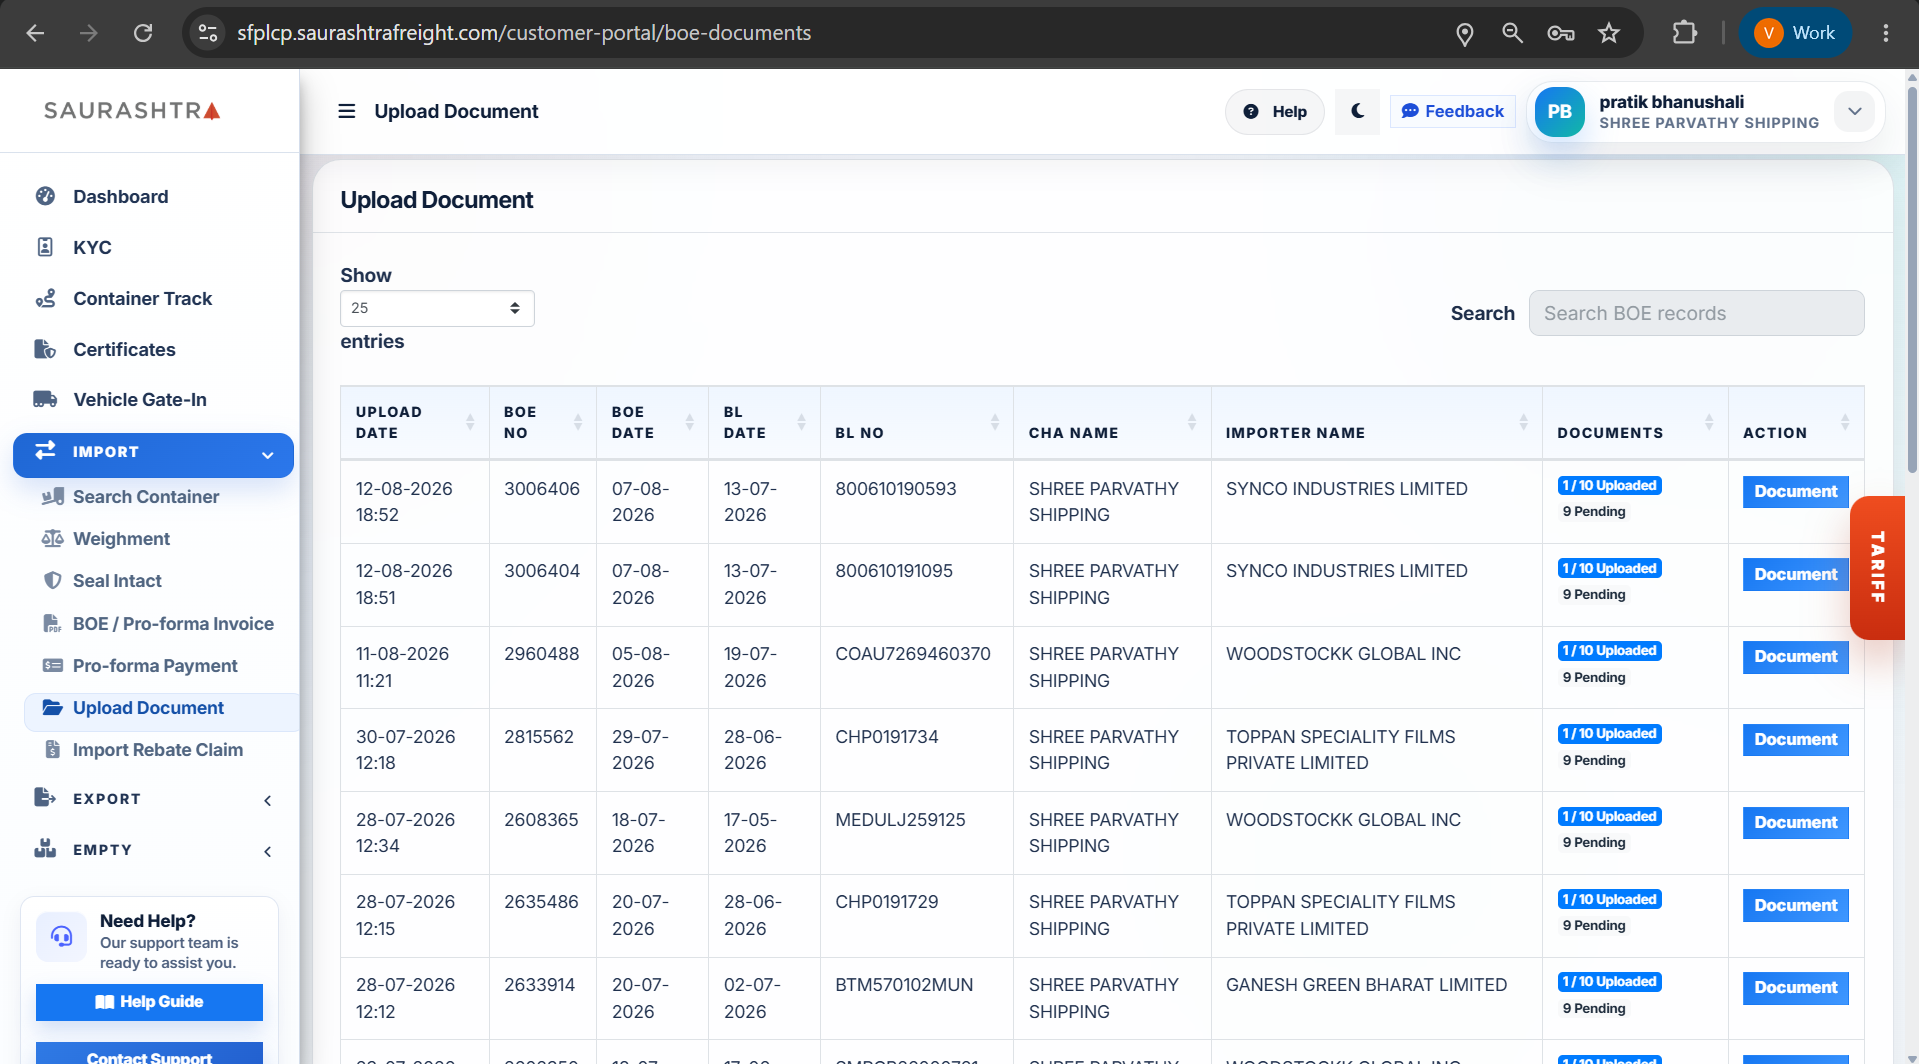
Upload Document — List View
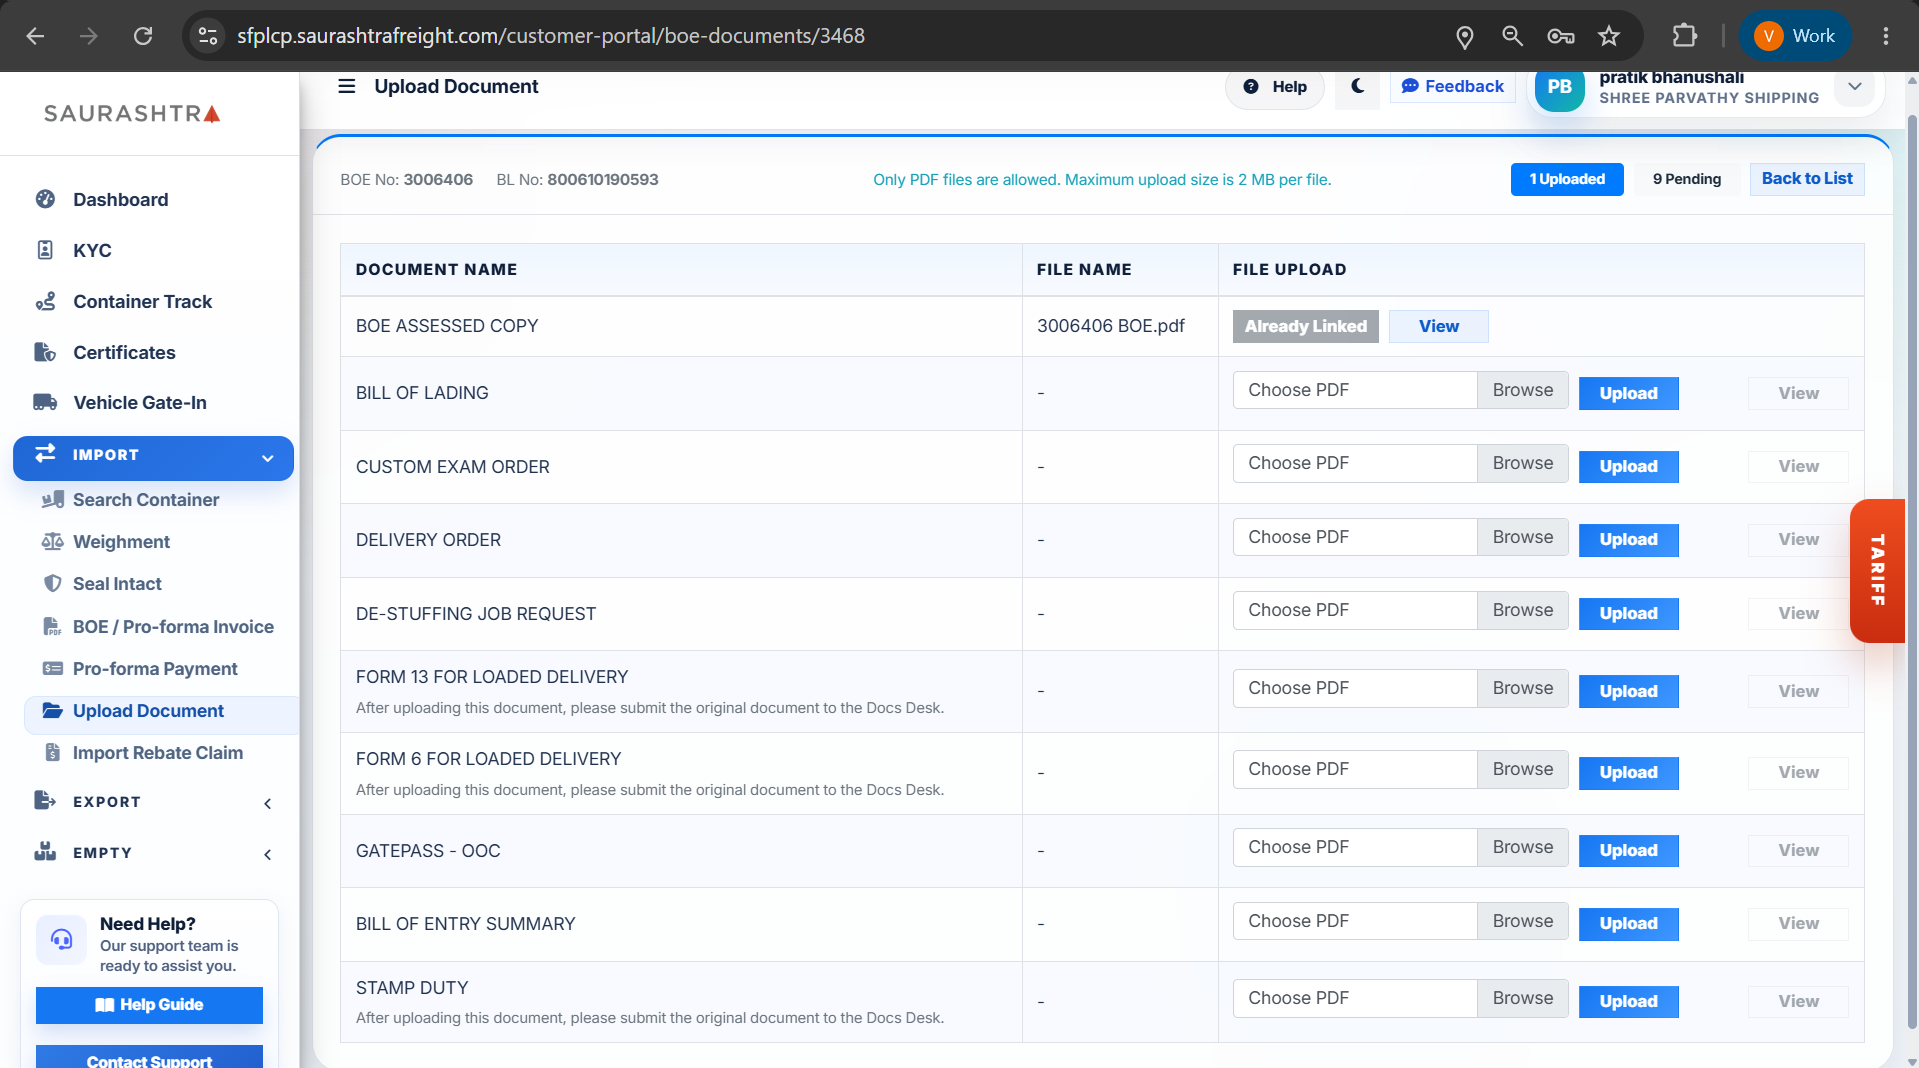
Document Upload Form
How to Upload Documents
- Navigate to Upload Document — Go to Import → Upload Document from the sidebar menu.
- Select BOE Entry — From the document list, locate the BOE entry for which you need to upload documents and click on it.
- Choose Document Type — Select the type of document you are uploading (e.g., Bill of Lading, Delivery Order, Authority Letter).
- Select File — Click the file upload area to browse and select the document file from your computer.
- Upload — Click the Upload button to submit the document. The upload status will be updated in the list view.
Ensure all uploaded documents are clear and legible. Supported file formats typically include PDF, JPG, and PNG. File size limits may apply.
Import Rebate Claim
Submit rebate claims online, download the official Annexure Excel template, create or edit claims, upload supporting documents, and track approval status from submission to settlement.
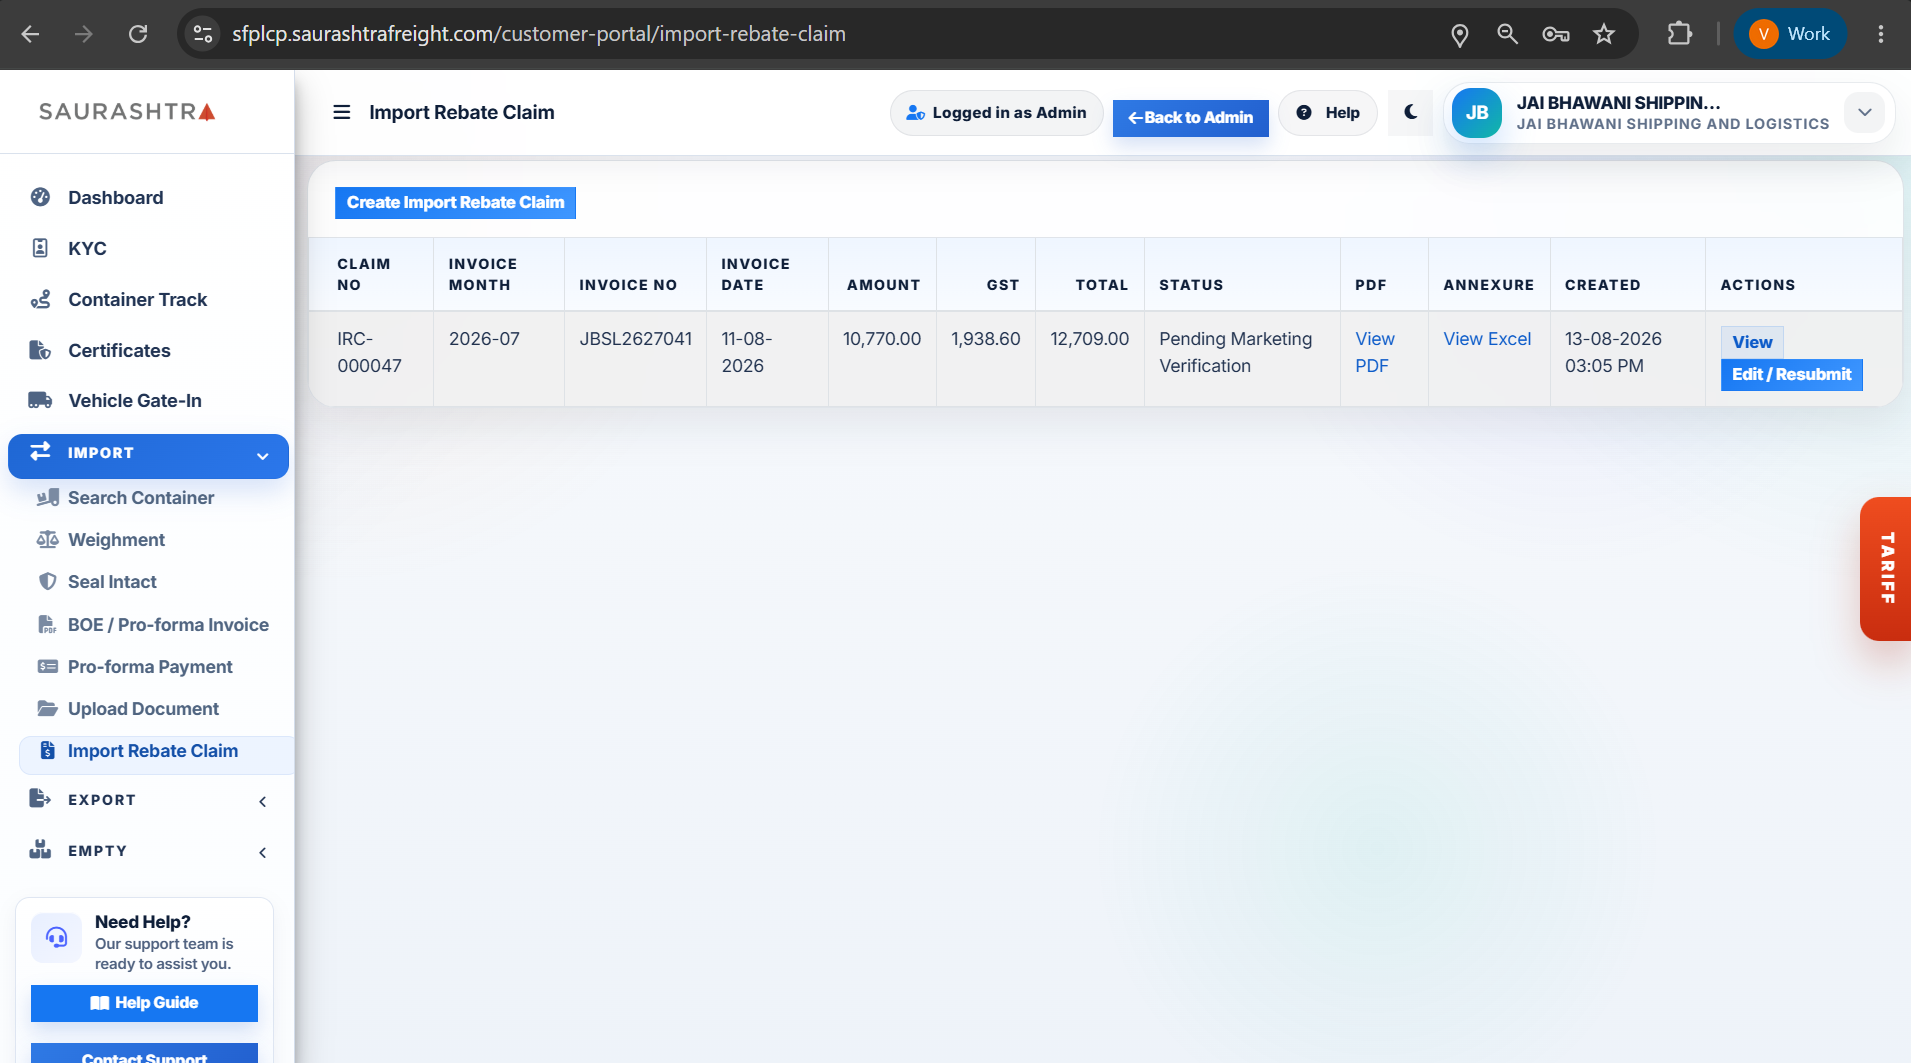
Claim List & Status
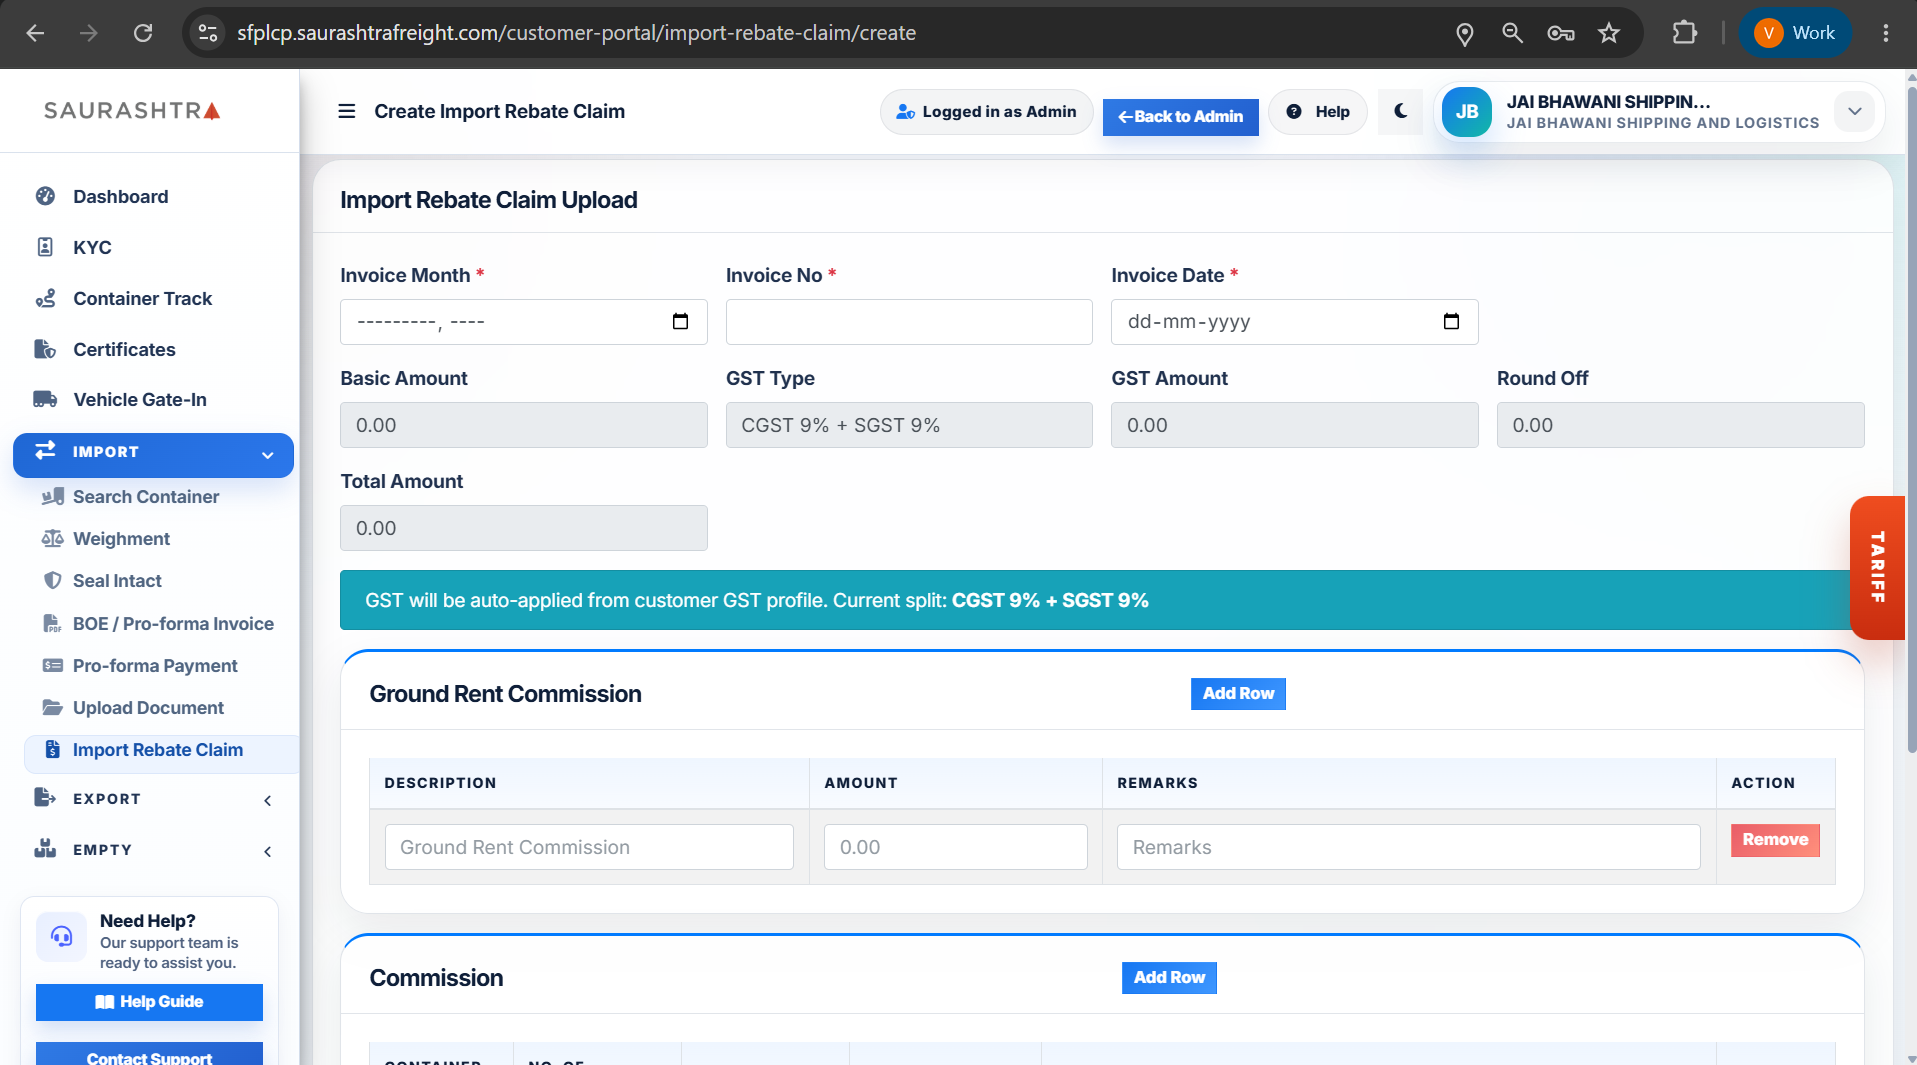
Create Claim — Step 1
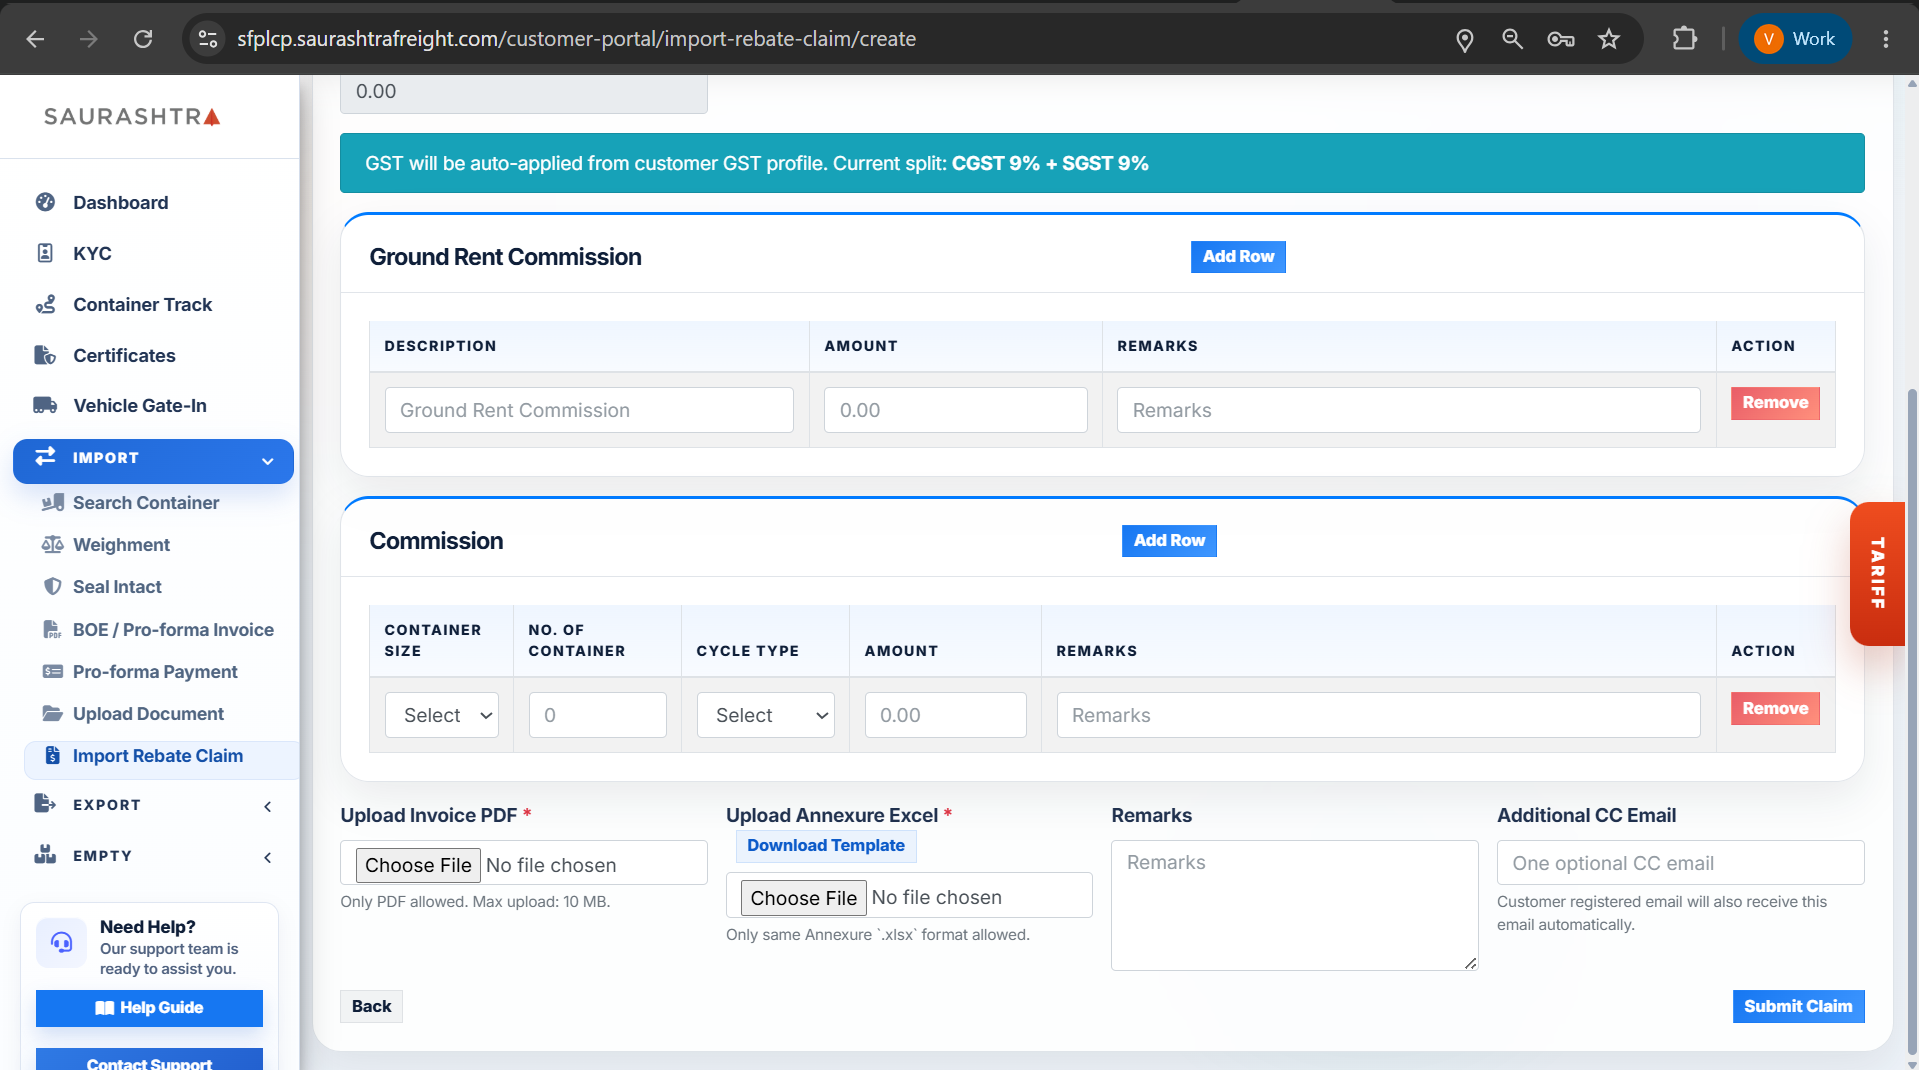
Create Claim — Step 2
How to Submit an Import Rebate Claim
- Navigate to Import Rebate Claim — Expand IMPORT in the sidebar and click Import Rebate Claim.
- Download Template (Optional) — Click Download Annexure Template to get the official Excel sheet for bulk claims. Fill required columns and keep supporting documents ready.
- Create New Claim — Click Create Claim or New Claim to open the claim wizard. In Step 1 select the BOE / Pro-forma invoice or manually choose containers to include (see image: Create Claim — Step 1).
- Enter Amounts & Attach Documents — In Step 2 enter the eligible rebate amounts, upload supporting documents (invoices, bank receipts, customs paperwork) and add remarks (see image: Create Claim — Step 2).
- Submit for Review — After verifying all inputs, click Submit. The claim will be submitted and receive a reference number. Status will change to
PendingorUnder Review. - Edit Pending Claims — Open any claim with status
Pendingand click Edit to update details or add missing documents before final review. - Track Approval & Settlement — Use the claim list to monitor statuses:
Pending,Under Review,Approved,Rejected, orSettled. Click the reference to view audit history and attachments.
Always attach clear supporting documents and ensure BOE / invoice references match portal records to avoid delays in verification and settlement.
Export Module Group
Authenticated
The Export module handles export shipment container movements, cargo arrivals, inventory balances, carting tallies, and TEU analytics.
Shipping Bill Entry
Register and manage export Shipping Bills before cargo arrival. Automatically parse and auto-fill data by uploading your Shipping Bill Checklist PDF, review Customer, Shipping Bill, Cargo, and Party Details, submit new entries, track approval status, and edit or view saved shipping bills.
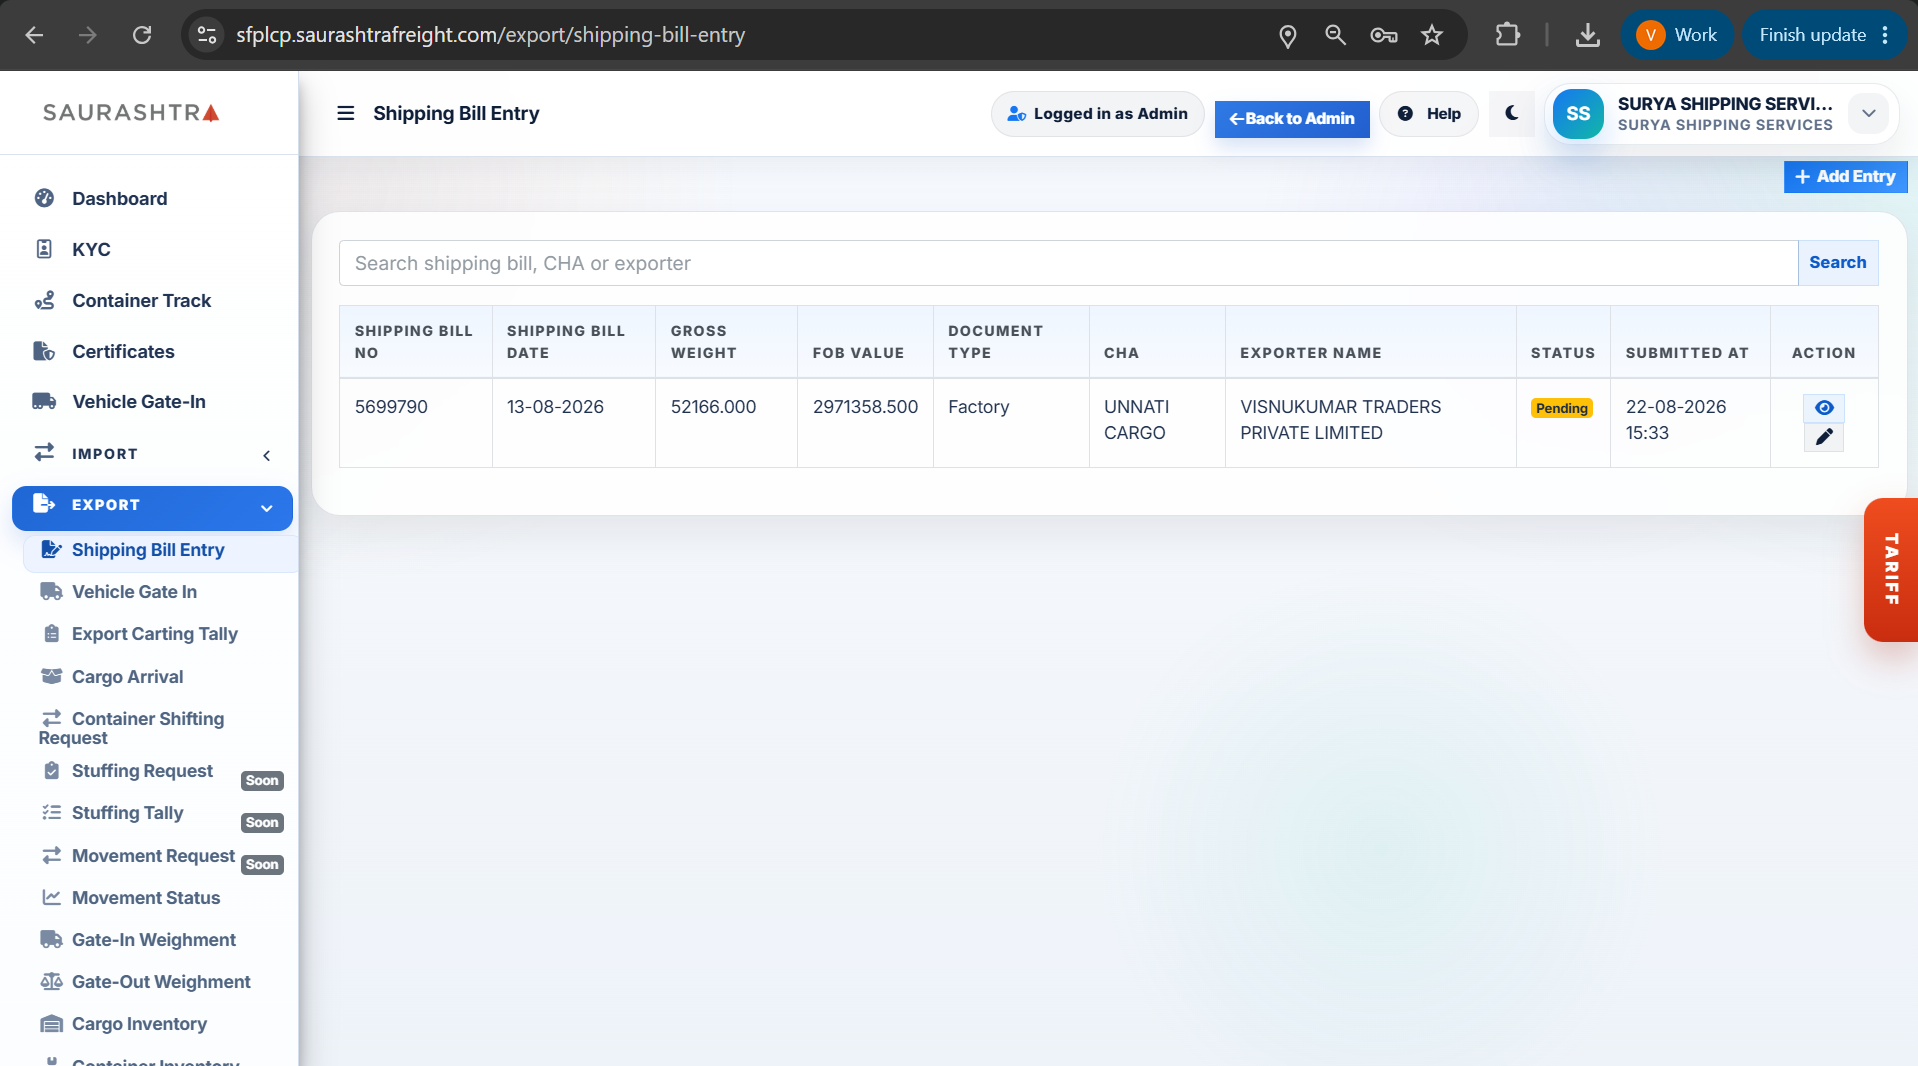
Screen 1: Listing & Search
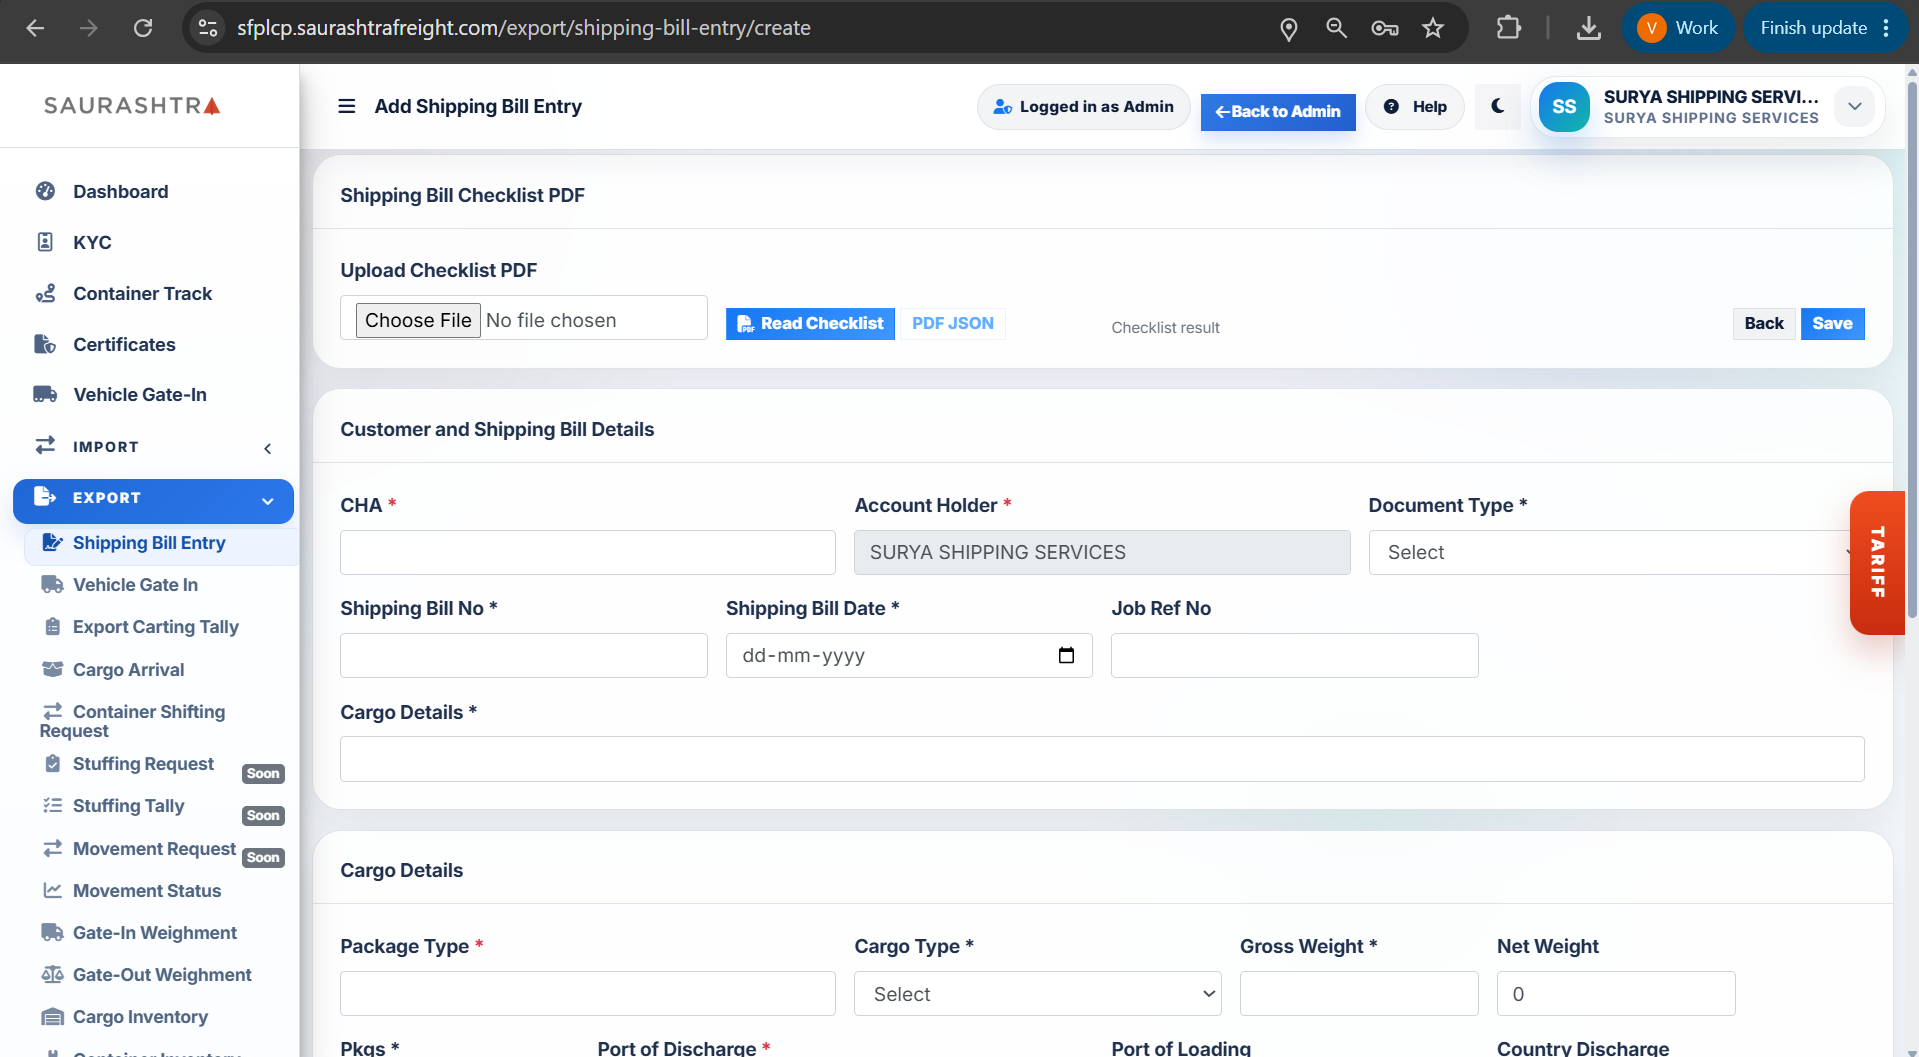
Screen 2: Upload & SB Details
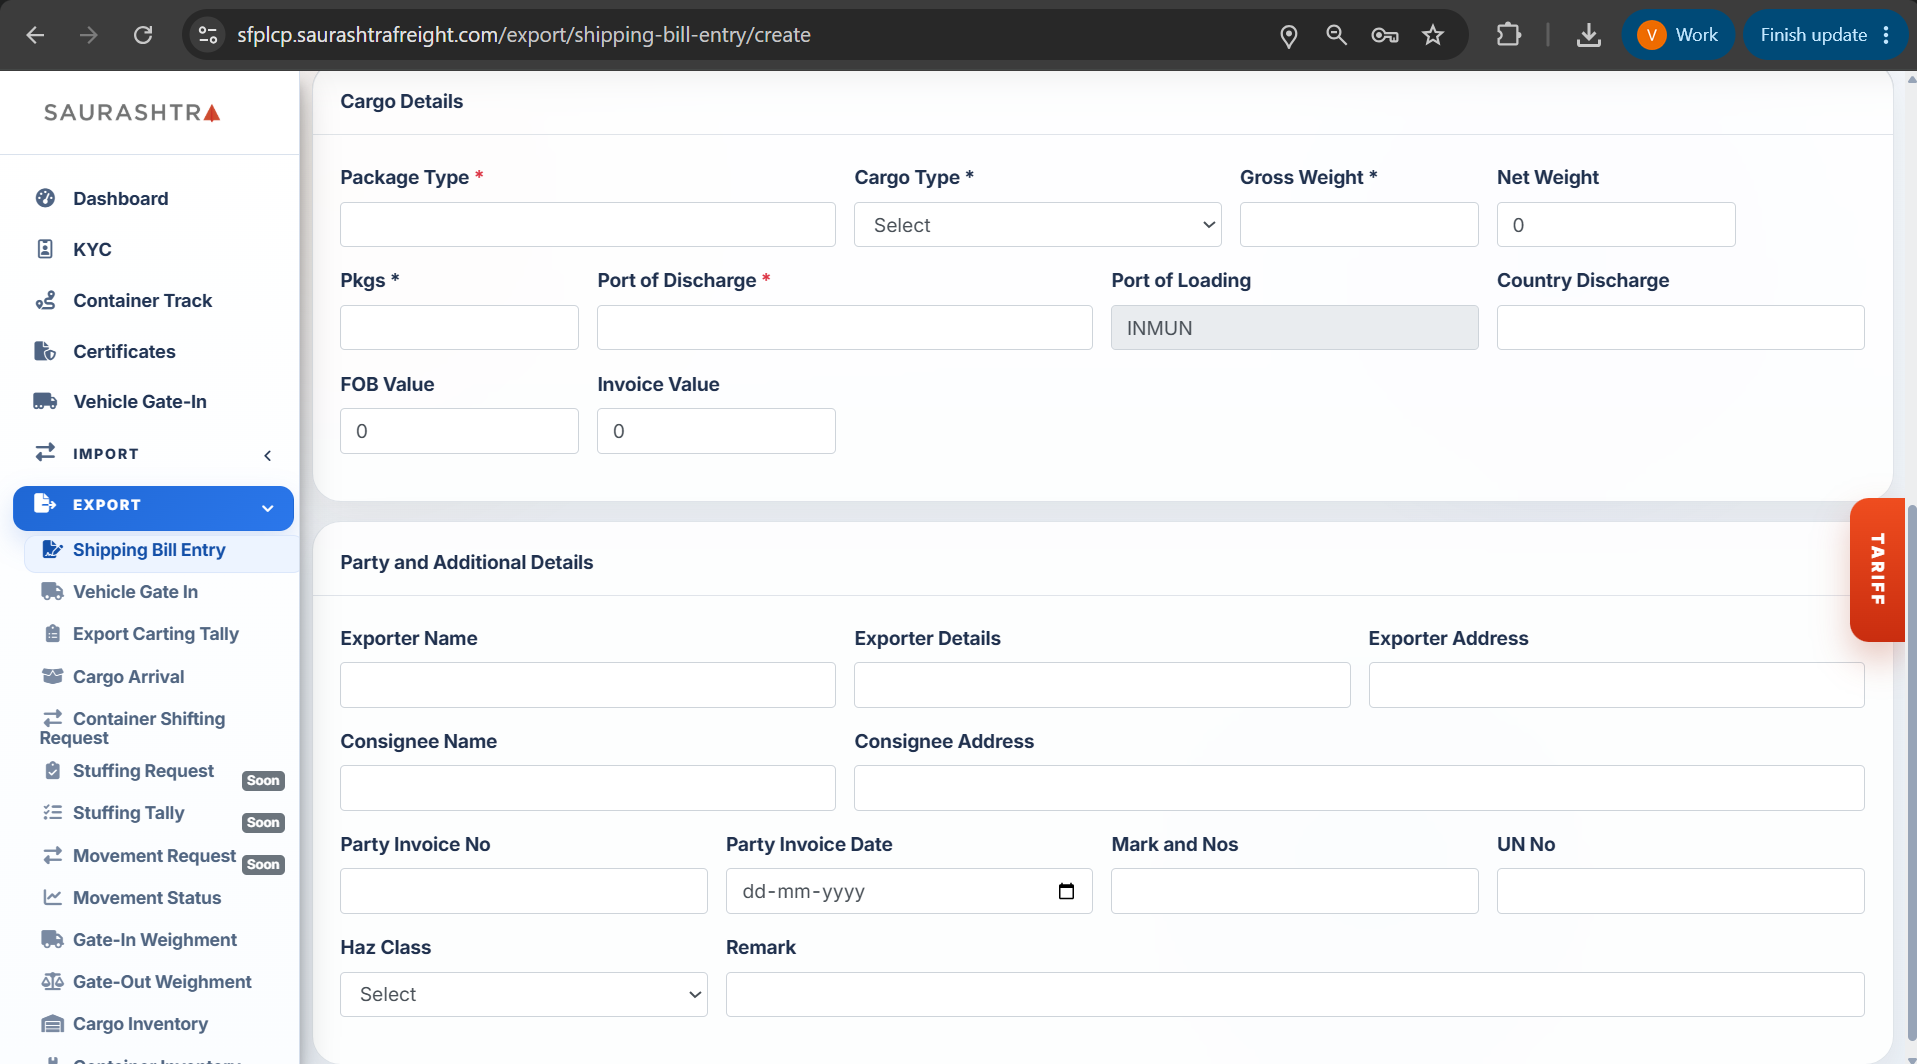
Screen 3: Cargo & Party Details
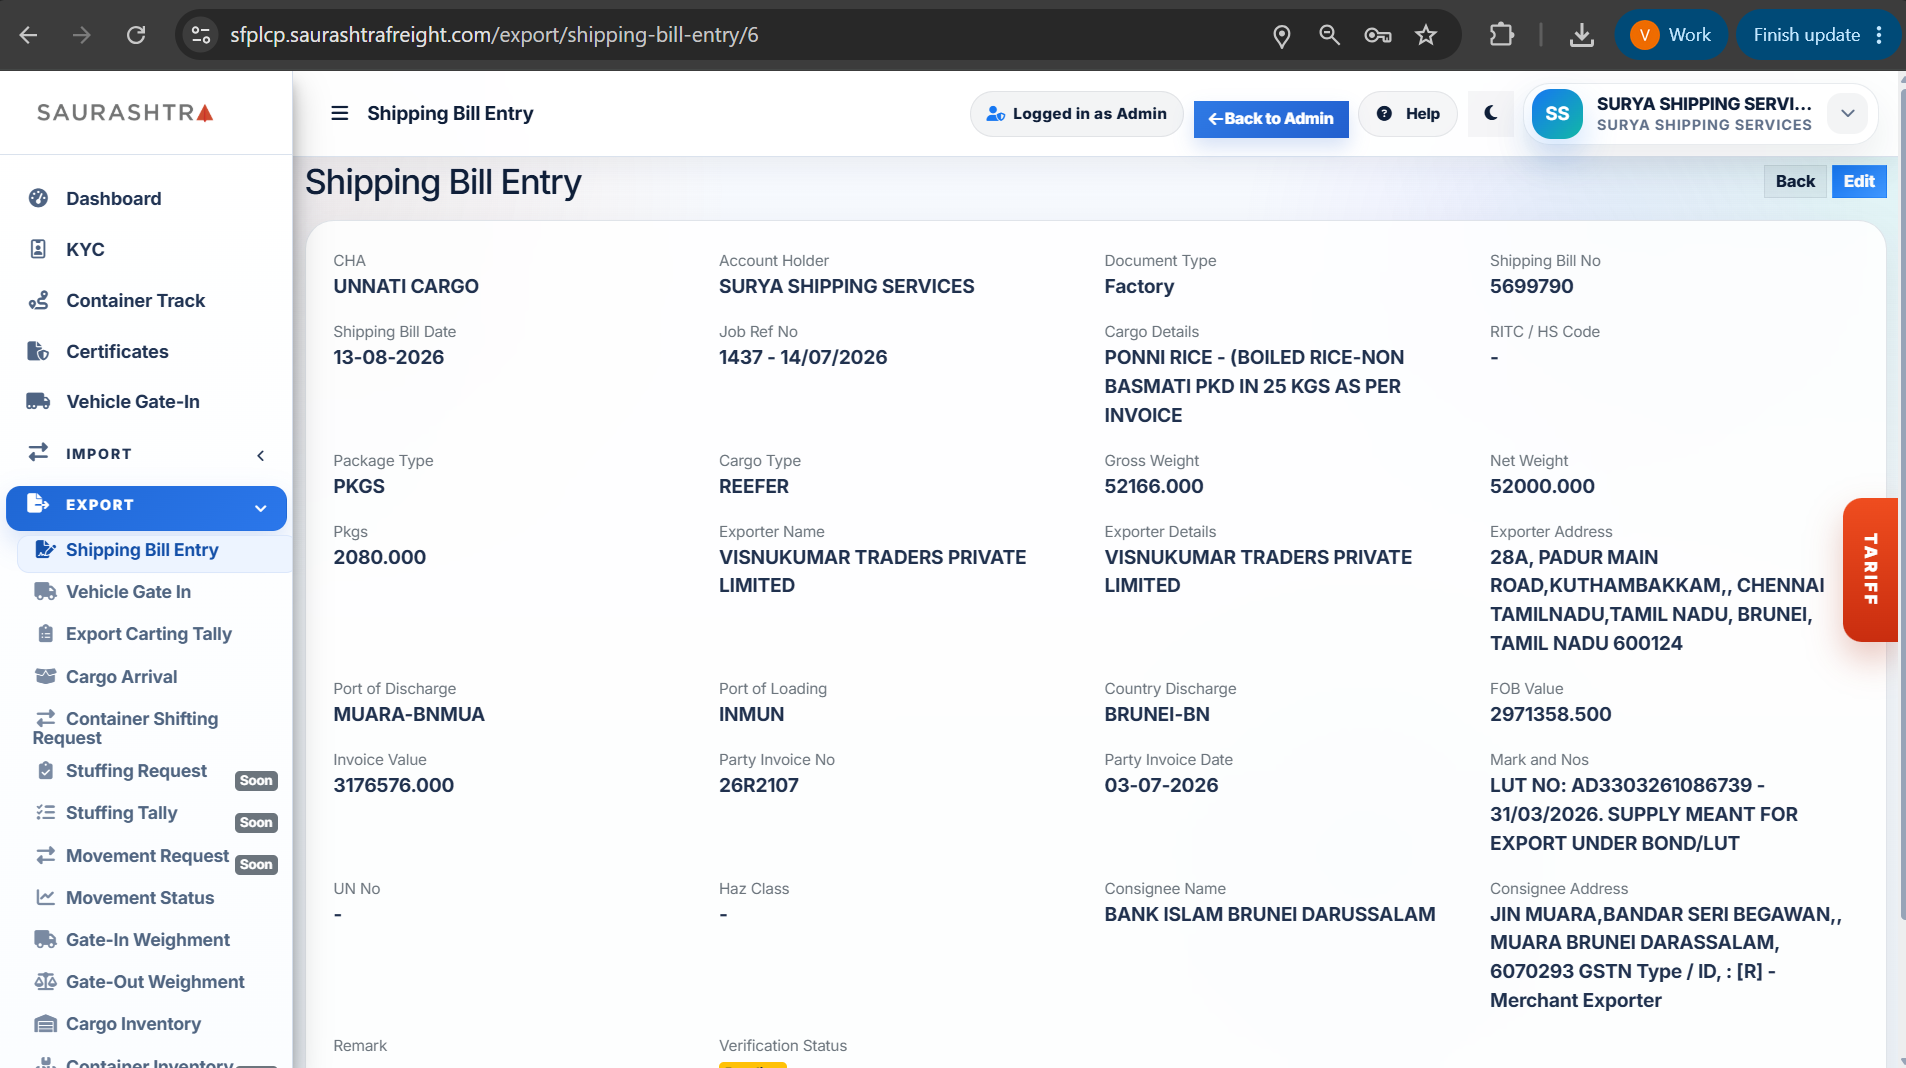
Screen 4: View Details
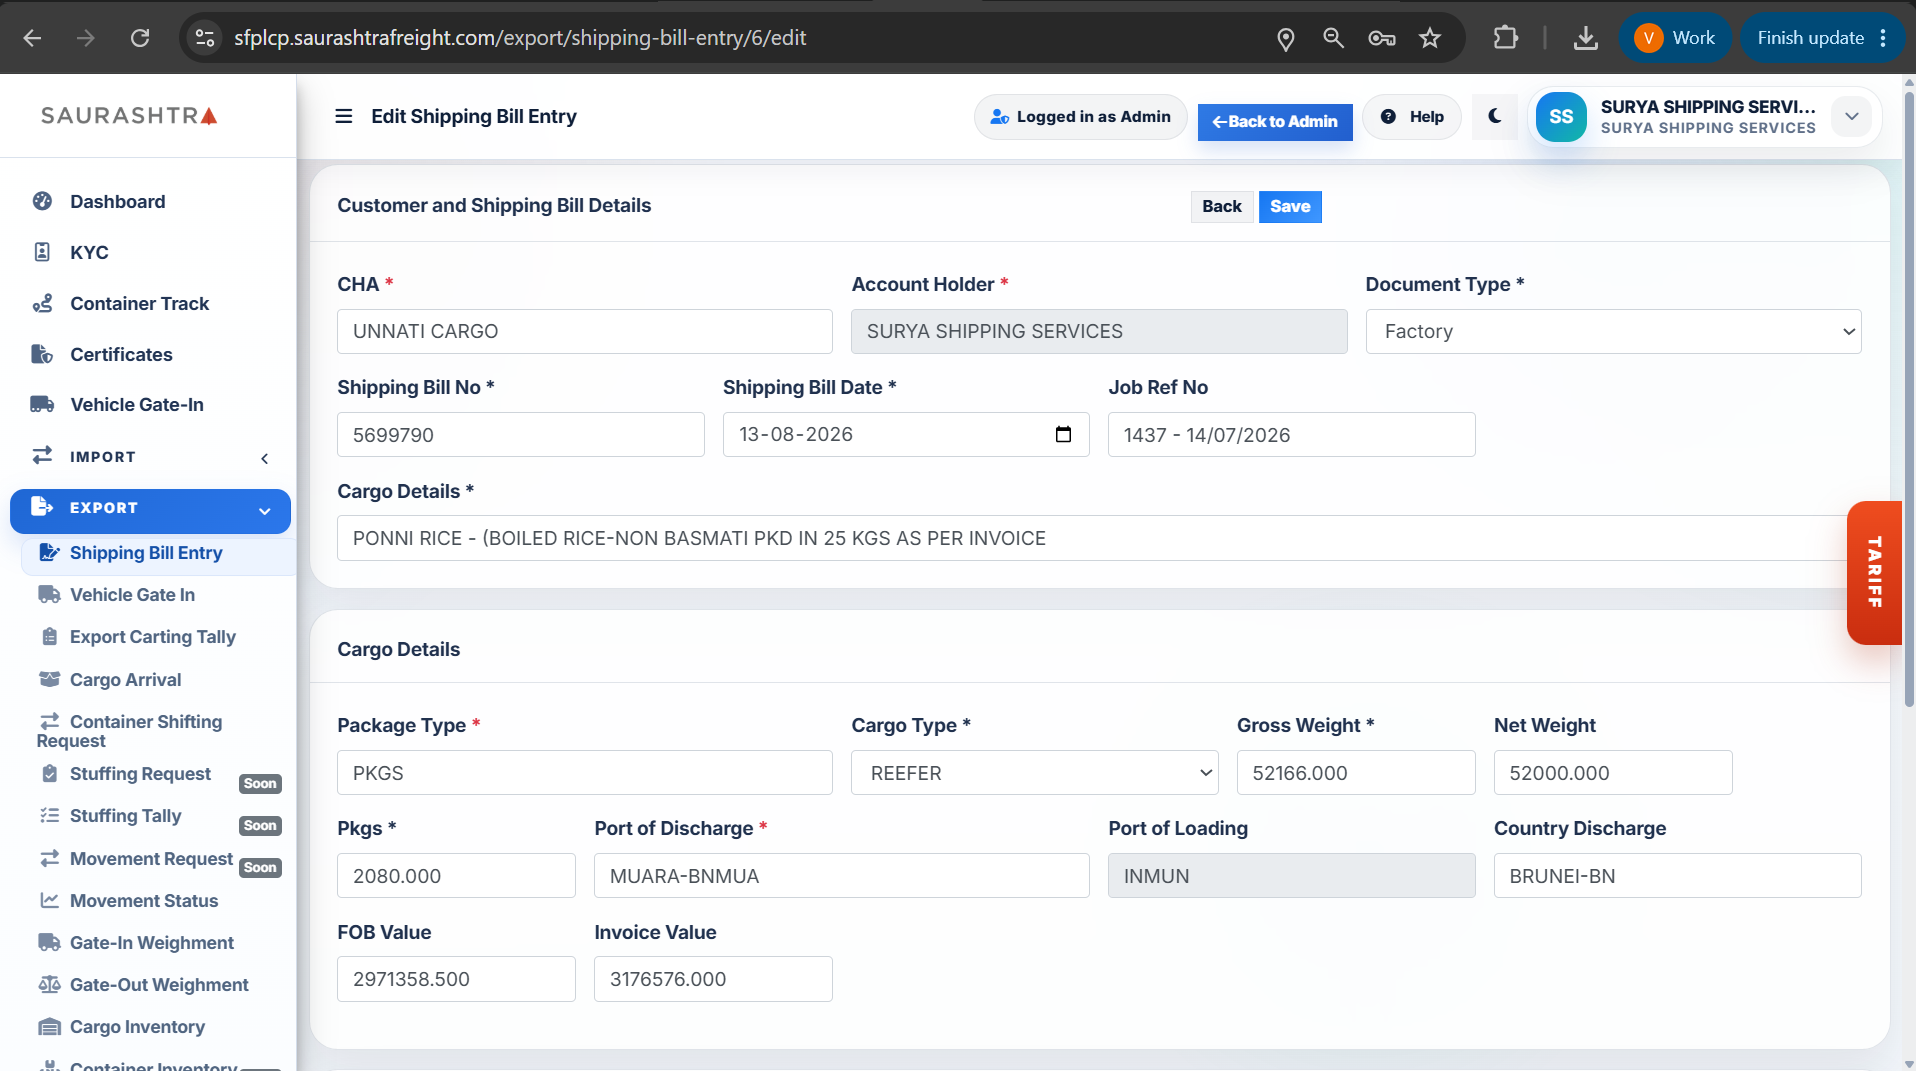
Screen 5: Edit Form (Part 1)
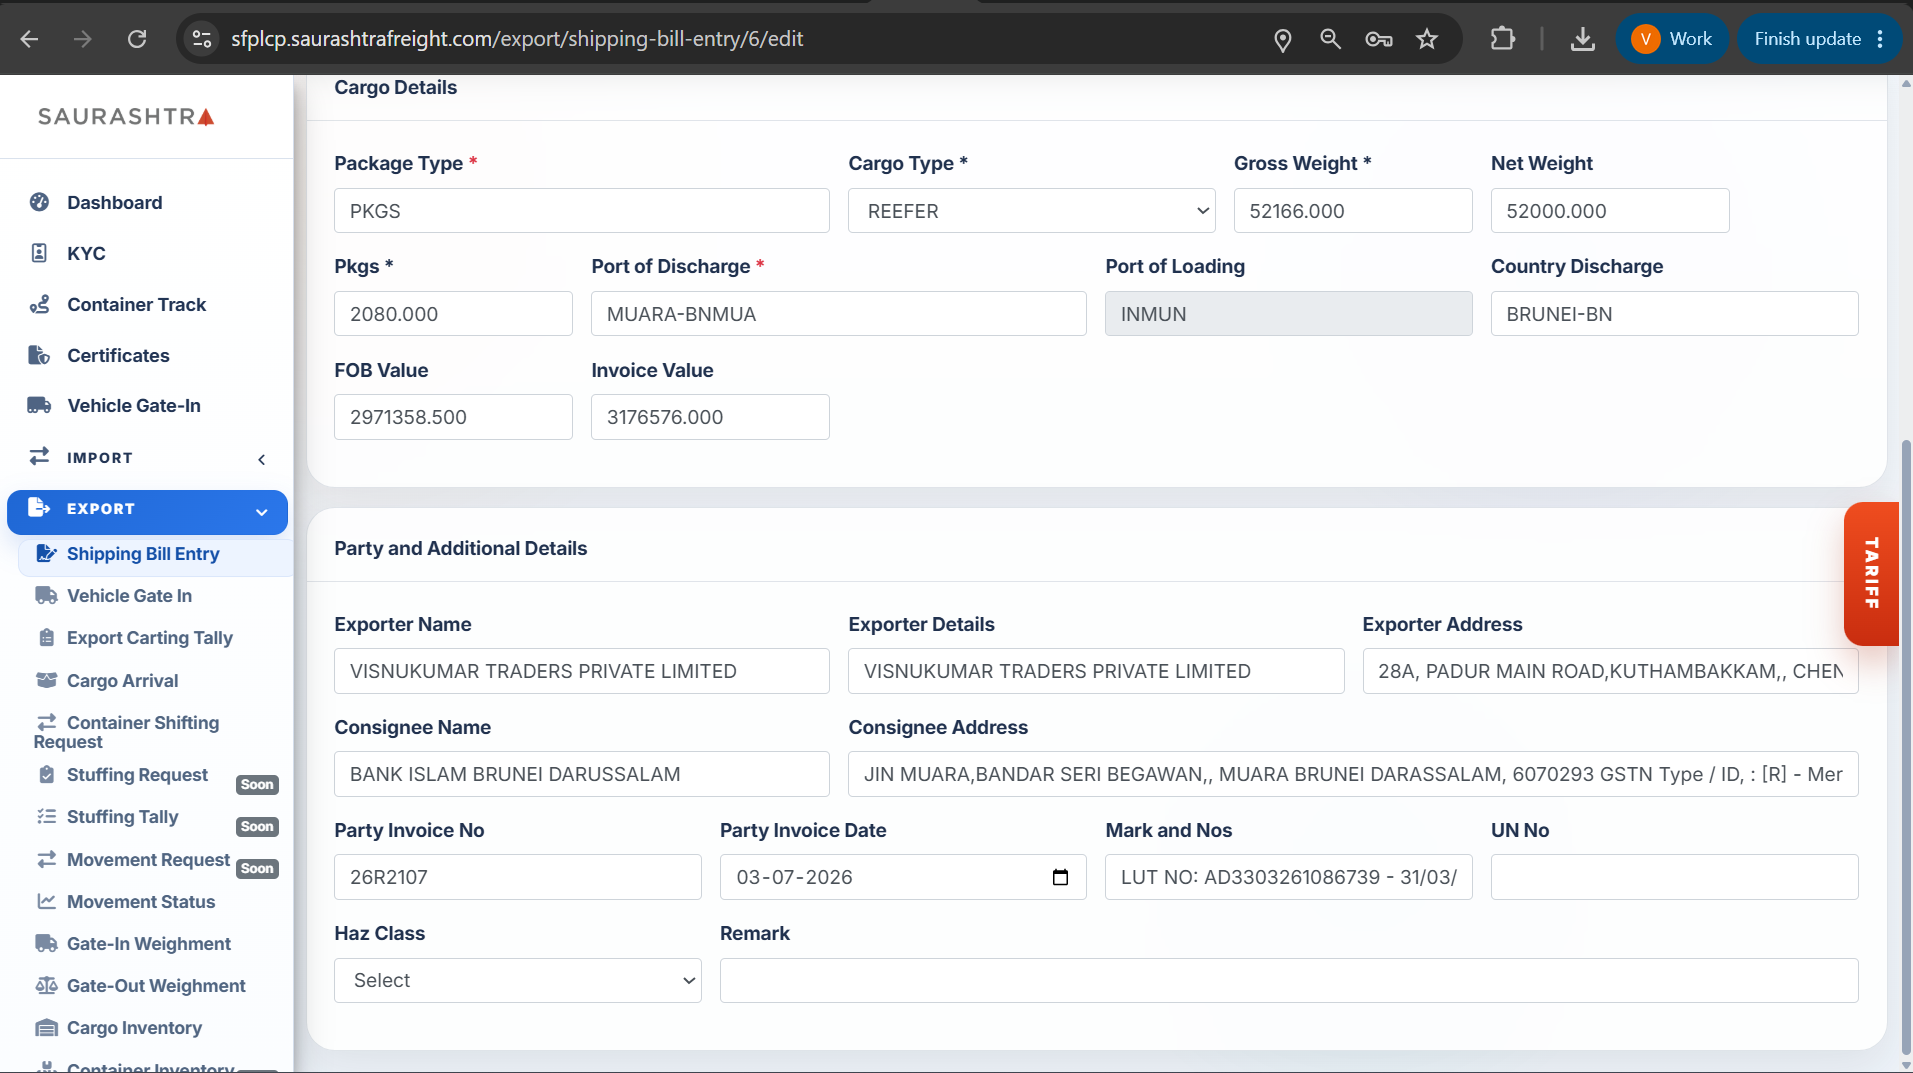
Screen 6: Edit Form (Part 2)
How to Submit & Manage Shipping Bill Entries
- Navigate to Shipping Bill Entry — Expand EXPORT in the left sidebar menu and click Shipping Bill Entry.
- Click + Add Entry — Click the blue + Add Entry button at the top right of the listing page to open the registration form.
- Upload Checklist PDF (Auto-Fill) — Under Shipping Bill Checklist PDF:
- Click Choose File and select your export checklist PDF file (e.g.
ExpChecklist_1437.pdf). - Click the blue Read Checklist button to automatically extract and populate the form fields.
- Optionally click PDF JSON to view the parsed structured data.
- Click Choose File and select your export checklist PDF file (e.g.
- Verify Customer and Shipping Bill Details — Review the auto-populated CHA, Account Holder, Document Type (e.g., Factory), Shipping Bill No, Shipping Bill Date, Job Ref No, and Cargo Details.
- Verify Cargo & Additional Details — Confirm Package Type, Cargo Type (e.g., GENL, REEFER), Gross Weight, Net Weight, Pkgs, Port of Discharge, Port of Loading (e.g., INMUN), FOB Value, Invoice Value, Exporter Name & Address, Consignee Name & Address, Party Invoice No & Date, Mark and Nos, UN No, and Haz Class.
- Save Entry — Click the blue Save button (or Back to cancel). The entry will appear in the listing with a Pending status badge and be synced with CFS operations for vehicle gate-in and carting verification.
- View or Edit Entries — From the listing table, click the Action column icons:
- View (Eye icon) — Opens the full read-only overview of the registered shipping bill.
- Edit (Pencil icon) — Opens the edit form to update shipping bill details and click Save.
Using the Read Checklist feature auto-populates over 20 fields directly from your checklist PDF in seconds, eliminating manual data entry errors and speeding up cargo clearance.
Carting Request
Submit and track gate-in requests for export cargo carting trucks arriving at Saurashtra CFS. Specify vehicle registration numbers, driver contact details, valid-till timestamps, select up to 15 active Shipping Bills, allocate gate-in package counts and weights, save drafts, or submit requests for automated Job Order (JO) and gate pass generation.
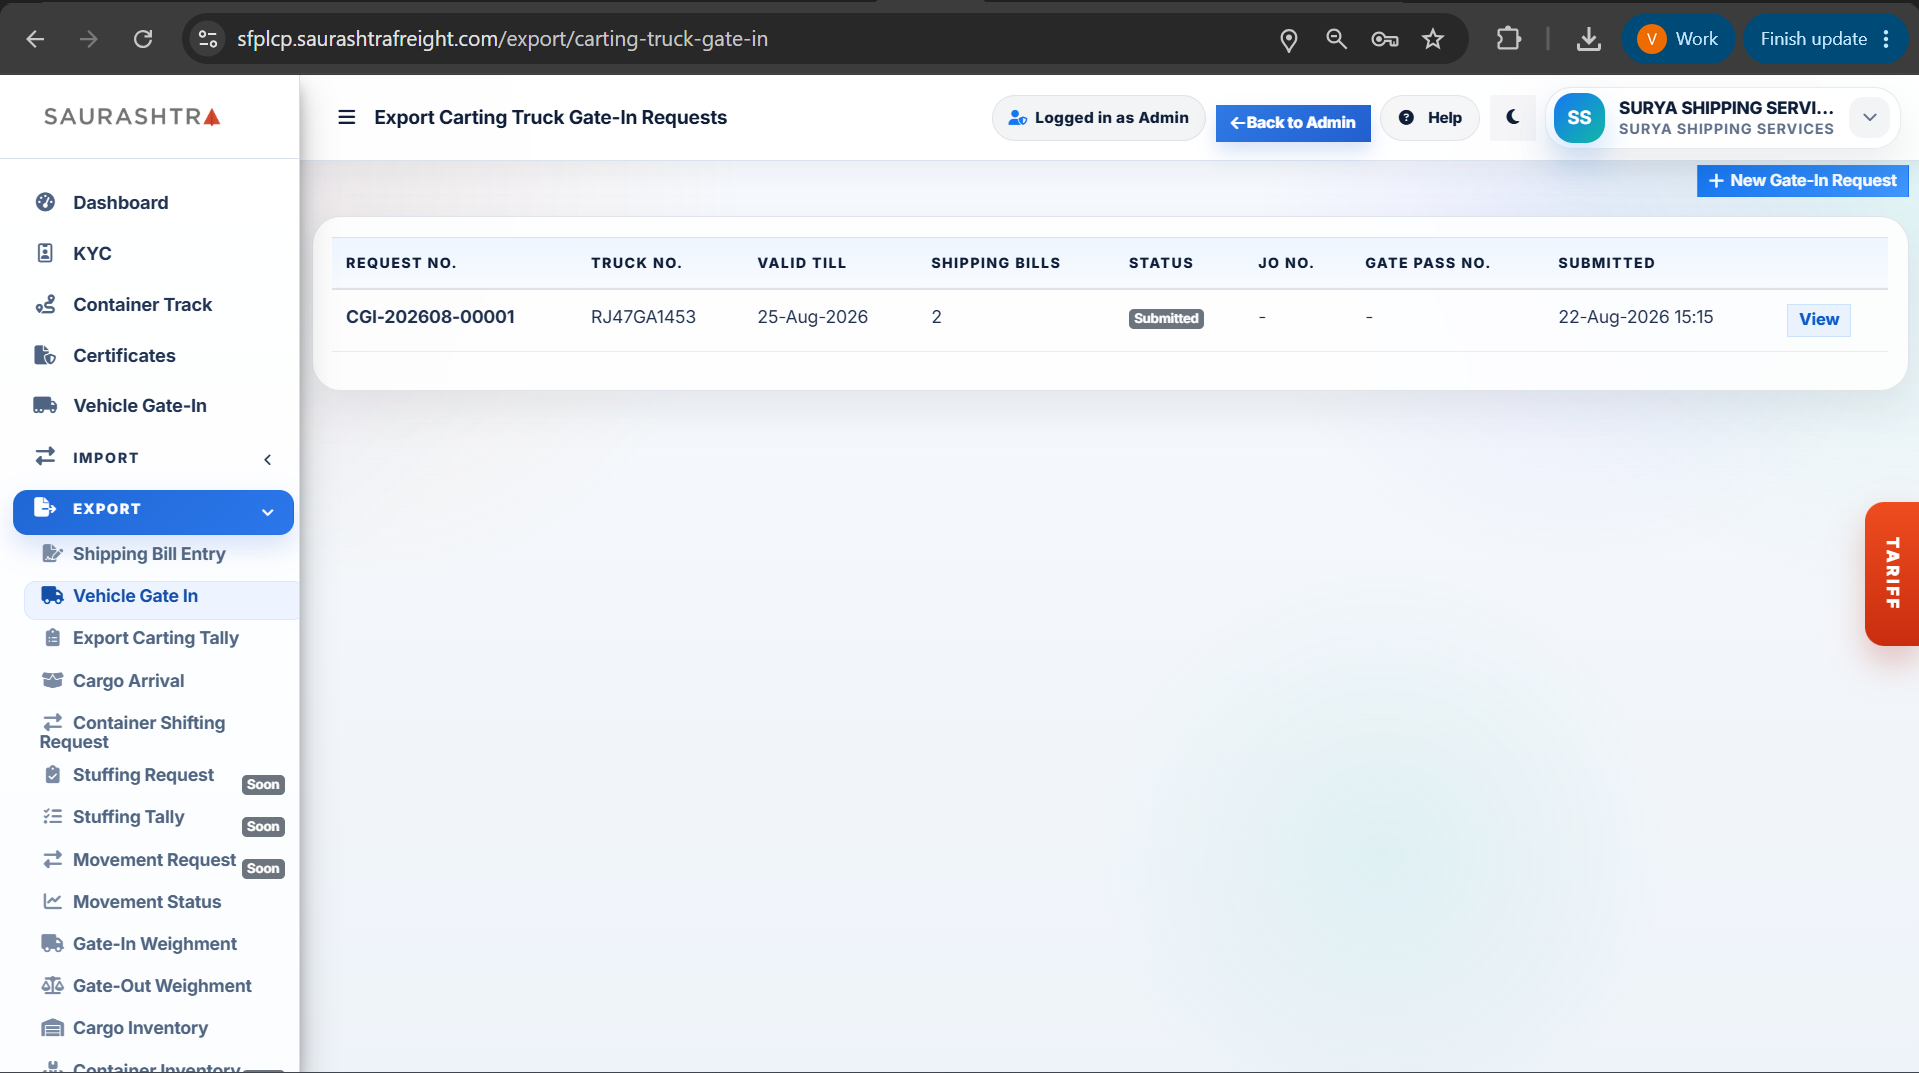
Screen 1: Requests Listing
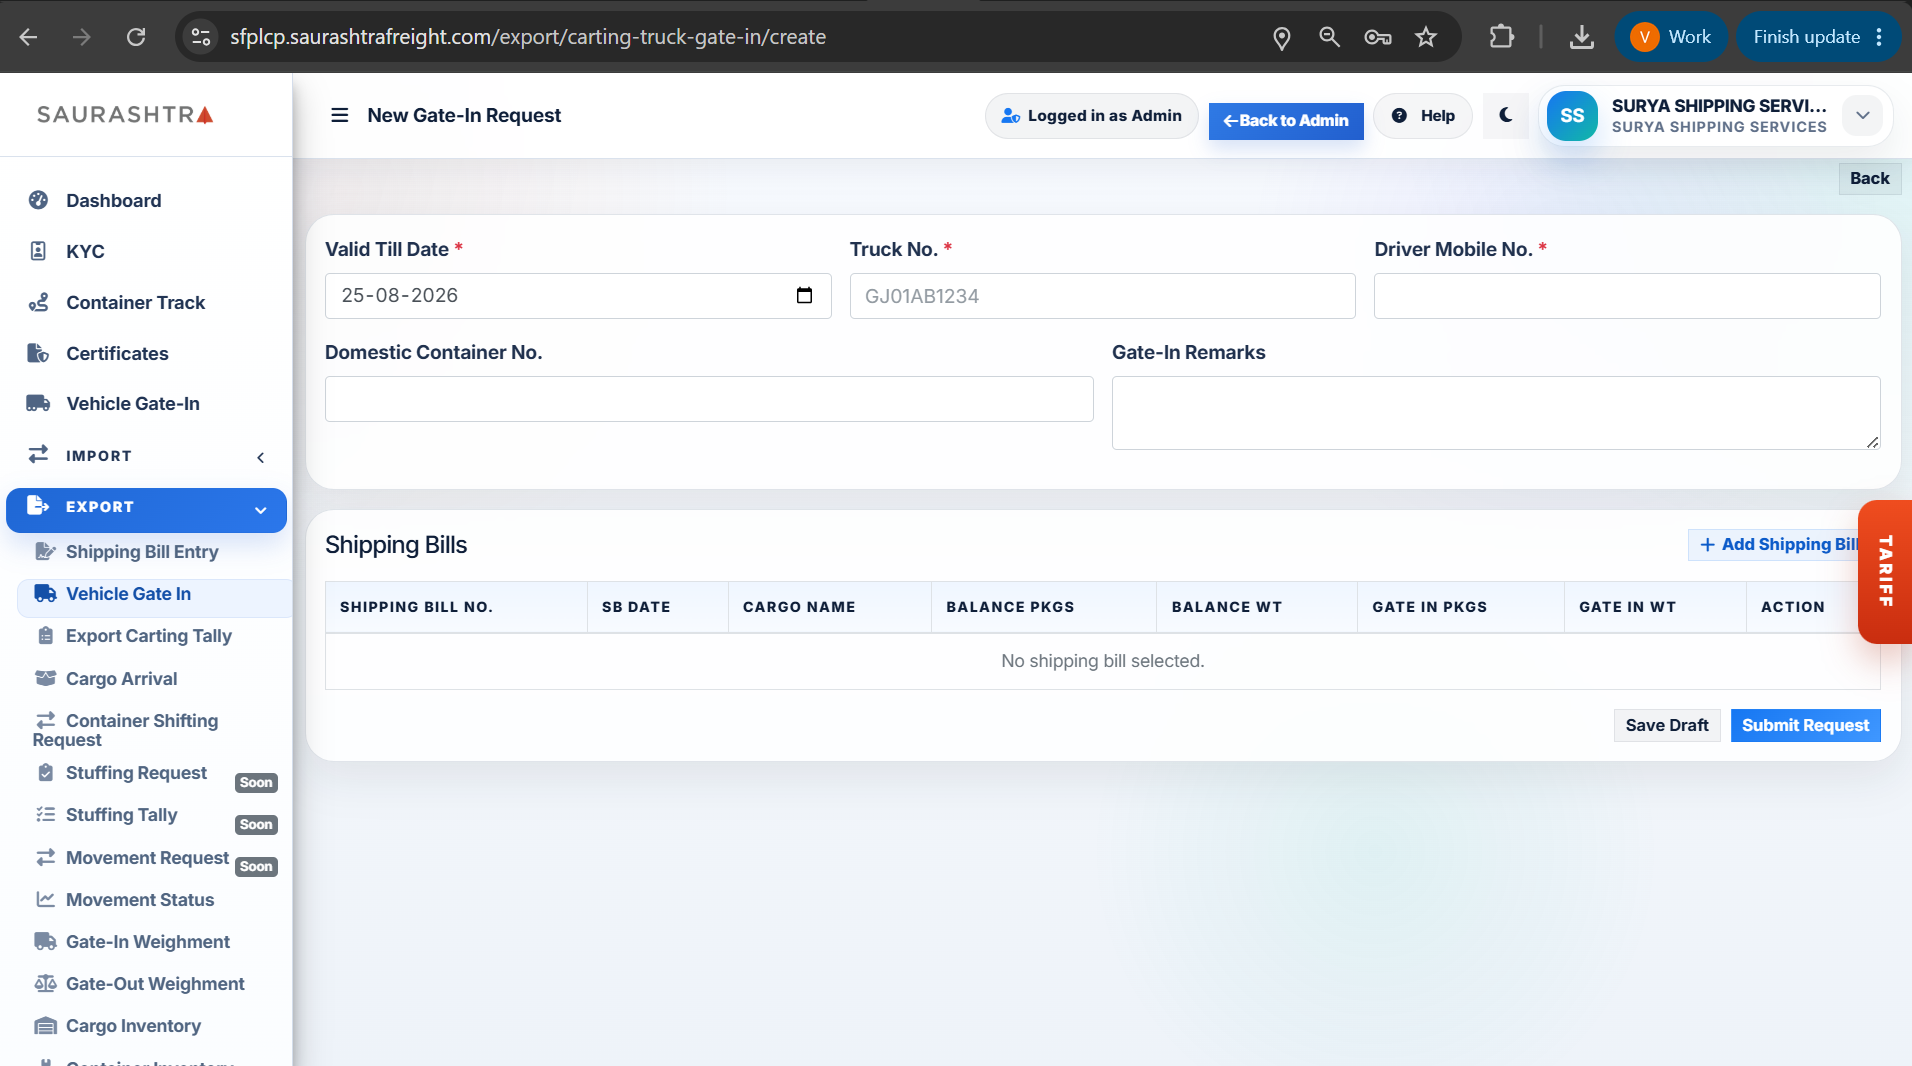
Screen 2: New Request Form
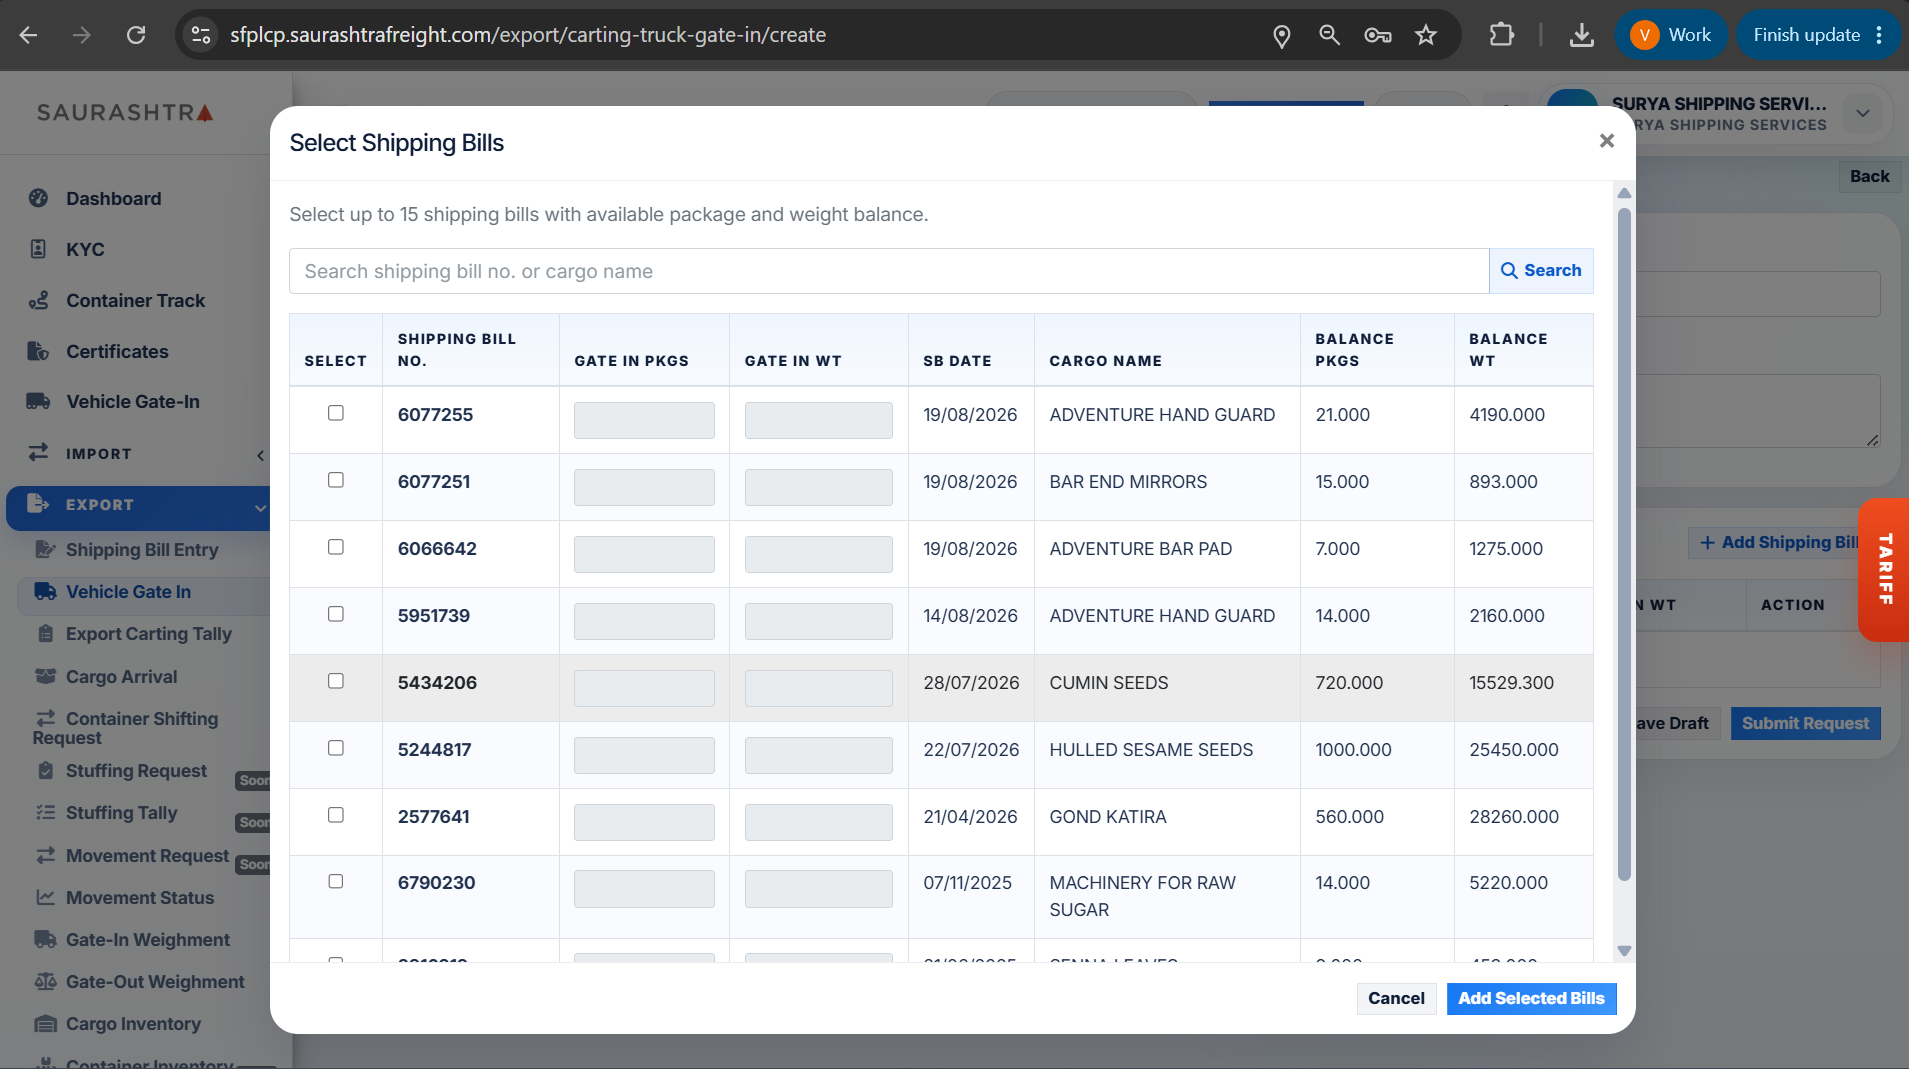
Screen 3: Select Shipping Bills Modal
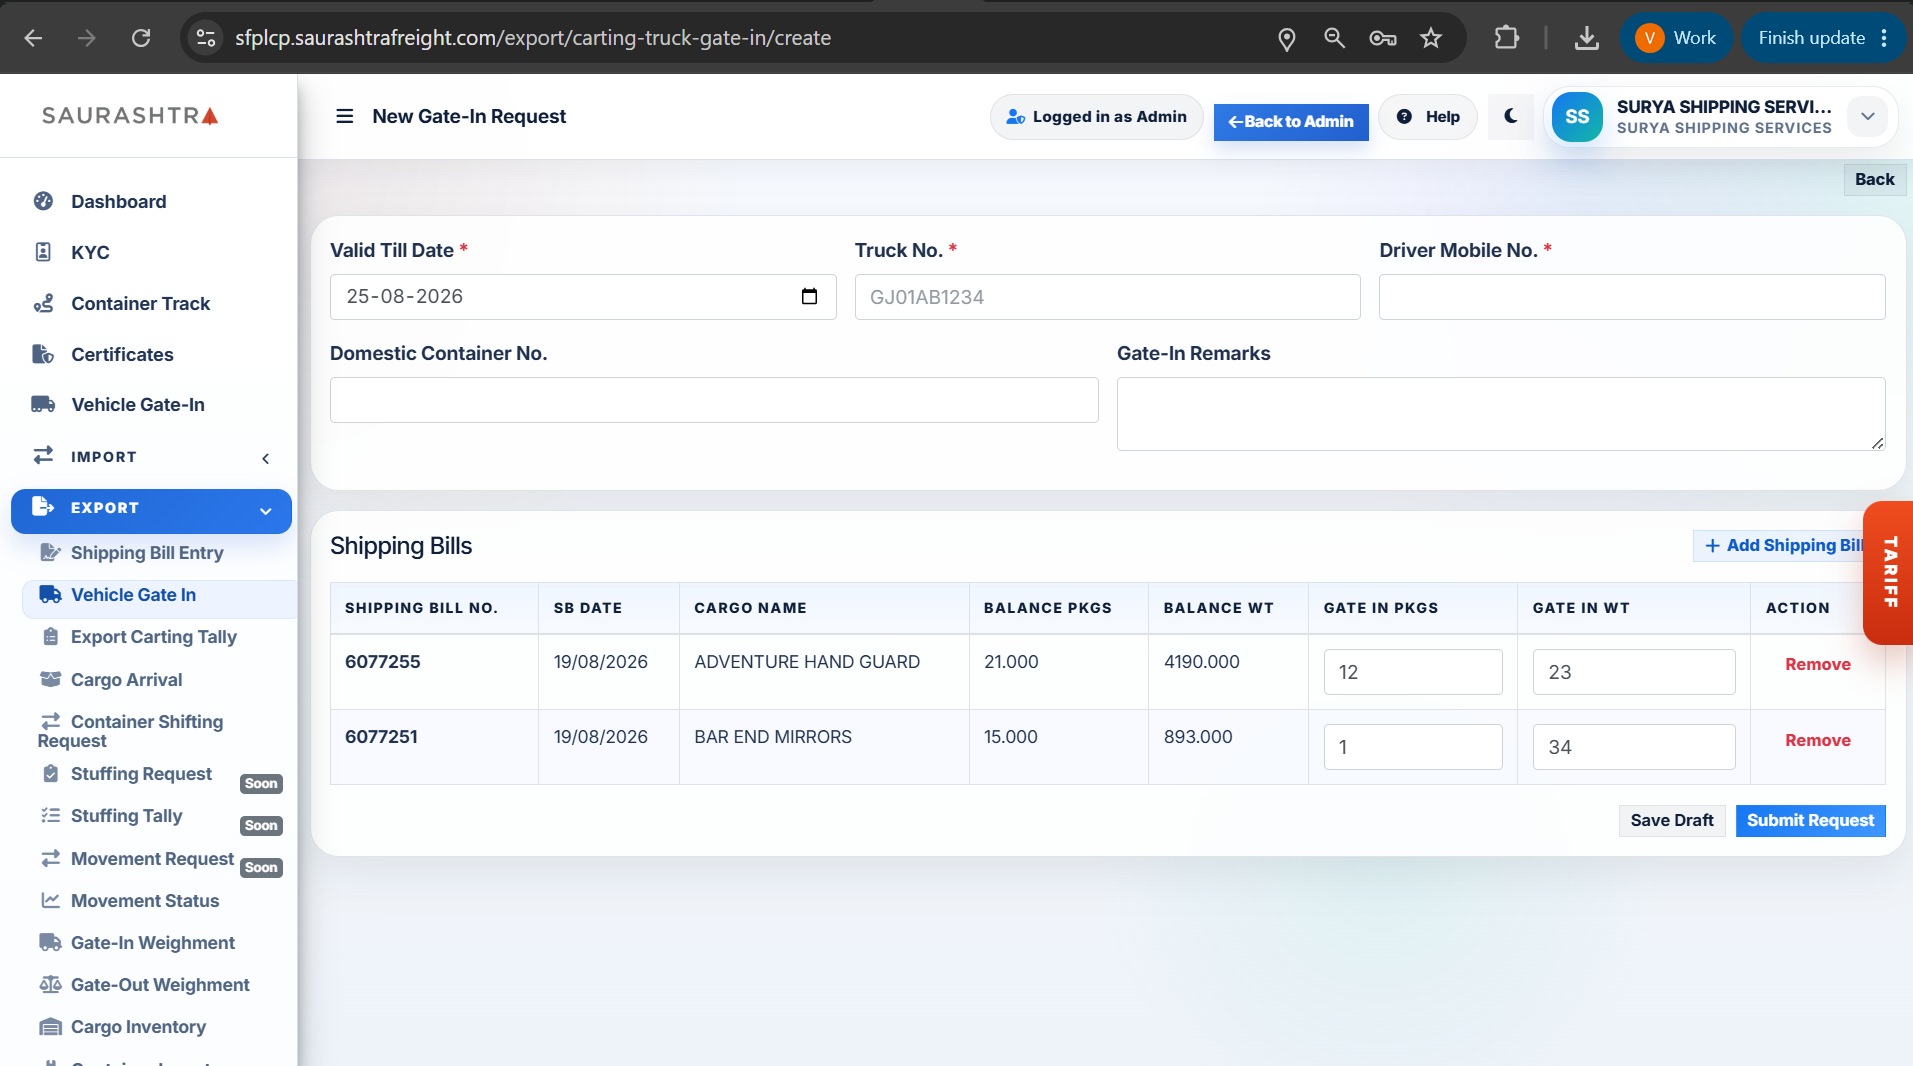
Screen 4: Allocated SB Quantities
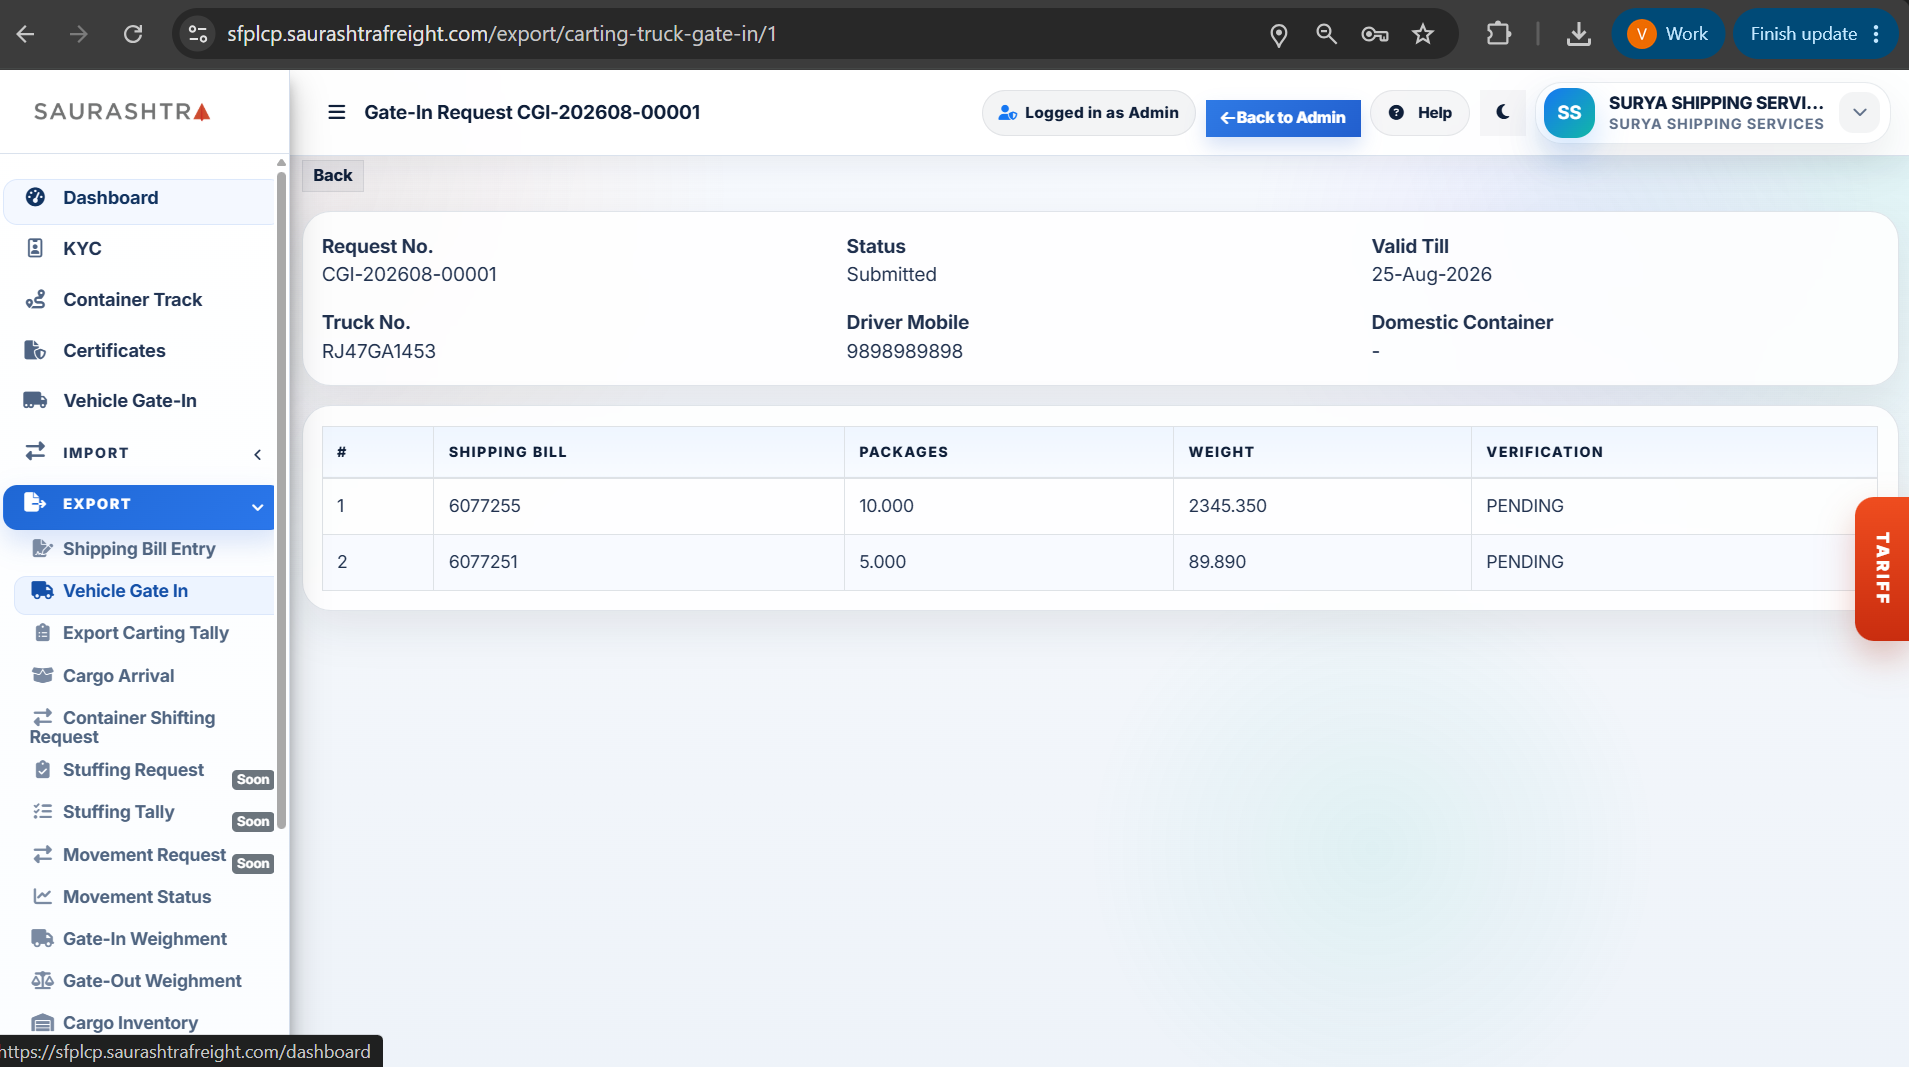
Screen 5: Request Details View
How to Submit an Export Carting Request
- Navigate to Carting Request — Expand EXPORT in the left sidebar menu and click Carting Request.
- Click + New Carting Request — Click the blue + New Carting Request button at the top right of the listing page.
- Provide Truck & Driver Details — Fill in the truck gate-in header details:
- Valid Till Date * — Select the expiration date and time for the truck's entry authorization.
- Truck No. * — Enter the vehicle registration number (e.g.,
GJ01AB1234orRJ47GA1453). - Driver Mobile No. * — Enter the 10-digit mobile number of the truck driver.
- Domestic Container No. — Specify container number if the cargo is arriving inside a domestic container (optional).
- Gate-In Remarks — Add any special unloading or handling remarks (optional).
- Add Shipping Bills — Click the + Add Shipping Bills button under the Shipping Bills section to open the selection modal:
- Search by Shipping Bill Number or Cargo Commodity Name.
- Select the checkbox next to each desired Shipping Bill (up to 15 bills allowed per truck).
- Click the blue Add Selected Bills button to insert them into your gate-in form.
- Specify Gate-In Packages & Weight — In the selected shipping bills table, enter the declared GATE IN PKGS and GATE IN WT for this truck (must not exceed available balance packages and weight). Click Remove if you need to detach a bill.
- Save Draft or Submit Request:
- Save Draft — Saves the form data without submitting, allowing you to edit later.
- Submit Request — Submits the request to the CFS operations system with Submitted status. Once approved, a Job Order (JO) No. and Gate Pass No. are issued.
- View Gate-In Requests — From the listing page, click the View button under the action column to view the full request details and live verification status.
Pre-registered export truck gate-in requests automatically associate shipping bills with incoming trucks, drastically reducing gate check-in time and weighbridge turnaround at Saurashtra CFS.
Export Carting Tally
View digital export carting tally records, filter tallies by operational status (Started, CartingDone, WeightDone), review truck gate pass & unloading details, inspect reel breakdowns, view attached photographic cargo proof, approve pending tally reports, and print official carting tally slips.
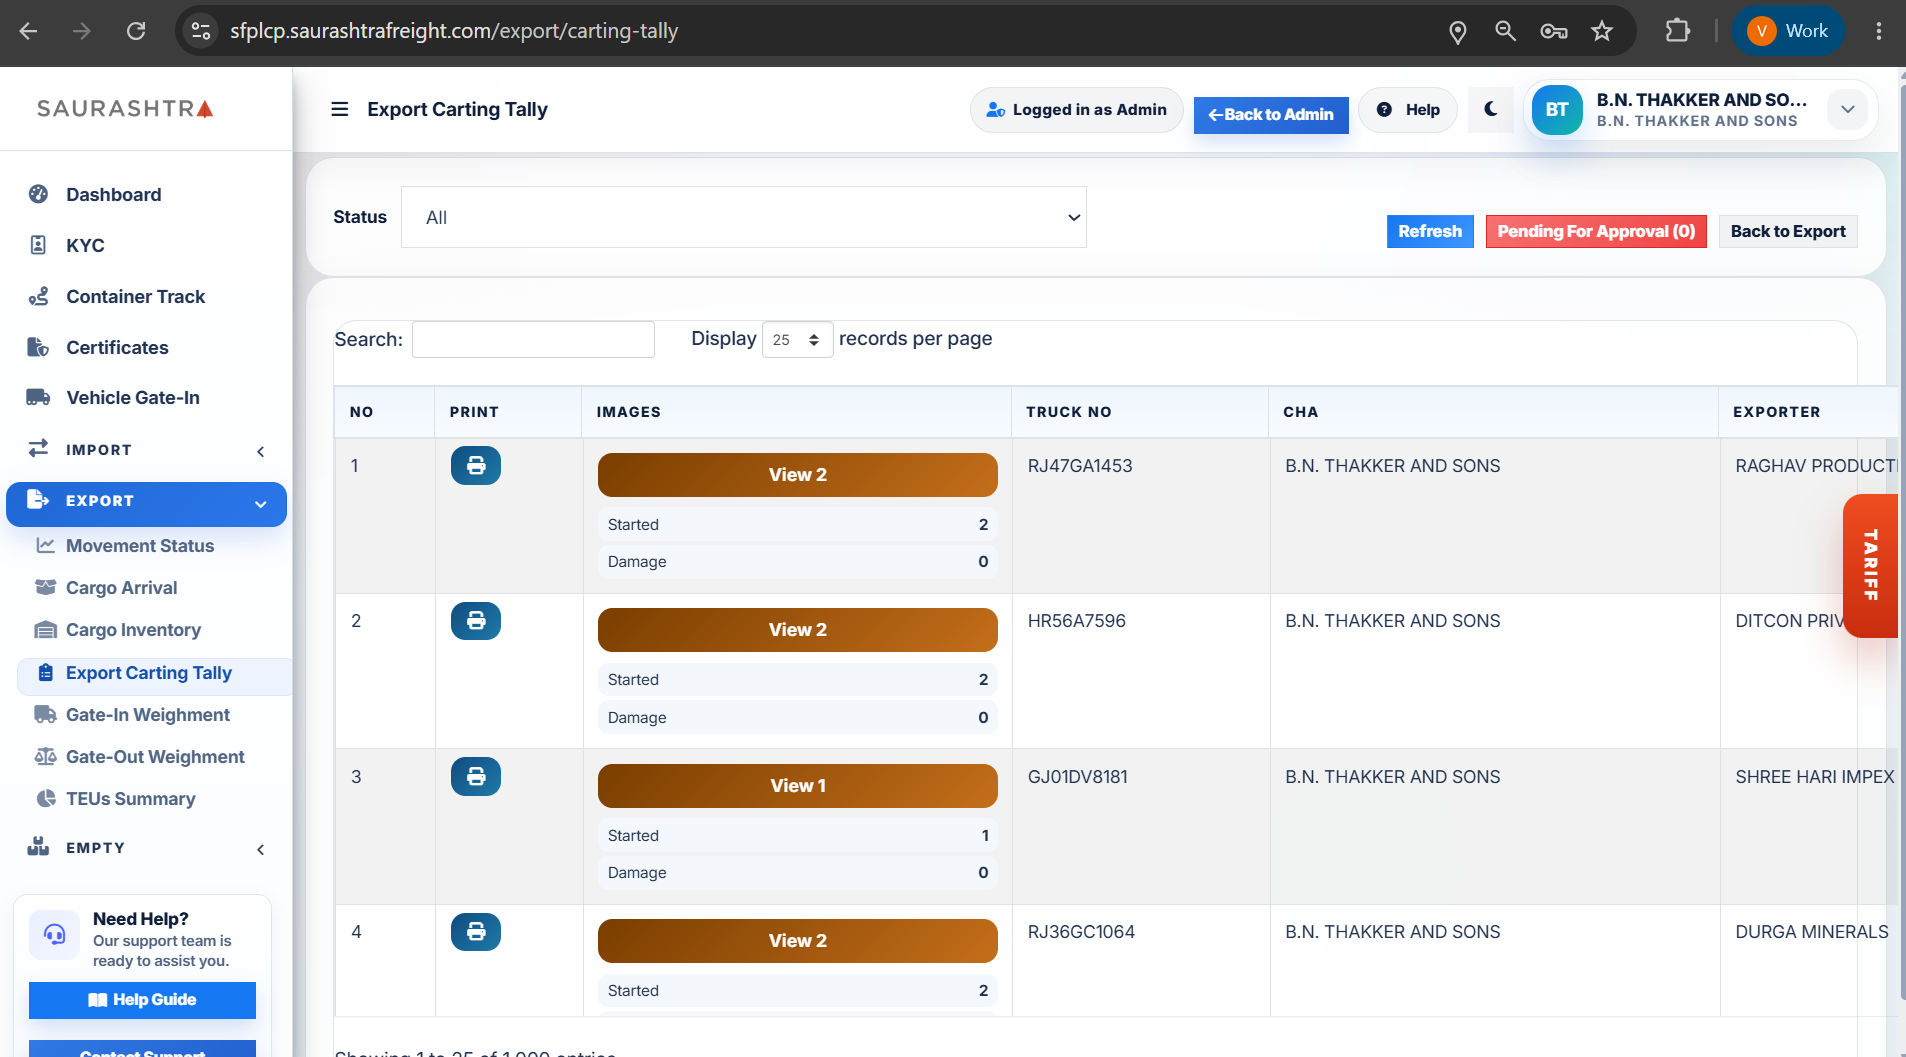
Screen 1: Carting Tally Index
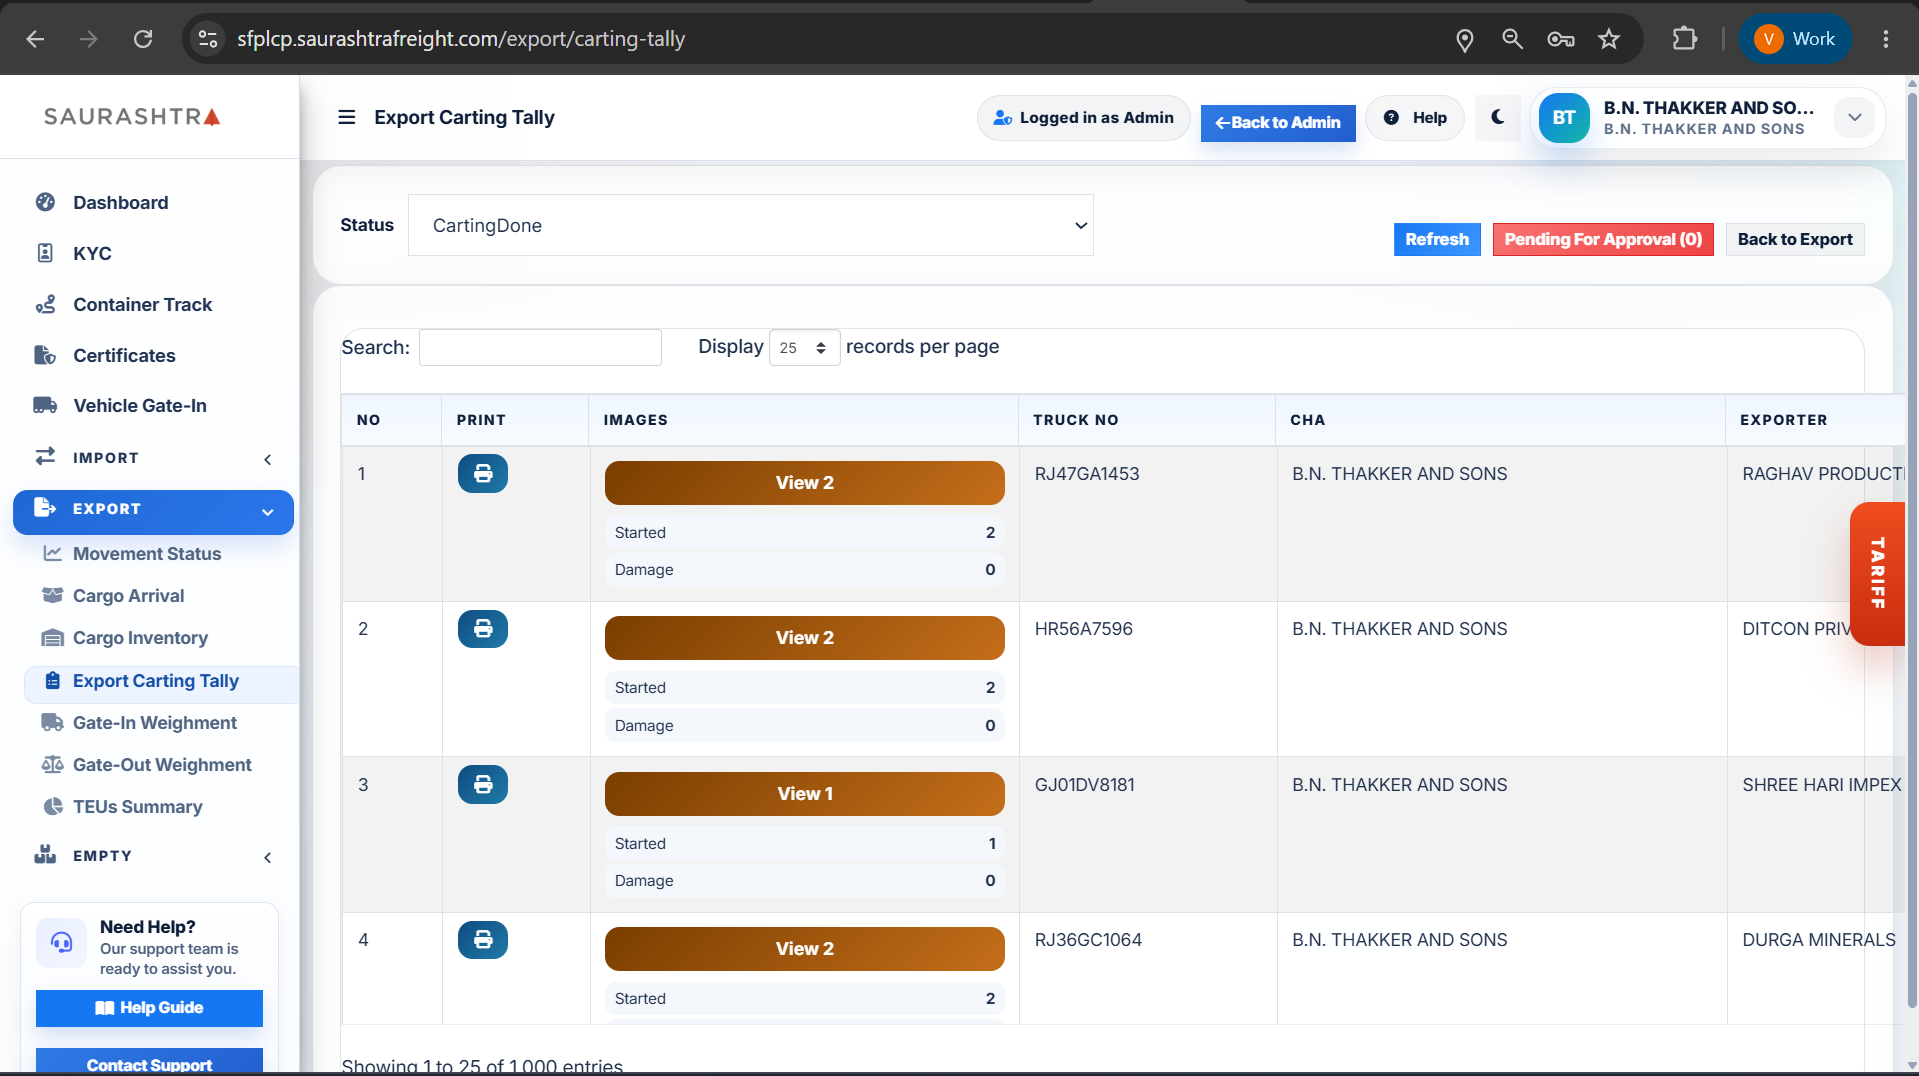
Screen 2: Search & Status Filter
How to Manage Export Carting Tallies
- Navigate to Export Carting Tally — Expand EXPORT in the left sidebar menu and click Export Carting Tally.
- Filter by Operational Status — Use the Status drop-down filter to filter tallies by stage:
- All — Display all recorded carting tallies.
- Started — Carting tallies currently in progress in the CFS warehouse.
- CartingDone — Unloading and carting tally completed.
- WeightDone — Weighbridge gross & tare weighment finalized.
- Search Tally Records — Type into the interactive table search input to filter tallies by Truck Number, SB Number, Exporter Name, or CHA Account.
- Inspect Photo Proof & Reel Details — Click the Images button to view attached cargo condition photographs, or click Total Reels to view the reel itemization modal.
- Approve & Print Tally Slip — Click Pending For Approval to review and approve carting tallies, or click the Print icon to print the official Carting Tally Slip PDF report.
Digital carting tallies provide end-to-end transparency with real-time package counts, attached cargo condition photos, and automated tally approval workflows prior to container stuffing.
Cargo Arrival
Monitor incoming export cargo arrivals at the CFS yard, track vehicle numbers, arrived package counts, commodity details, gross weight, and unloading status by Shipping Bill (SB) number.
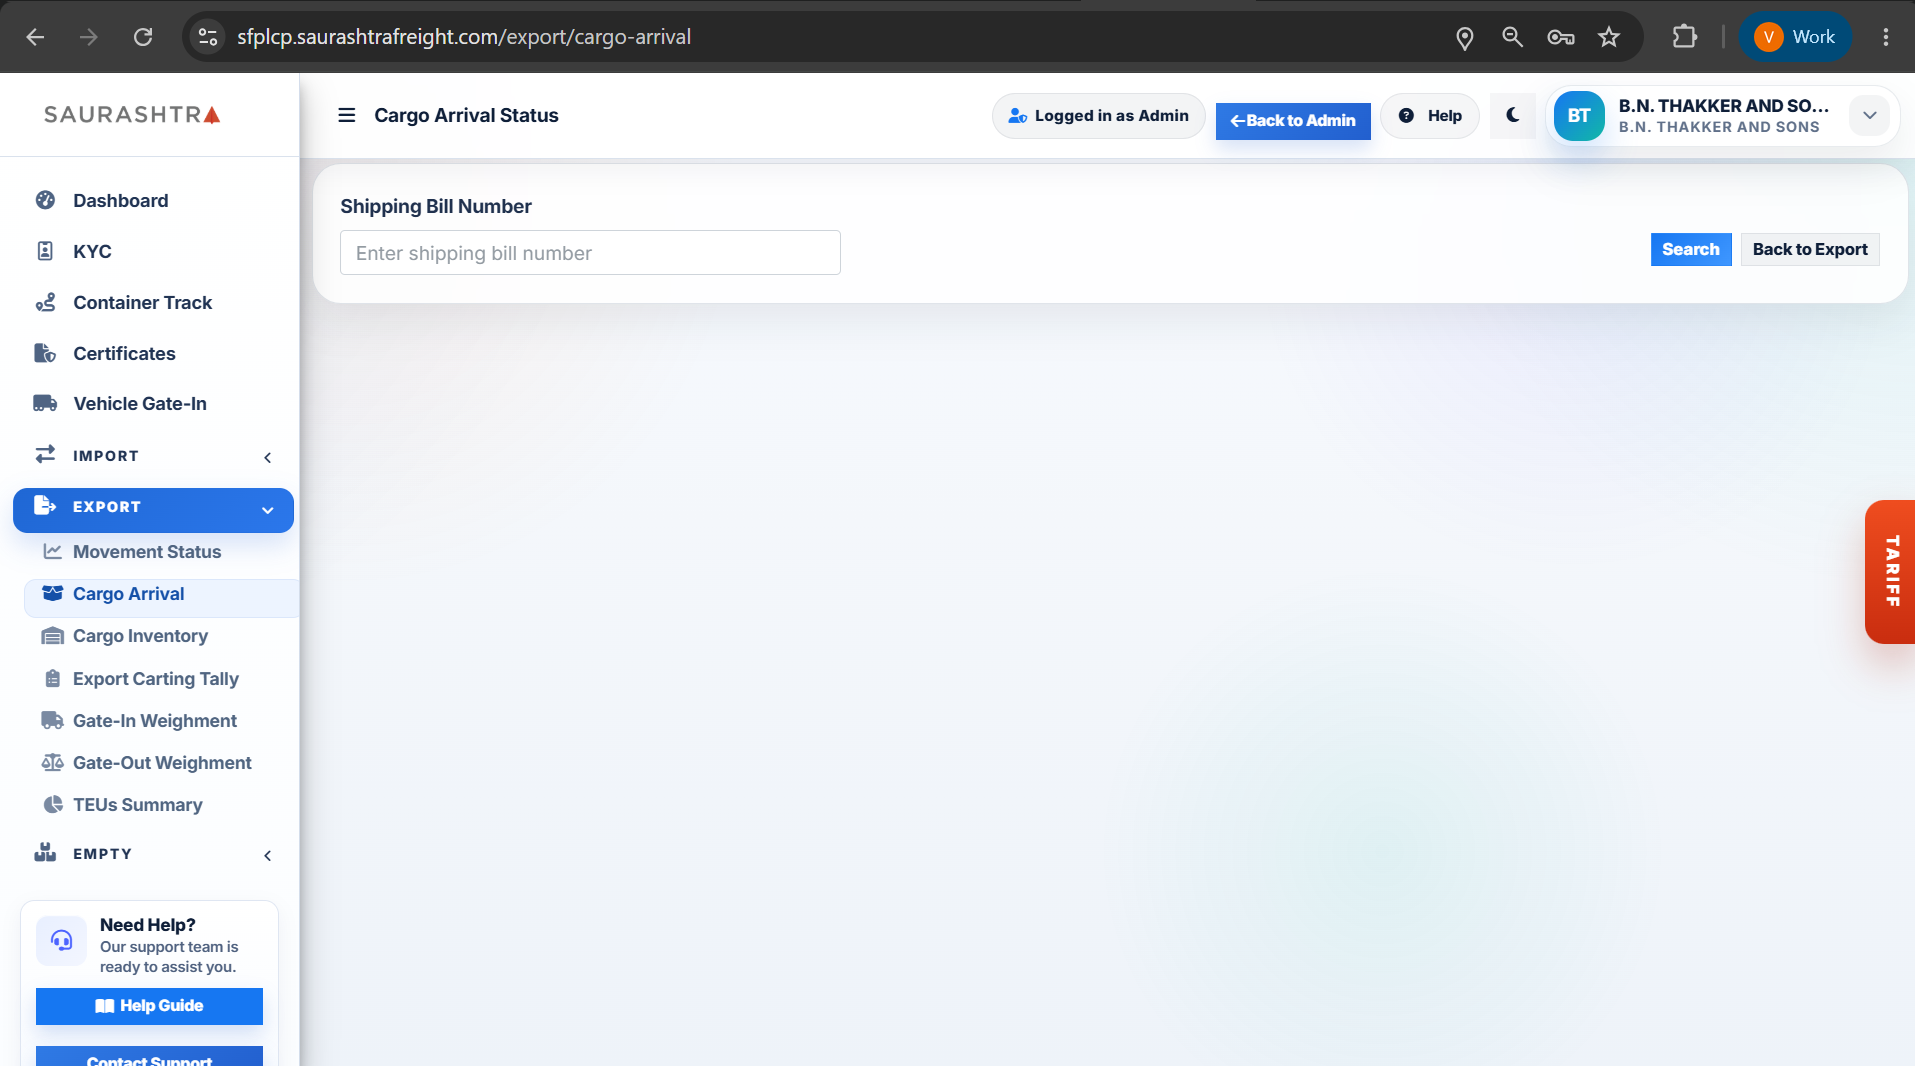
Screen 1: Search Form
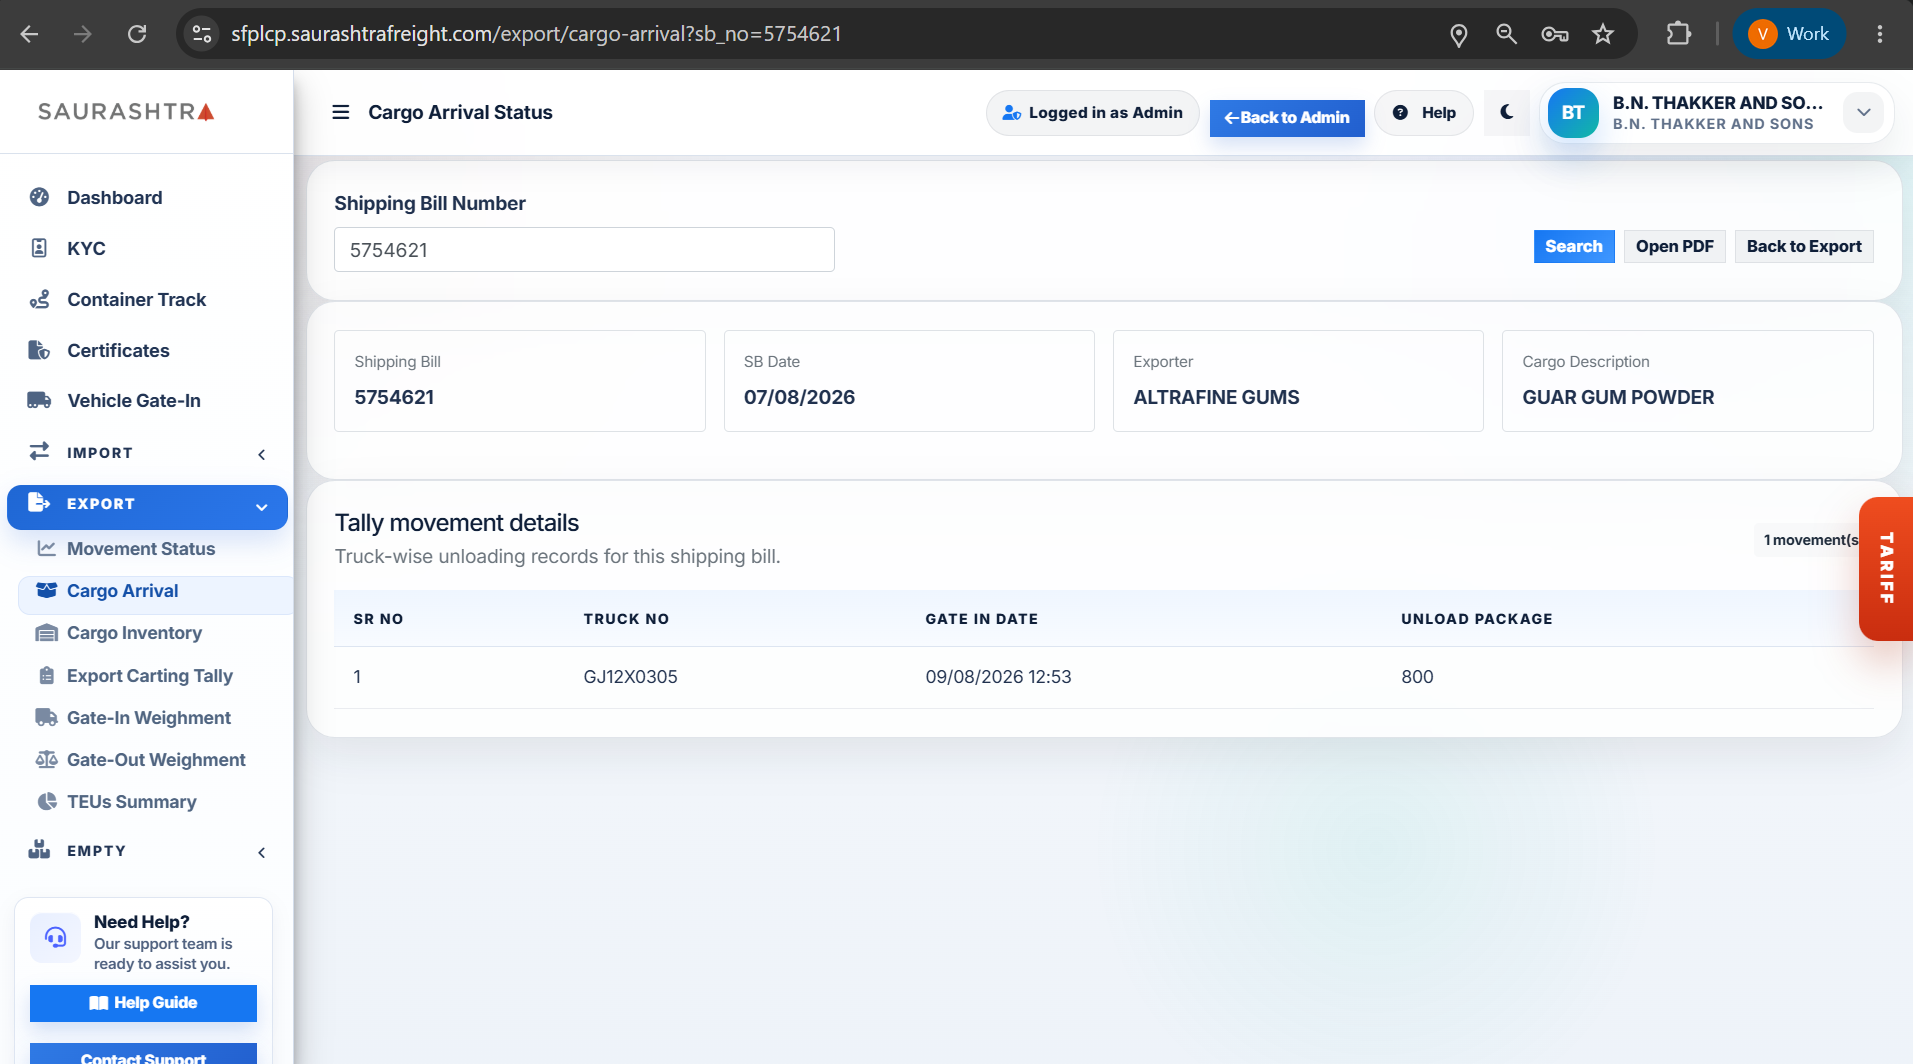
Screen 2: Search by SB Number
How to Track Export Cargo Arrival
- Navigate to Cargo Arrival — Expand EXPORT in the left sidebar menu and click Cargo Arrival.
- Enter Shipping Bill (SB) Number — Type the target Shipping Bill number (e.g.,
5754621) into the search field. - Execute Search — Click the blue Search button to query cargo arrival records.
- Review Cargo Arrival Details — Inspect key operational data including SB Number, Vehicle Number, Arrived Package Quantity, Commodity Description, Gross Weight (Kgs), and Unloading Status.
- Open PDF / Print Receipt — Click the Open PDF button next to Search to open and print the official Cargo Arrival Receipt PDF report in a new tab.
Real-time tracking of export cargo arrival helps exporters and CHAs verify vehicle gate-in and warehouse unloading prior to carting and container stuffing.
Container Shifting Request
Submit and track internal and third-party container shifting requests. Upload original DO PDF documents, auto-fetch container size, type, location, and line name from OPS for internal shifting, specify container details and transportation mode for third-party shifting, import container lists via Excel, and track request approvals.
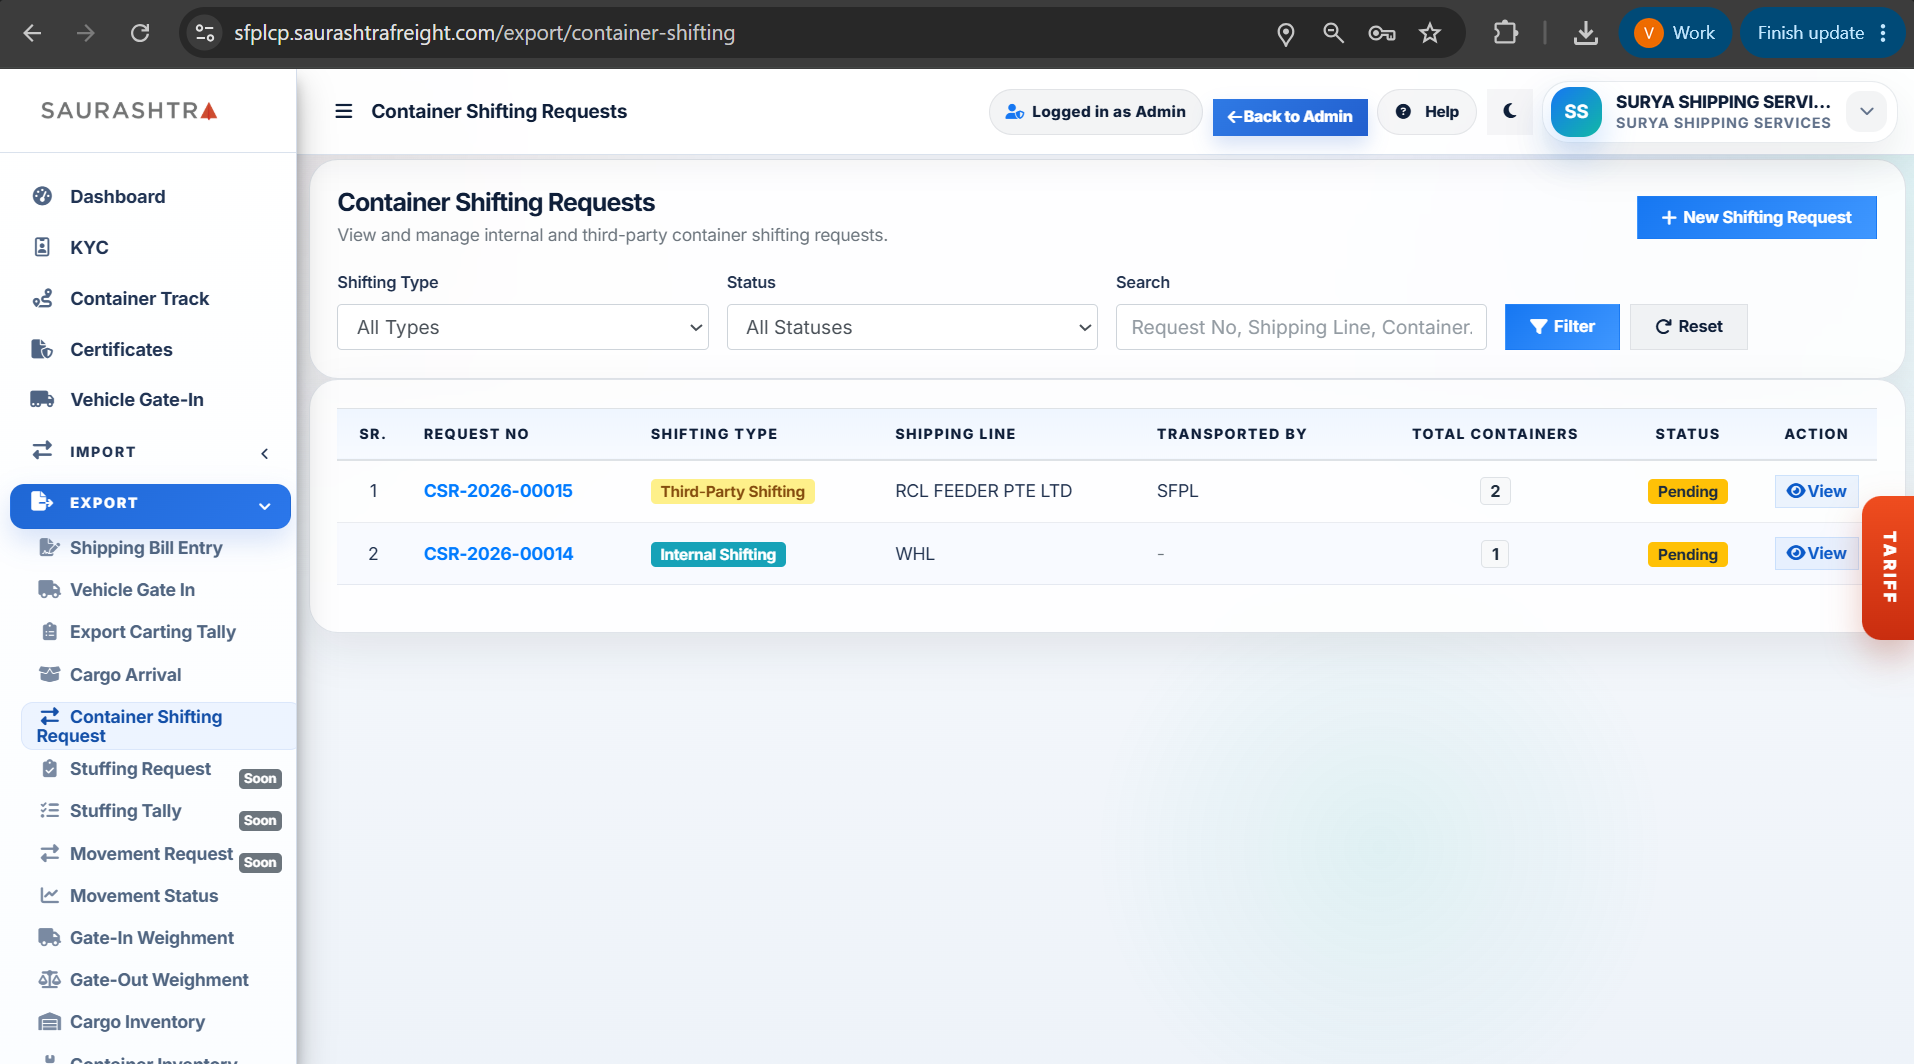
Screen 1: Requests Listing
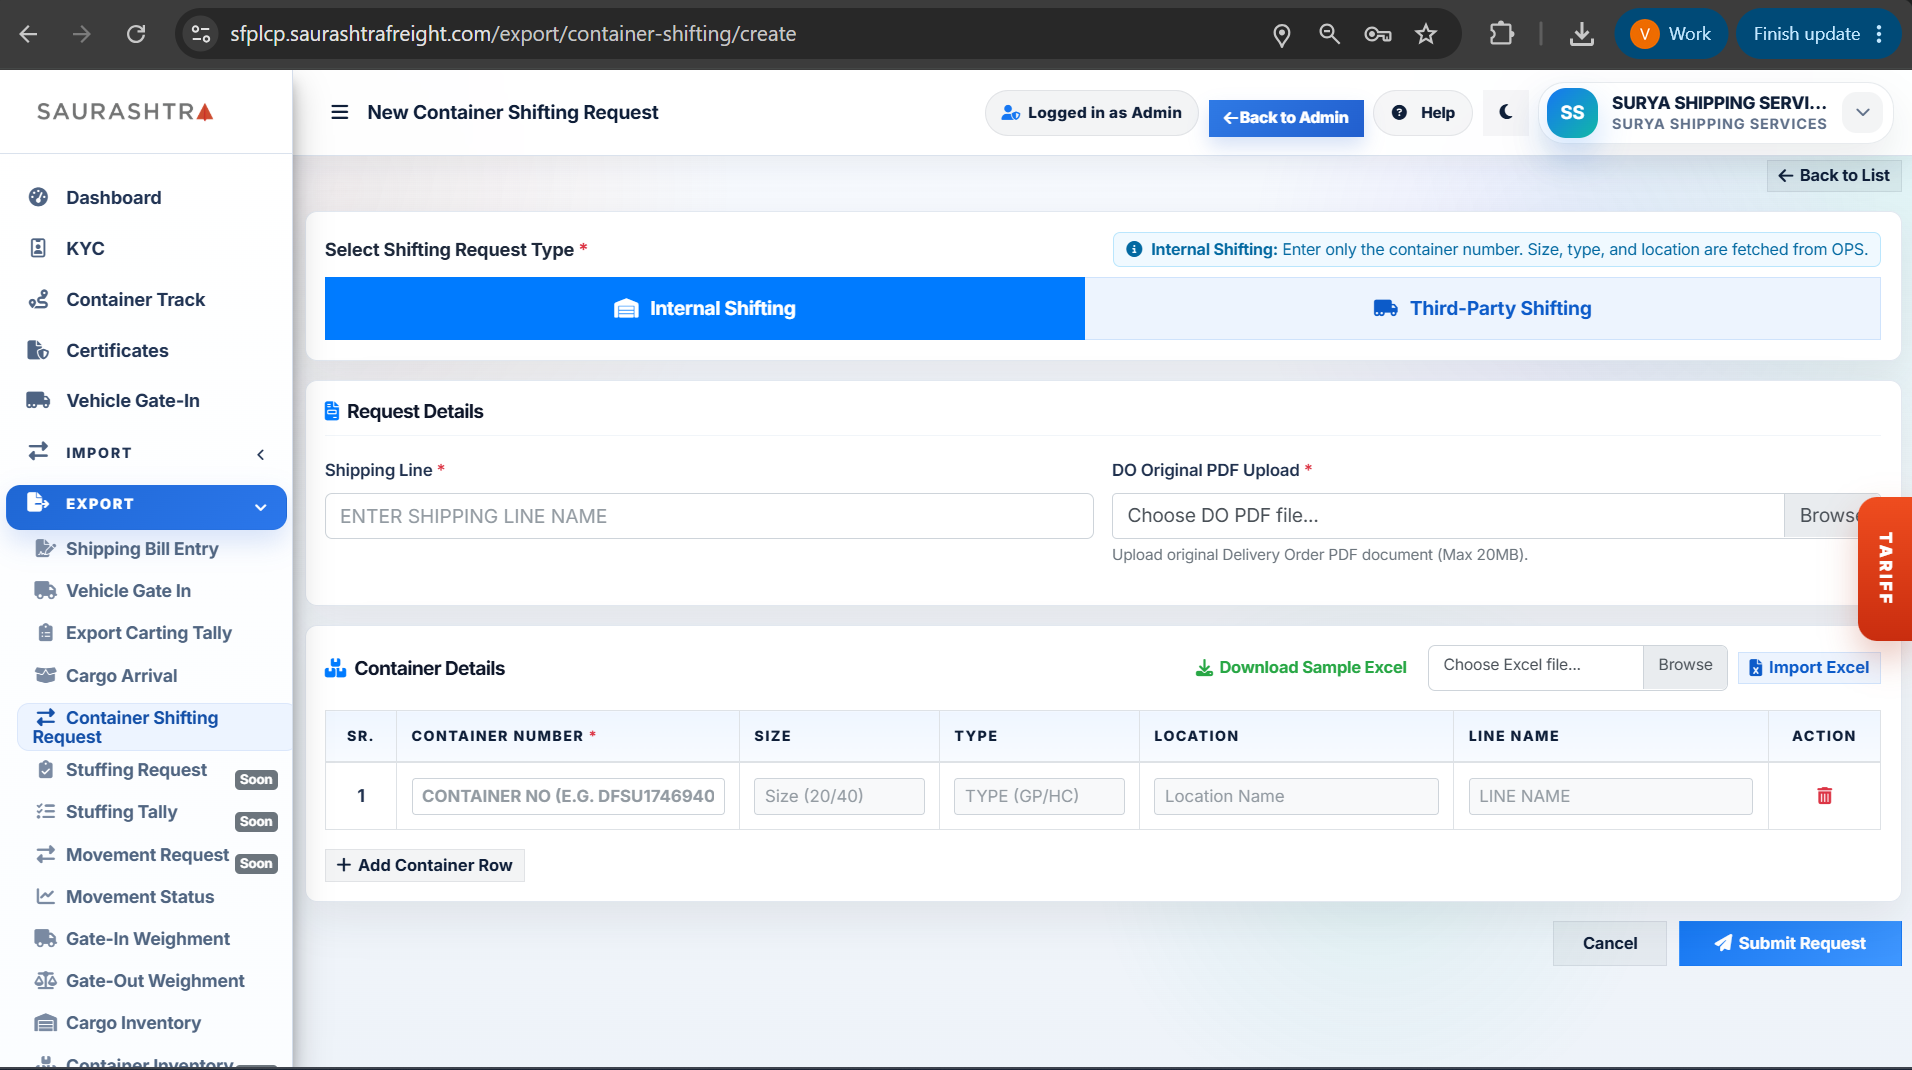
Screen 2: Internal Shifting Form
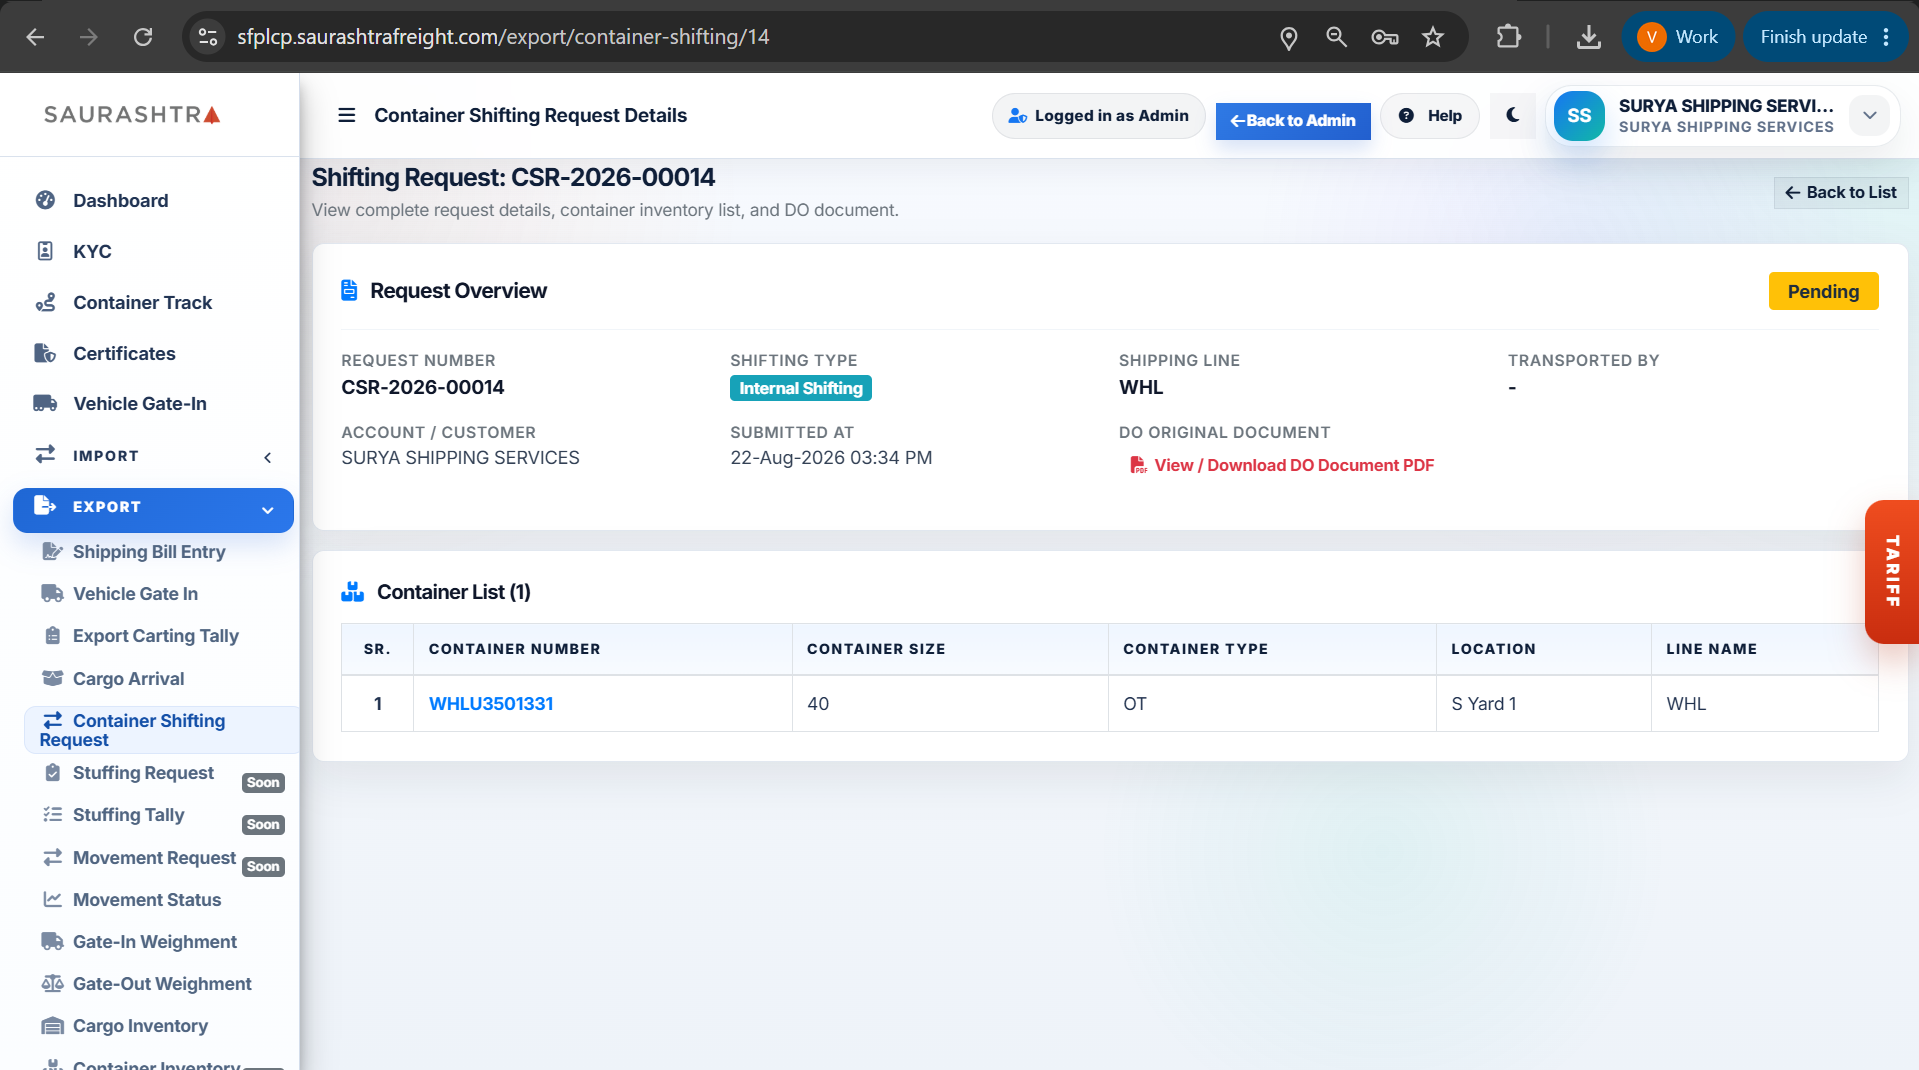
Screen 3: Internal Request View
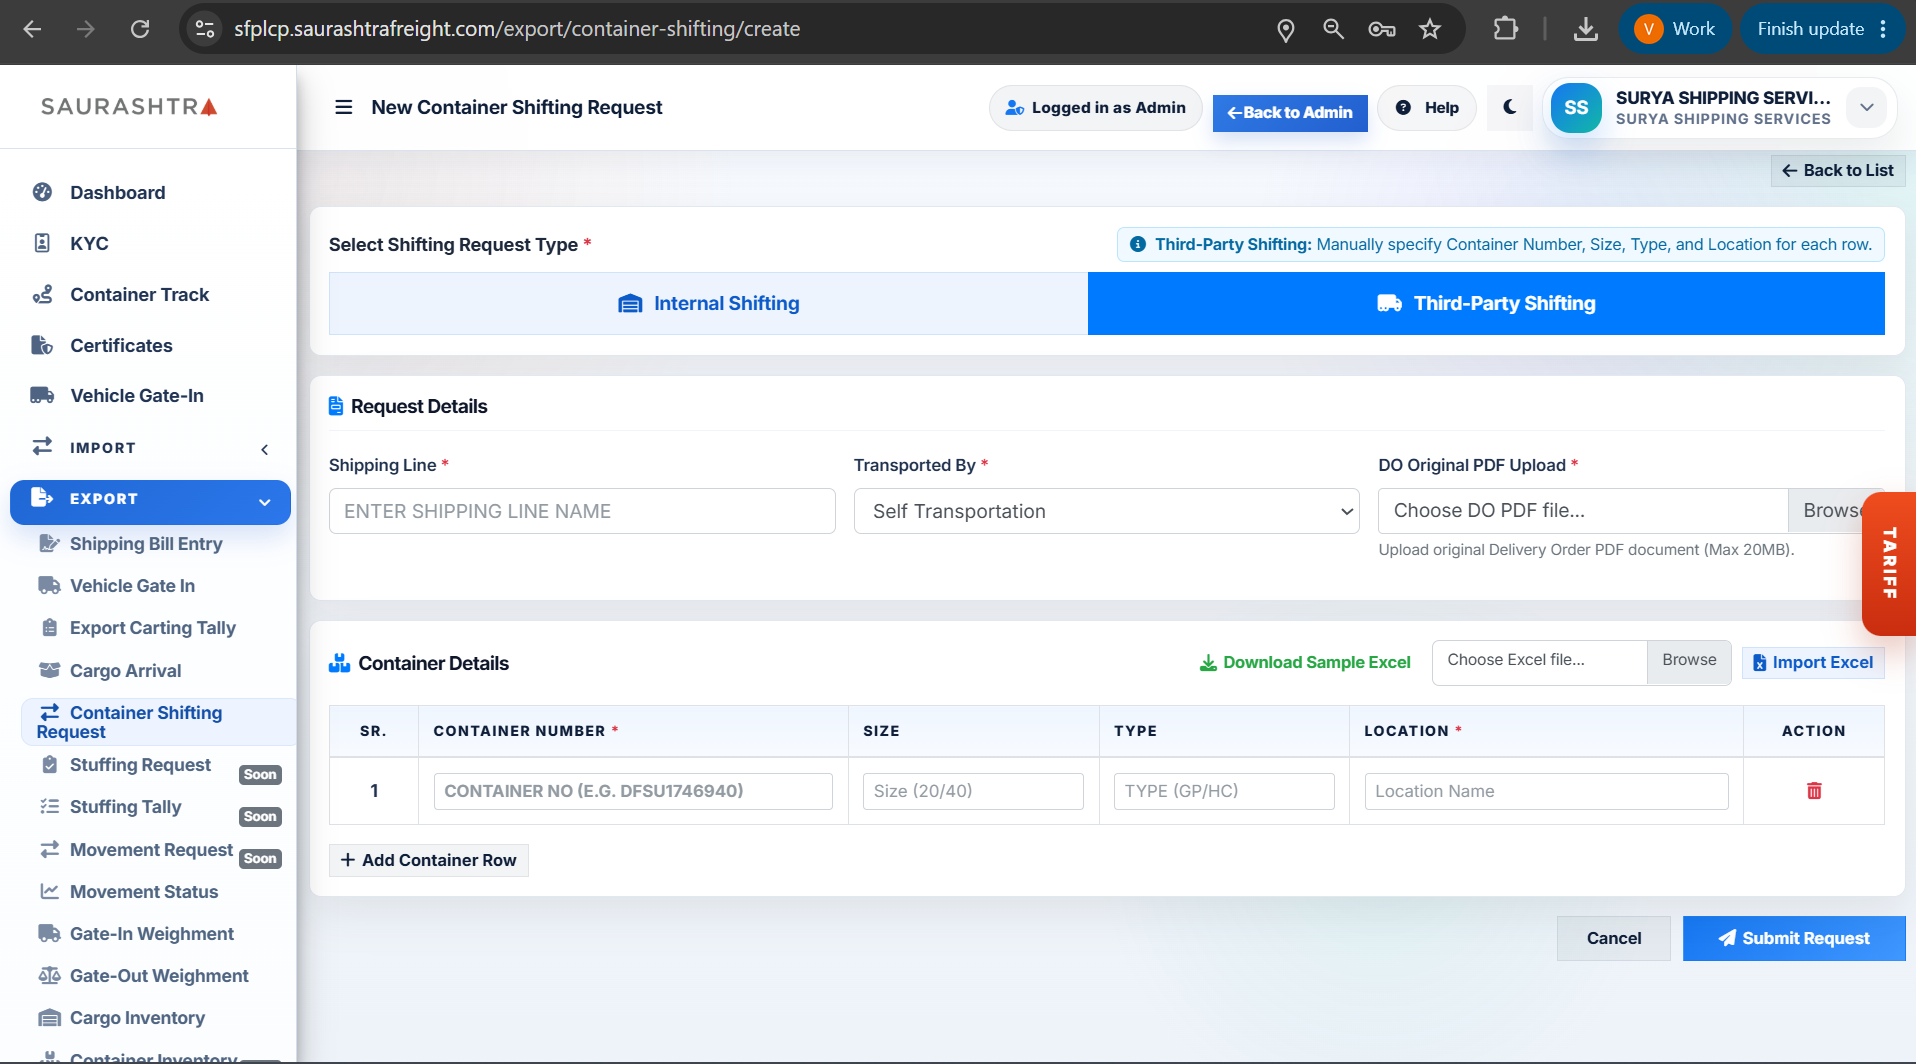
Screen 4: Third-Party Shifting Form
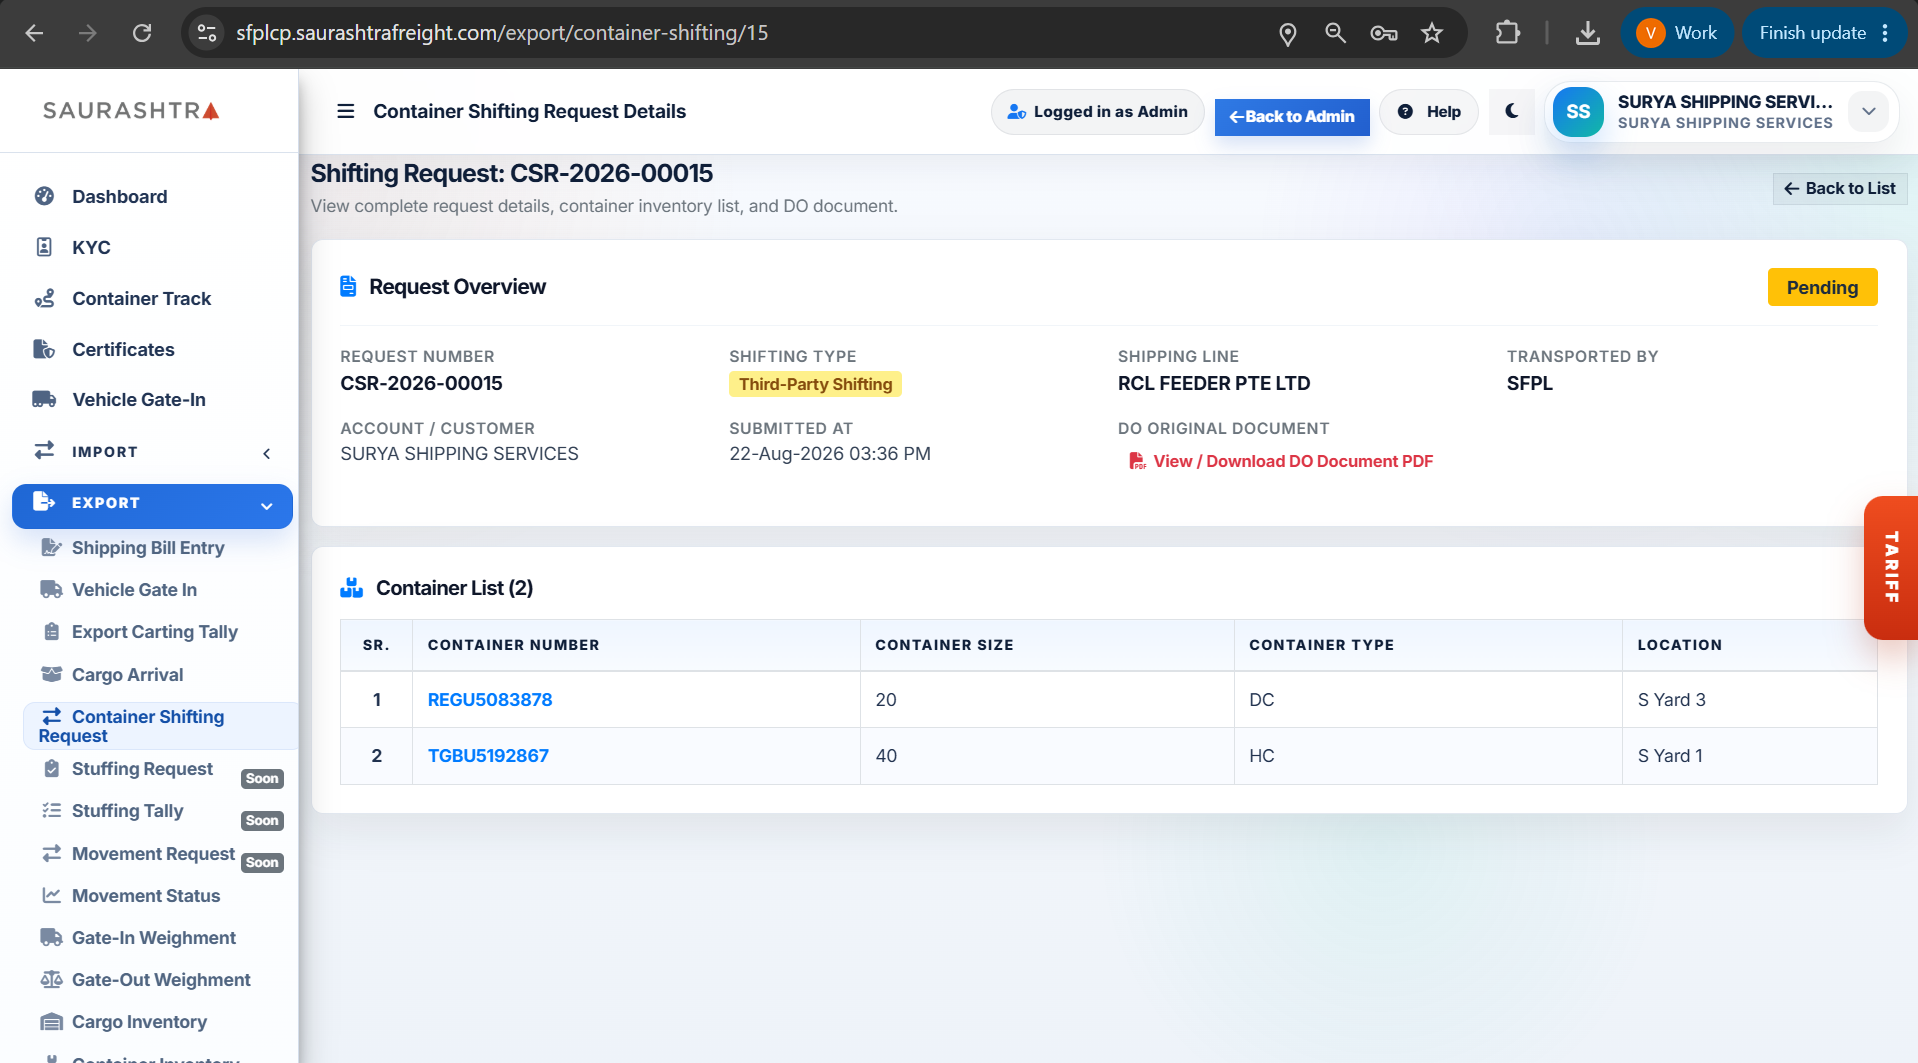
Screen 5: Third-Party Request View
How to Submit a Container Shifting Request
- Navigate to Container Shifting Request — Expand EXPORT in the left sidebar menu and click Container Shifting Request.
- Click + New Shifting Request — Click the blue + New Shifting Request button at the top right of the listing page.
- Select Shifting Request Type — Click to choose between the two shifting modes:
-
Internal Shifting:
- Enter the Shipping Line name.
- In the container rows, enter only the Container Number (e.g.,
DFSU1746940orWHLU3501331). - The container's Size, Type, Location, and Line Name are automatically fetched from OPS and locked as read-only.
- All added containers must belong to the selected main shipping line in the CFS yard inventory.
- Click Download Sample Excel to download the 1-column template (Container Number).
-
Third-Party Shifting:
- Enter the Shipping Line name.
- Select Transported By from the dropdown: Self Transportation or SFPL.
- In the container rows, manually enter all details: Container Number, Size (e.g.,
20or40), Type (e.g.,GP,HC,DC,OT), and Location (e.g.,S Yard 1,S Yard 3). - Click Download Sample Excel to download the 4-column template (Container Number, Size, Type, Location).
-
Internal Shifting:
- Upload DO Original PDF — Click Browse under DO Original PDF Upload * to attach the original Delivery Order PDF document (Max 20MB). The attached DO is also automatically sent with email notifications.
- Add Containers / Import Excel:
- Manual Entry — Click the + Add Container Row button to add more container rows, or click the red Trash icon to delete a row.
- Excel Import — Click Choose Excel file... → Browse to select your file, then click the blue Import Excel button to populate container rows in bulk.
- Submit Request — Click the blue Submit Request button (or Cancel to discard). The shifting request is created with Pending status, and automated email notifications with the DO PDF attachment are dispatched to the operations and logistics teams.
- Track and View Requests — Filter requests on the listing page by Shifting Type, Status, or search keywords using the Filter and Reset buttons. Click the View button on any row to open the complete details overview and click View / Download DO Document PDF to view the uploaded DO.
For Internal Shifting, OPS integration automatically validates container inventory in the yard and auto-fills container specs. For Third-Party Shifting, manual entry gives full flexibility for containers arriving or departing via external transport.
Stuffing Request Coming Soon
The Stuffing Request sub-module enables exporters and CHAs to request container stuffing directly through the portal. Link available empty containers to cleared Shipping Bills, specify cargo package allocation, request special handling instructions, and schedule stuffing shifts with CFS terminal operations.
Coming Soon: This feature is actively under development and will be available in an upcoming release of the Customer Portal.
Stuffing Tally Coming Soon
View real-time verified stuffing tally reports upon completion of container loading. Inspect stuffed package quantities, container seal numbers (Customs & Line seals), surveyor sign-offs, stuffing timestamps, and download official container stuffing tally sheets.
Coming Soon: This feature is actively under development and will be available in an upcoming release of the Customer Portal.
Movement Request Coming Soon
Initiate export container movement orders from Saurashtra CFS to port terminals, rail sidings, or designated buffer yards. Submit Form-13 requests, assign transport carriers, and track movement dispatch authorizations.
Coming Soon: This feature is actively under development and will be available in an upcoming release of the Customer Portal.
Movement Status
Track export container movement milestones, shipping bill details, container size & type, gate-in timestamps, carting status, and port dispatch details by Shipping Bill (SB) number or Container number.
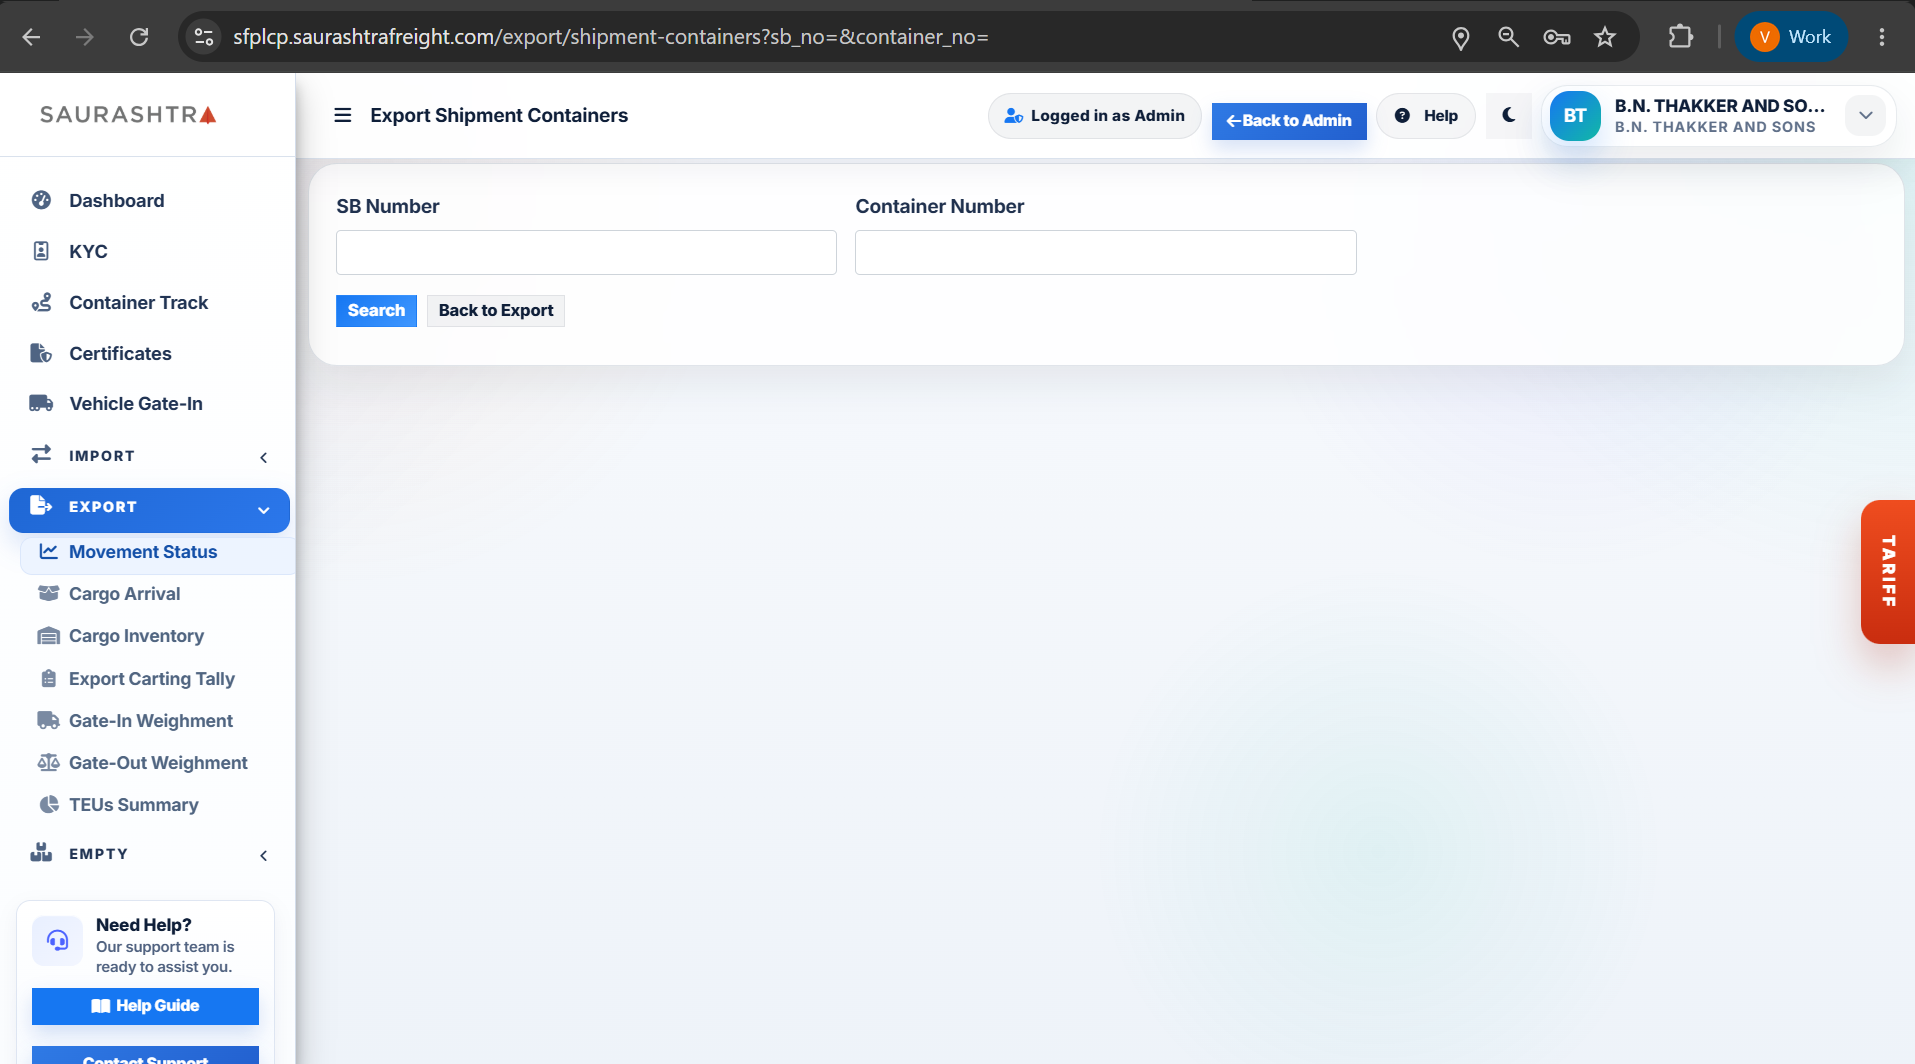
Screen 1: Search Form
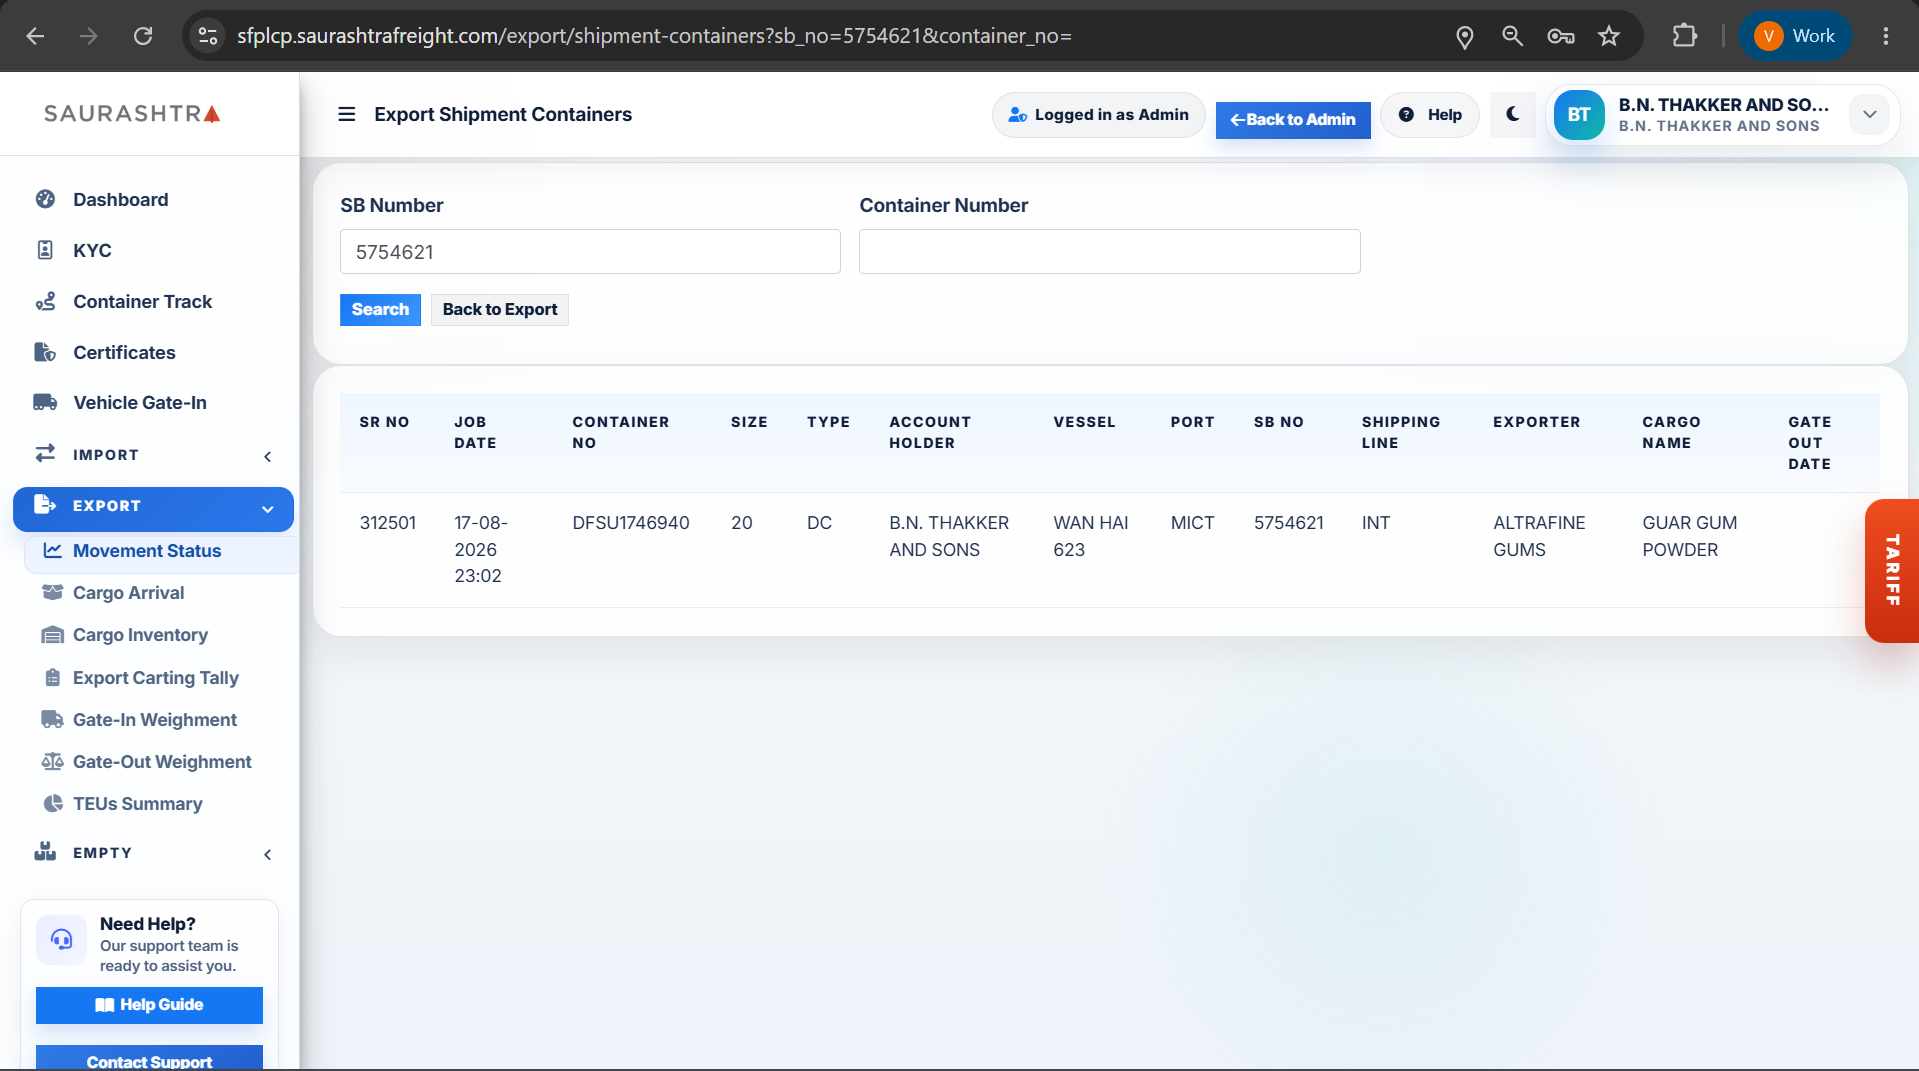
Screen 2: Search by SB Number
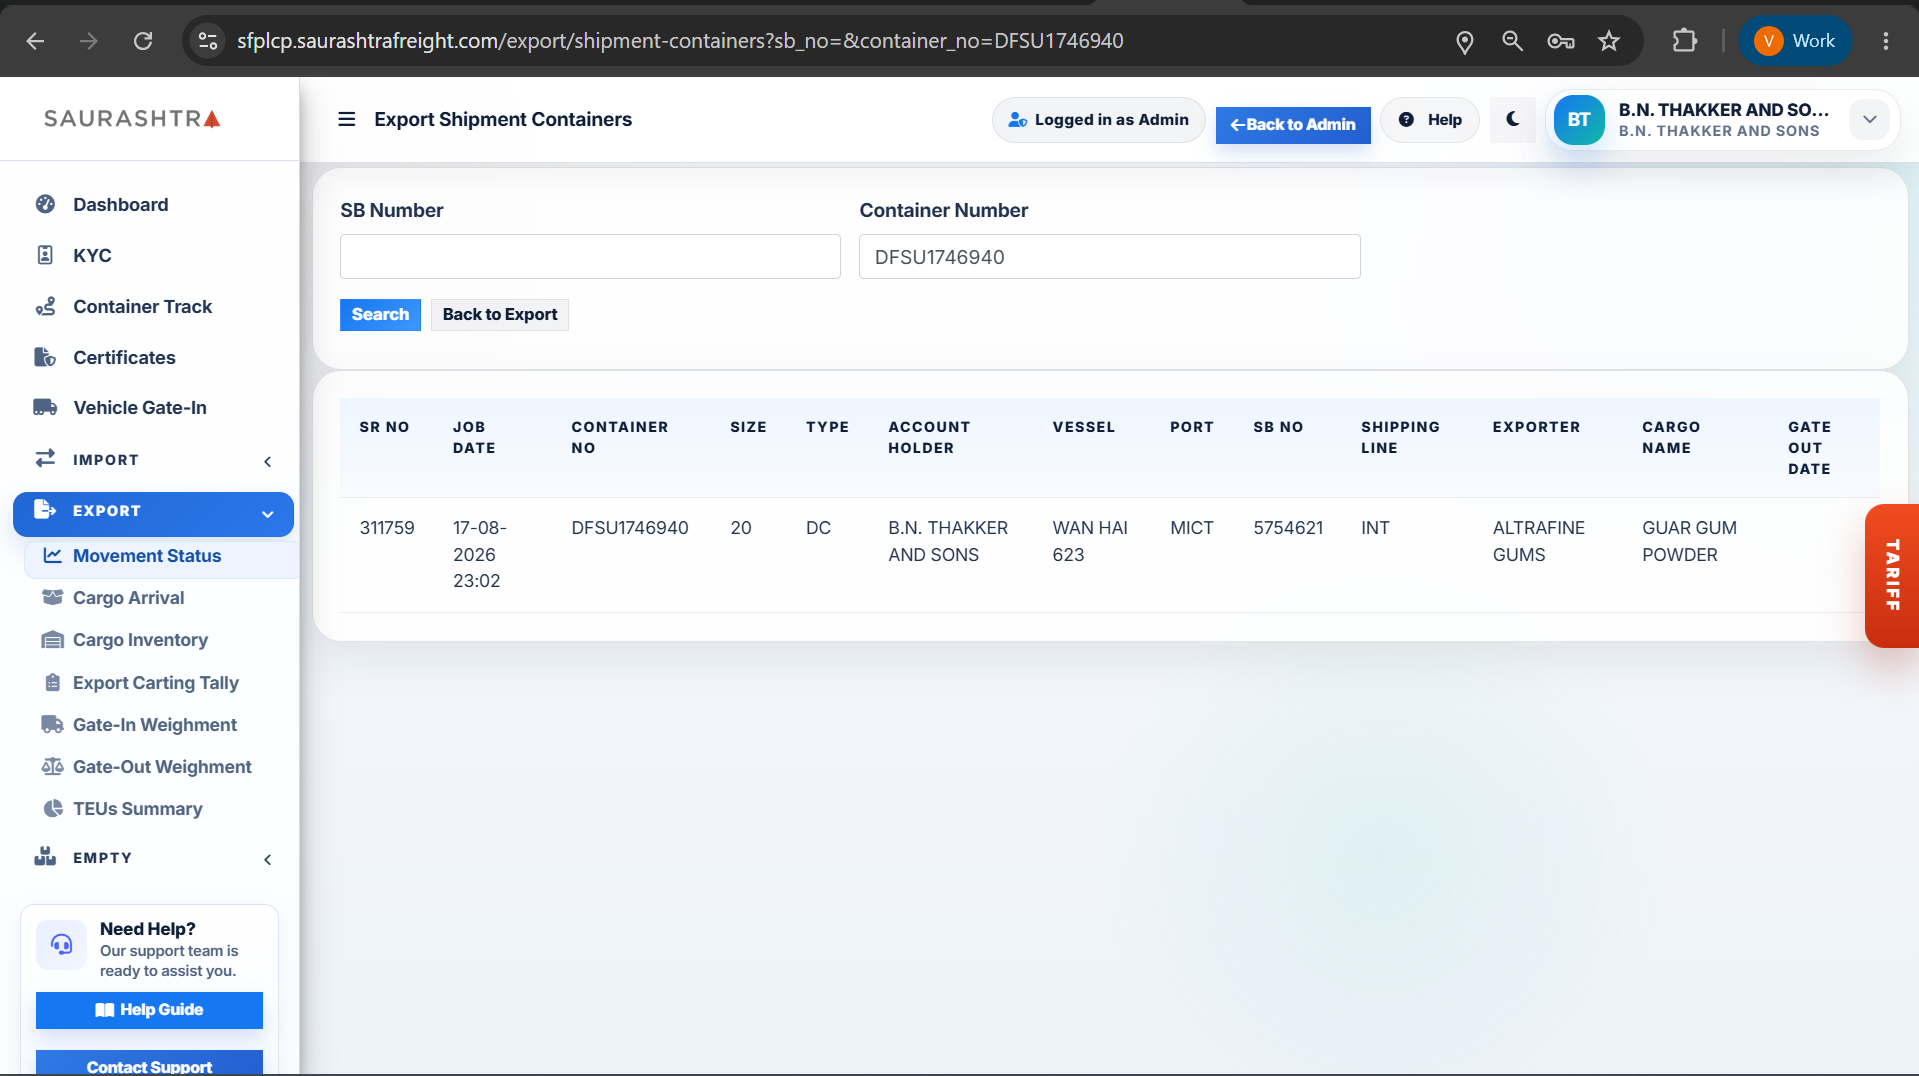
Screen 3: Search by Container No
How to Check Export Movement Status
- Navigate to Movement Status — Expand EXPORT in the left sidebar menu and click Movement Status.
- Choose Search Criteria — Enter search details into either input field:
- SB Number Field — Enter the Shipping Bill number (e.g.,
5754621) to view all export containers registered under that shipping bill. - Container Number Field — Enter a specific container number to track individual container movement status directly.
- SB Number Field — Enter the Shipping Bill number (e.g.,
- Execute Search — Click the blue Search button to fetch live movement records. Use Refresh to reset inputs.
- Review Shipment Container Details — View comprehensive export tracking metrics including SB Number, Container Number, Size / Type, Gate-In Date & Time, Stuffing / Tally Status, Seal Numbers, and Port Movement Status.
- Export / Print PDF — Click the Print PDF button to generate and download a printable container movement report.
Export movement statuses update in real time as cargo is gated in, weighed, stuffed, sealed, and dispatched from the CFS to the port terminal.
Gate-In Weighment
Track and manage export vehicle gate-in weighment records. Filter weighment logs by Truck Number, Shipping Bill (SB) Number, or Date Range, view weighbridge gross weight, vehicle tare weight, and net cargo weight, and download official PDF weighment receipts.
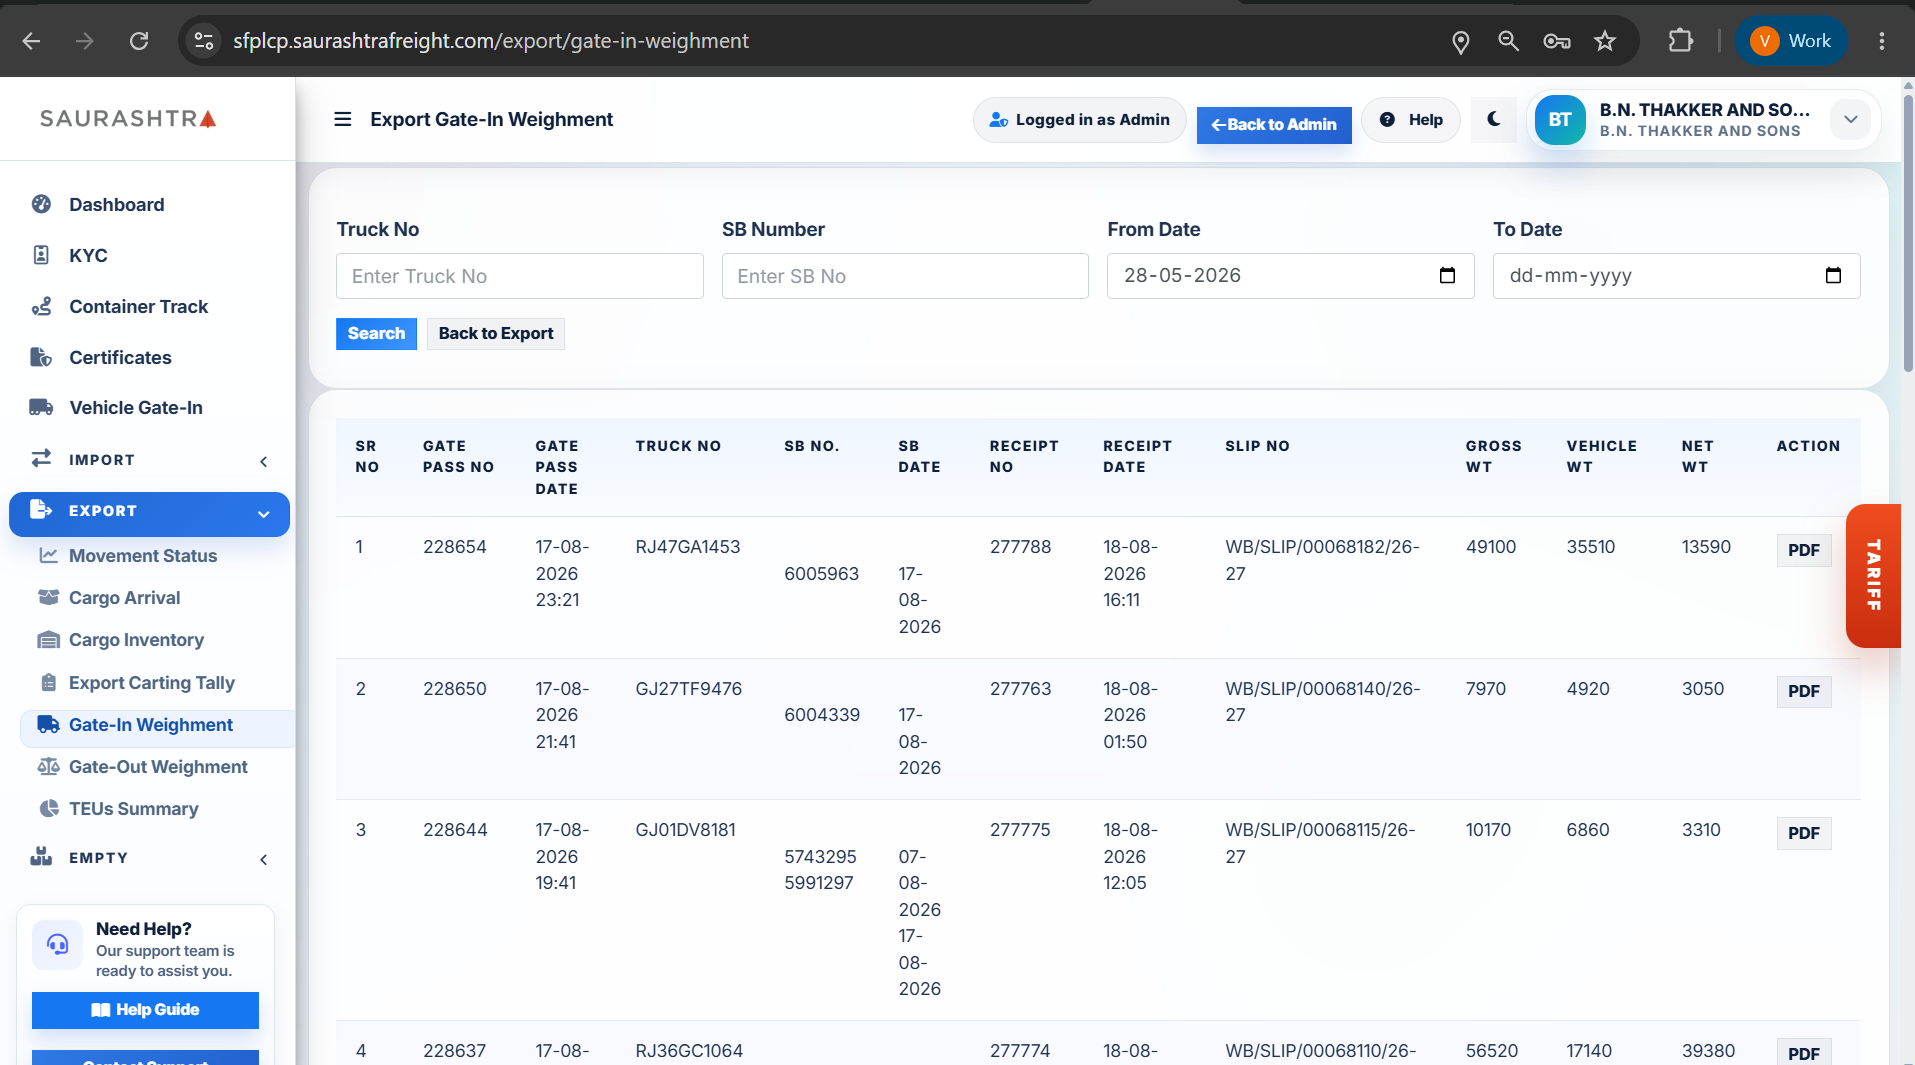
Screen 1: Search Form
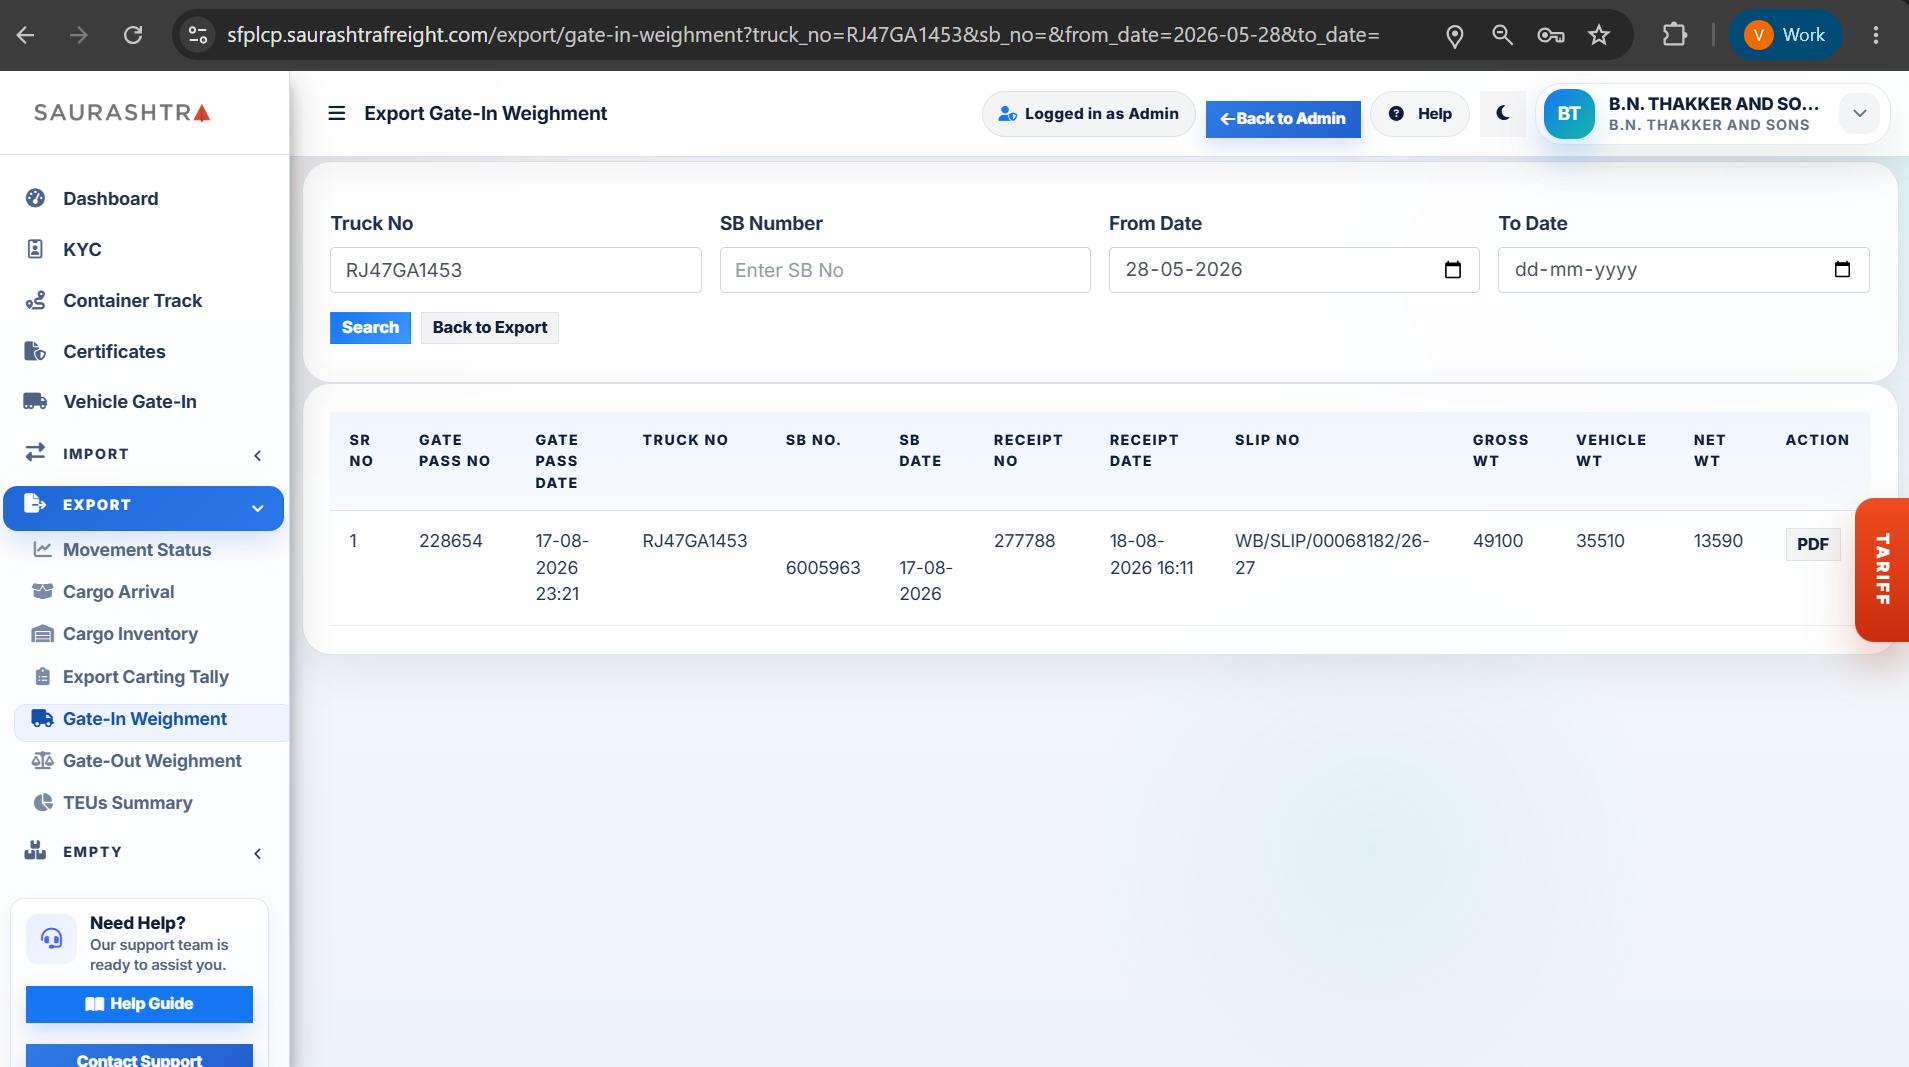
Screen 2: Weighment Records Table
How to View & Print Export Gate-In Weighment Slips
- Navigate to Gate-In Weighment — Expand EXPORT in the left sidebar menu and click Gate-In Weighment.
- Choose Search Criteria — Enter filter parameters into any of the search fields:
- Truck No Field — Enter the export cargo vehicle registration number.
- SB Number Field — Enter the Shipping Bill reference number.
- Date Range (From Date / To Date) — Specify the date interval for gate-in weighment records.
- Execute Search — Click the blue Search button to retrieve matching weighment logs.
- Review Weighment Details — Inspect key weighbridge metrics including Gate Pass No & Date, Truck No, SB No, Receipt No & Slip No, Gross Weight, Vehicle Weight (Tare Wt), and Net Weight.
- Open PDF / Print Receipt — Click the PDF button under the Action column to open and print the official Gate-In Weighment Receipt PDF report in a new tab.
Automated weighbridge integration ensures accurate net cargo weight calculations by deducting vehicle tare weight from gross weight upon CFS gate-in.
Gate-Out Weighment
Track and manage export container gate-out weighment records prior to port dispatch. Search weighment logs by Shipping Bill (SB) number or Container number to inspect gross weight, vehicle tare weight, container tare weight, net cargo weight, weighment date, and print official weighment receipt PDFs.
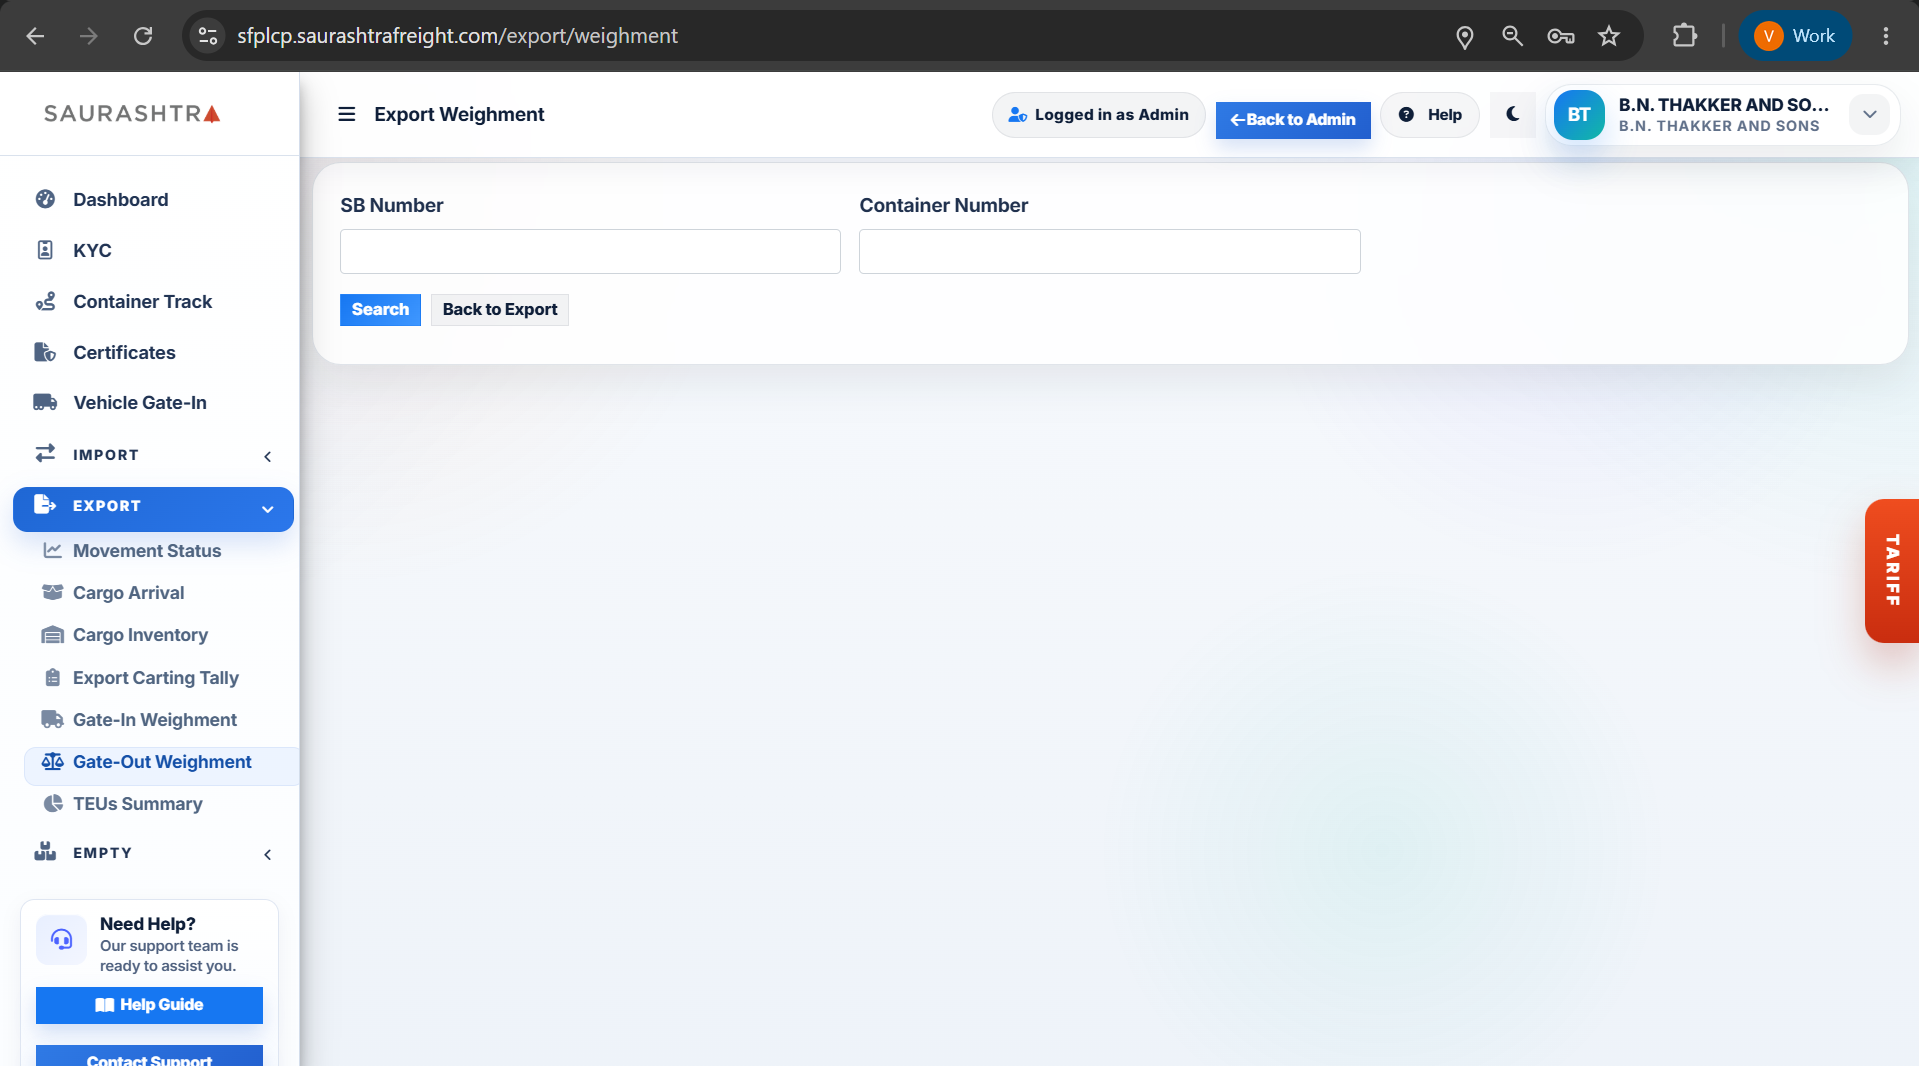
Screen 1: Search Form
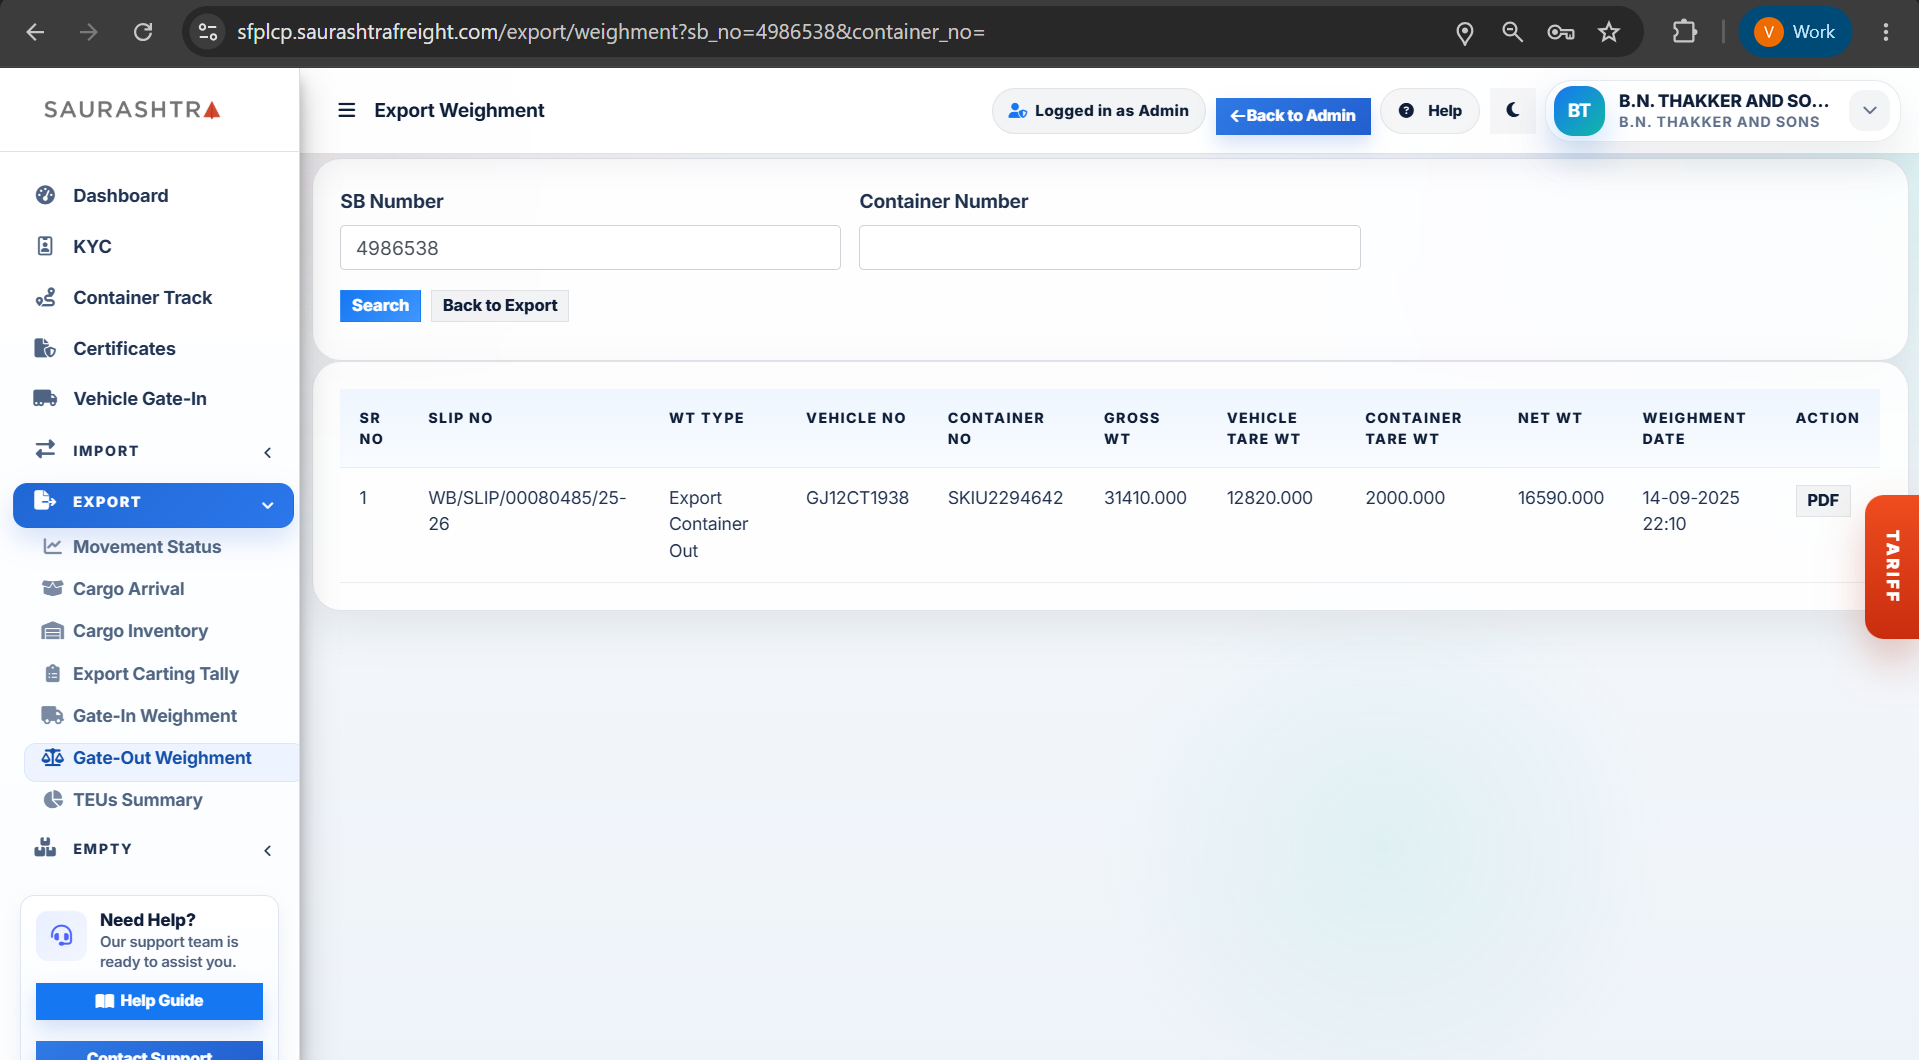
Screen 2: Search by SB Number
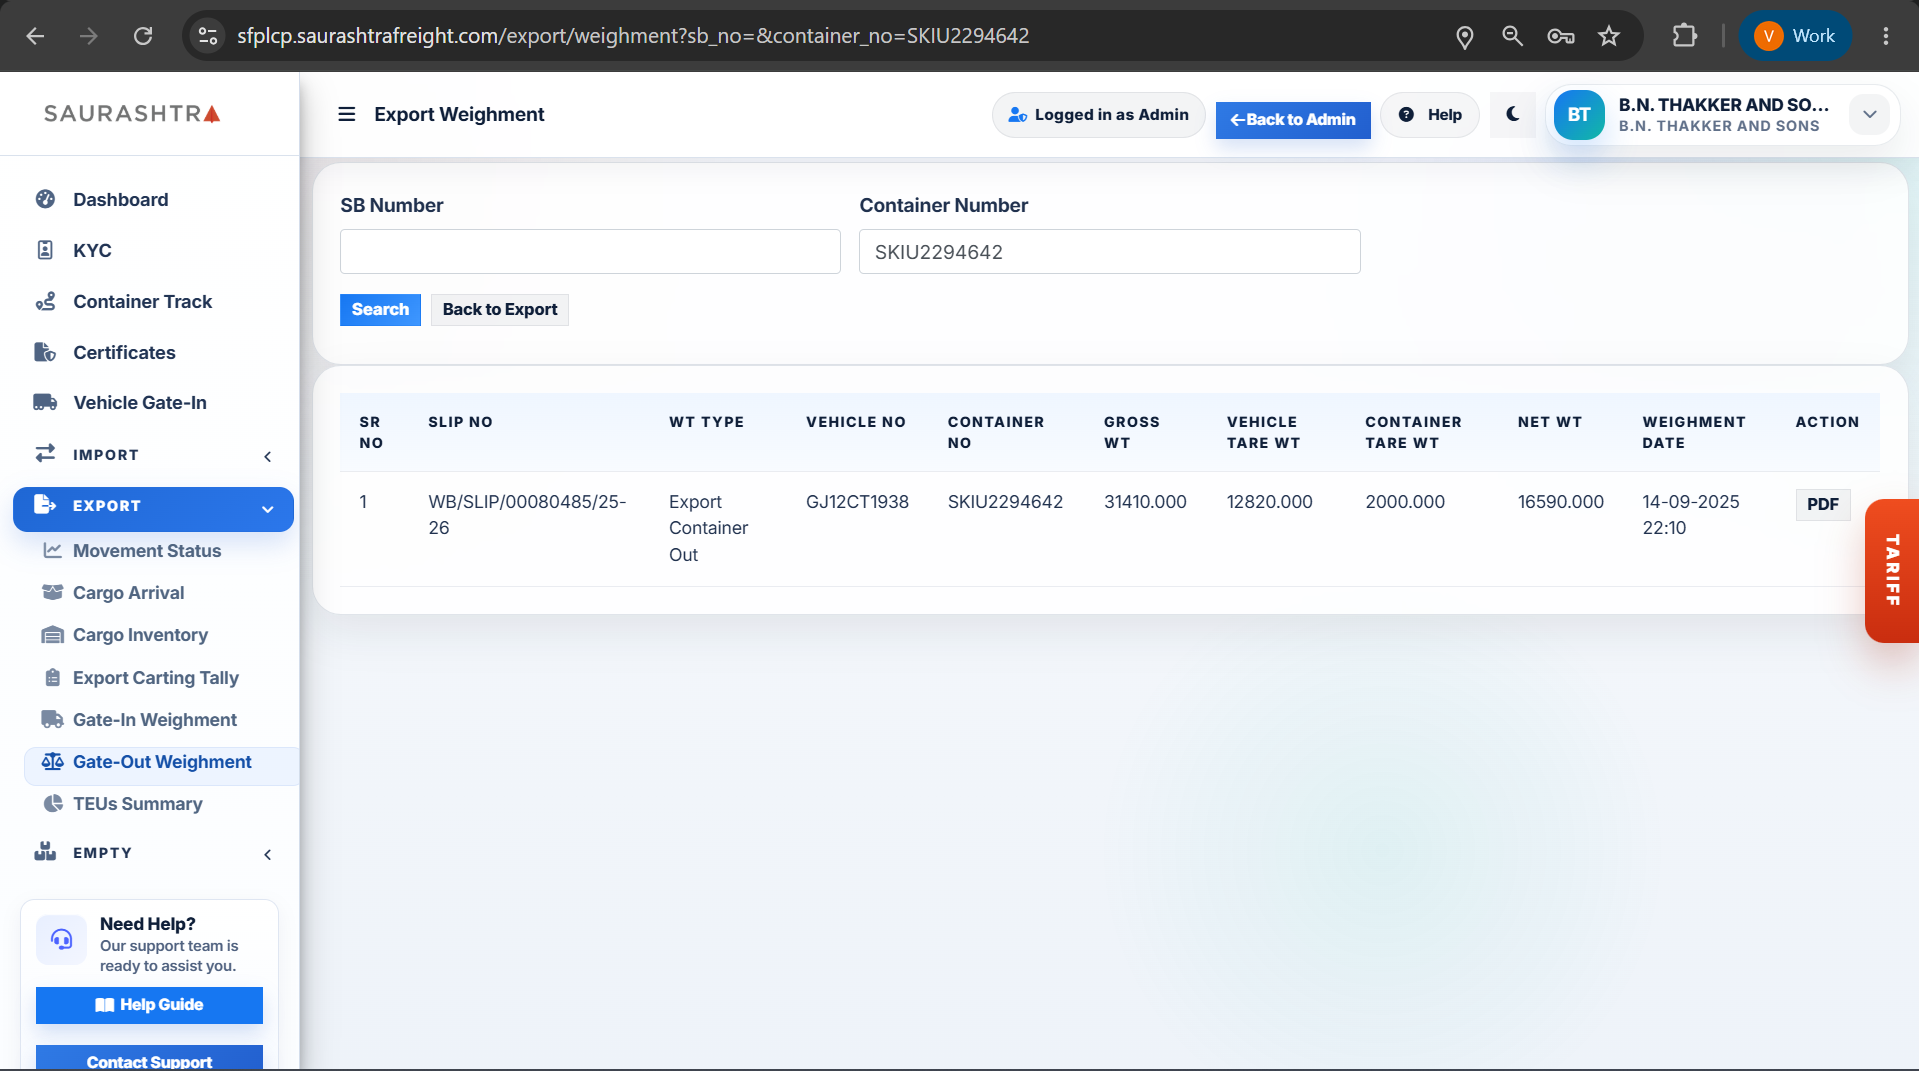
Screen 3: Search by Container No
How to View & Print Export Gate-Out Weighment Receipts
- Navigate to Gate-Out Weighment — Expand EXPORT in the left sidebar menu and click Gate-Out Weighment.
- Choose Search Criteria — Enter search details into either input field:
- SB Number Field — Enter the Shipping Bill number to view weighment records for all containers under that shipping bill.
- Container Number Field — Enter a specific container number (e.g.,
DFSU1746940) for direct container weighment lookup.
- Execute Search — Click the blue Search button to retrieve matching weighbridge records.
- Review Weighment Details — Inspect complete weighment metrics including Slip No, Weight Type, Vehicle No, Container No, Gross Weight, Vehicle Tare Wt, Container Tare Wt, Net Weight, and Weighment Date.
- Open PDF / Print Receipt — Click the PDF button under the Action column to open and print the official Gate-Out Weighment Receipt PDF report in a new tab.
Gate-Out weighment receipts verify net cargo weight by accounting for both vehicle tare weight and container tare weight before container dispatch to port terminal.
Cargo Inventory
Track live export cargo inventory balances stored inside the CFS warehouse. Search by Shipping Bill (SB) number to inspect total received packages, stuffed package counts, balance package quantities remaining in warehouse, gross weight balances, and storage days.
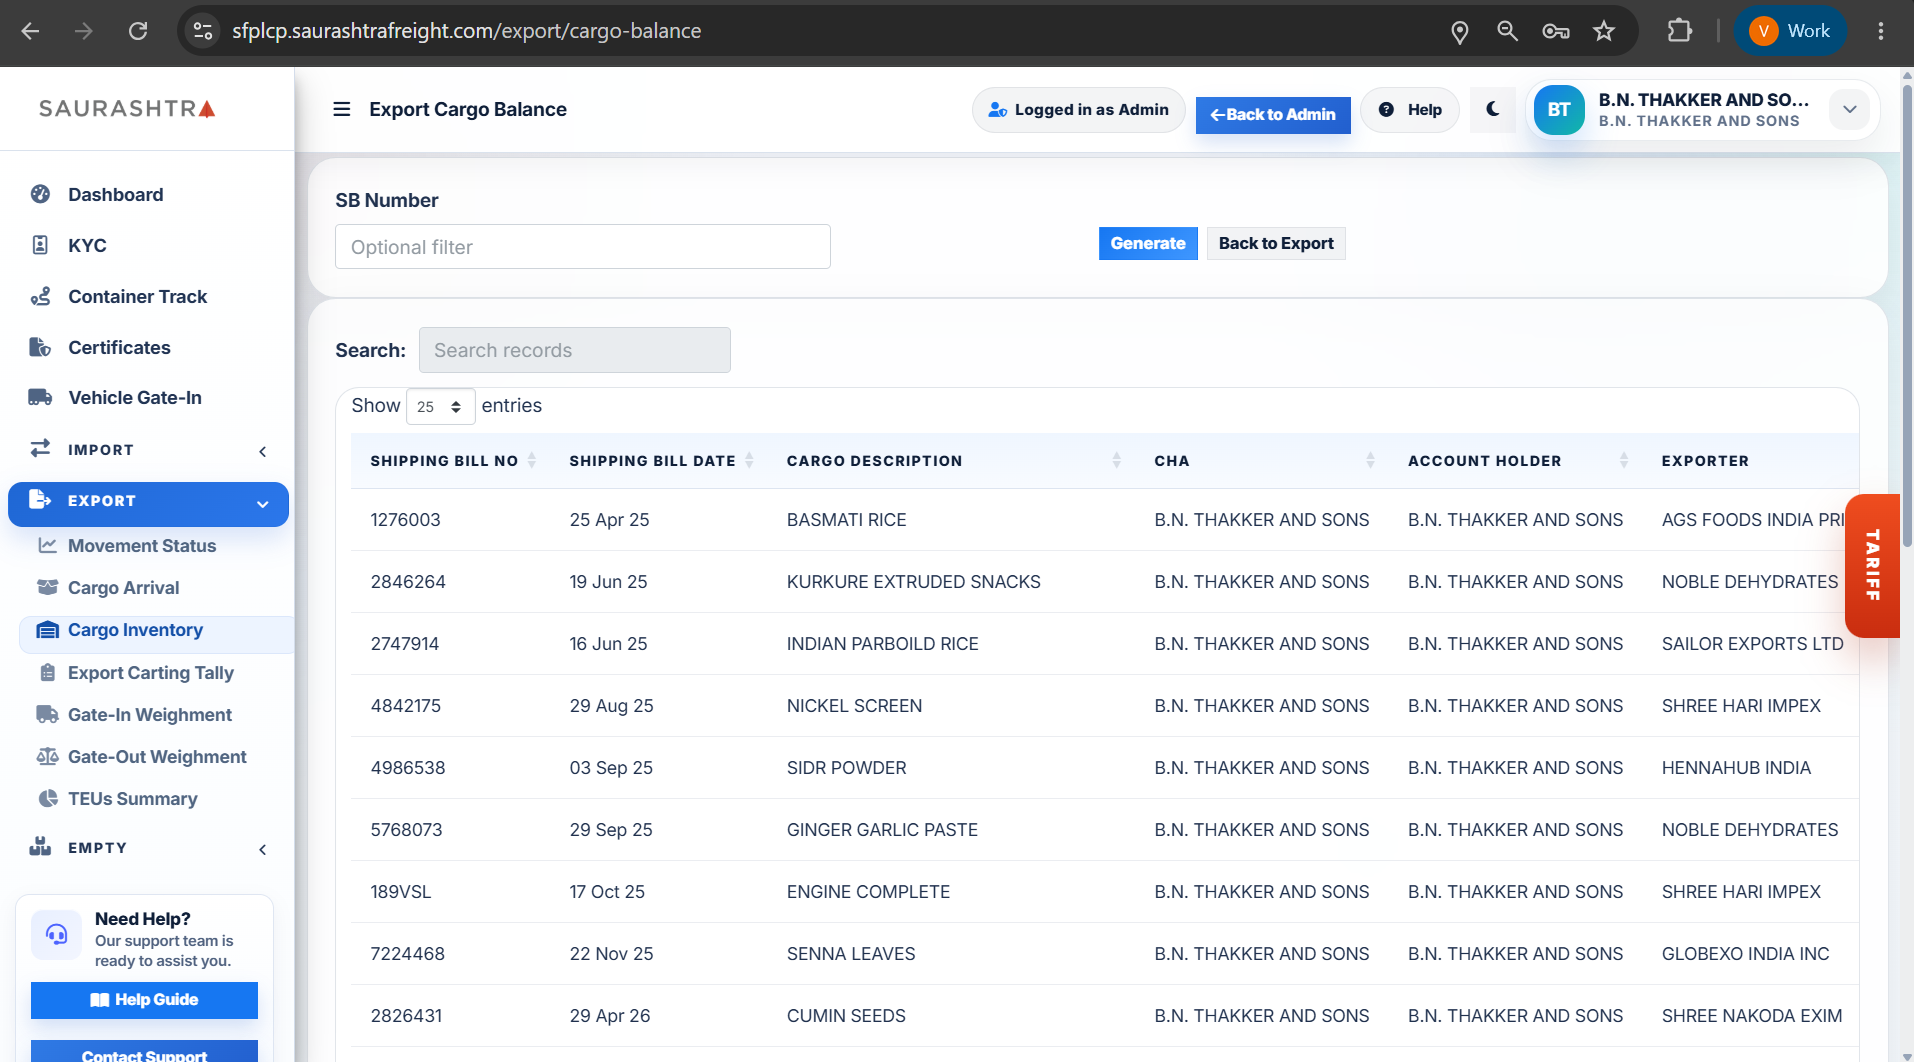
Screen 1: Search Form
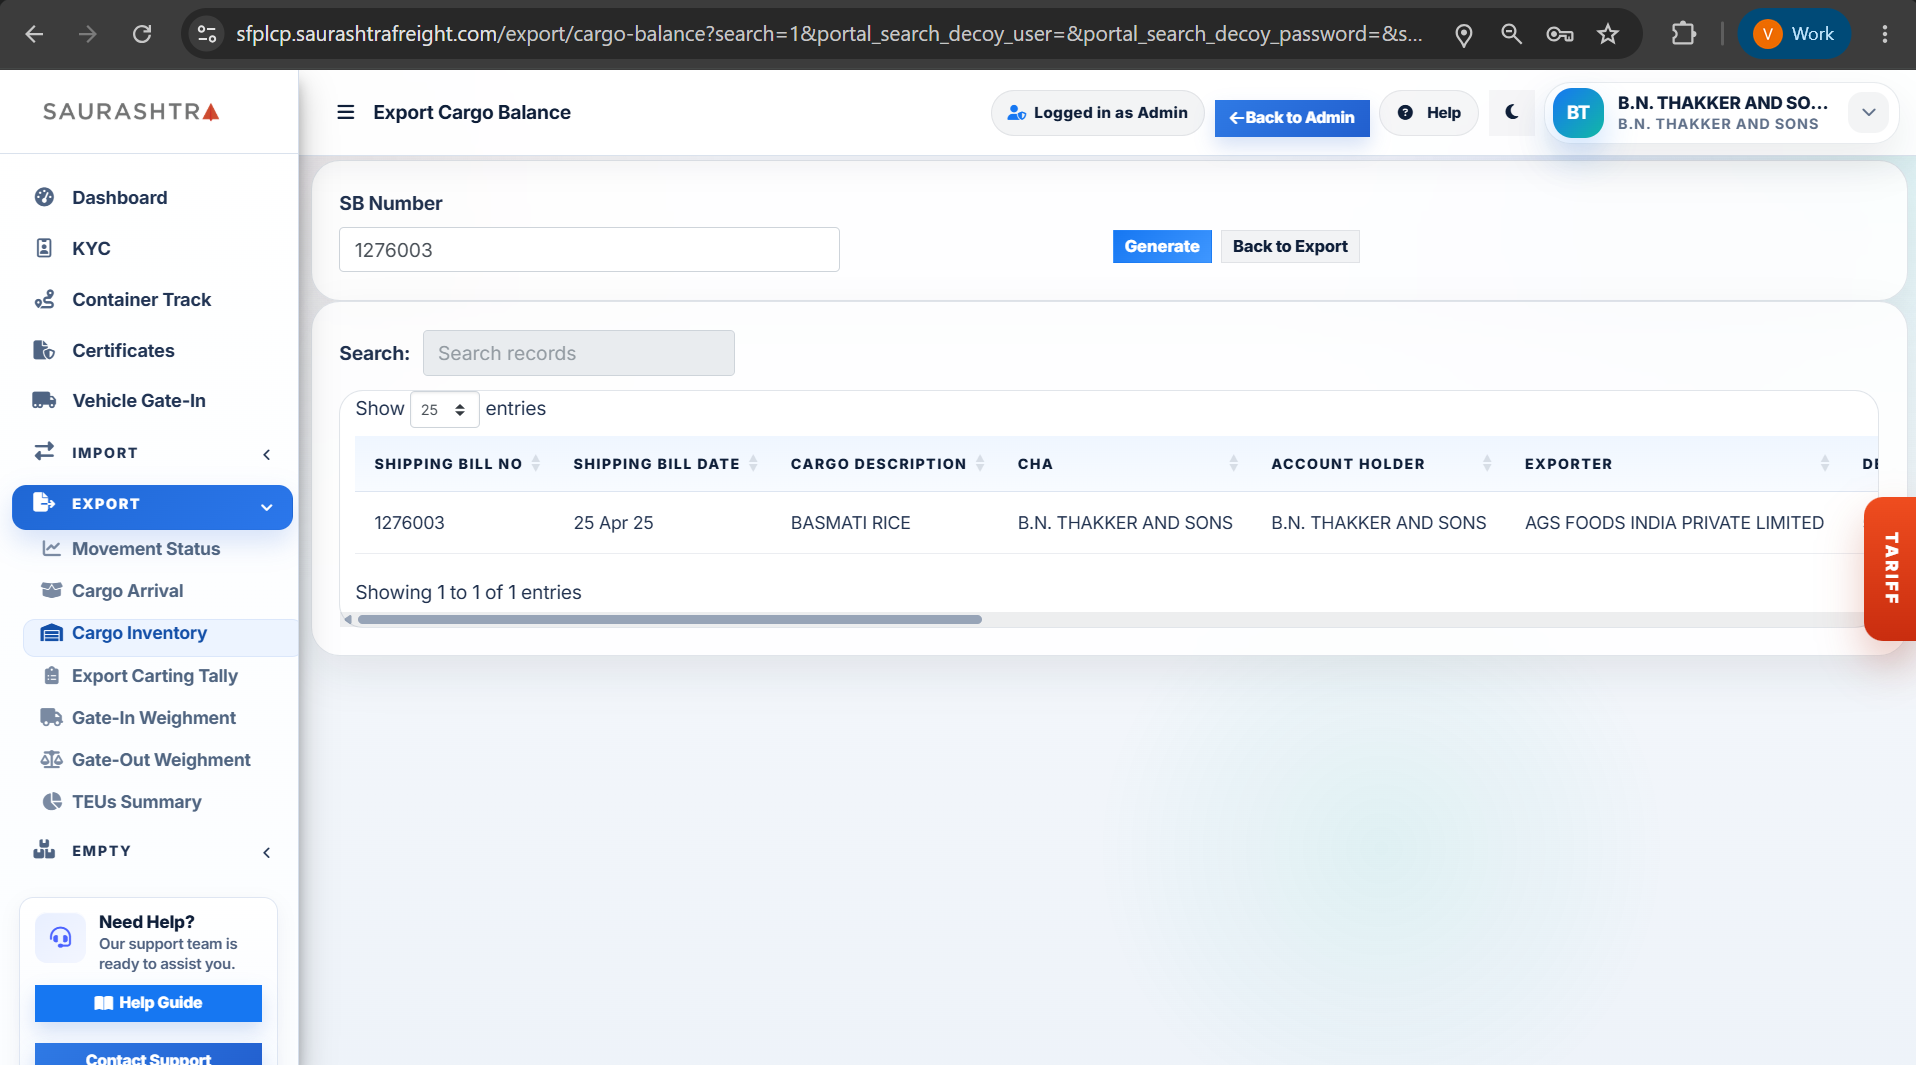
Screen 2: Inventory Records Table
How to Check Export Cargo Inventory Balances
- Navigate to Cargo Inventory — Expand EXPORT in the left sidebar menu and click Cargo Inventory.
- Enter SB Number — Input the Shipping Bill reference number into the search field.
- Execute Search — Click the blue Search button.
- Review Inventory Balance Metrics — Inspect key balance metrics including SB Number & Date, Exporter Name, Commodity, Total Arrived Packages, Total Stuffed Packages, Balance Packages In-Yard, and Storage Duration (Days).
Cargo inventory figures update dynamically upon every carting tally completion and container stuffing operation.
Container Inventory Coming Soon
Monitor loaded and empty export container inventory stored across CFS yard zones. Search by Shipping Line, Size / Type, or dwell time bracket to view container holding status, customs hold flags, and terminal dispatch readiness.
Coming Soon: This feature is actively under development and will be available in an upcoming release of the Customer Portal.
TEUs Summary
View real-time export performance analytics, including daily container TEUs, monthly TEU totals, annual TEU volumes for the financial year, and 24-hour carting vehicle counts.
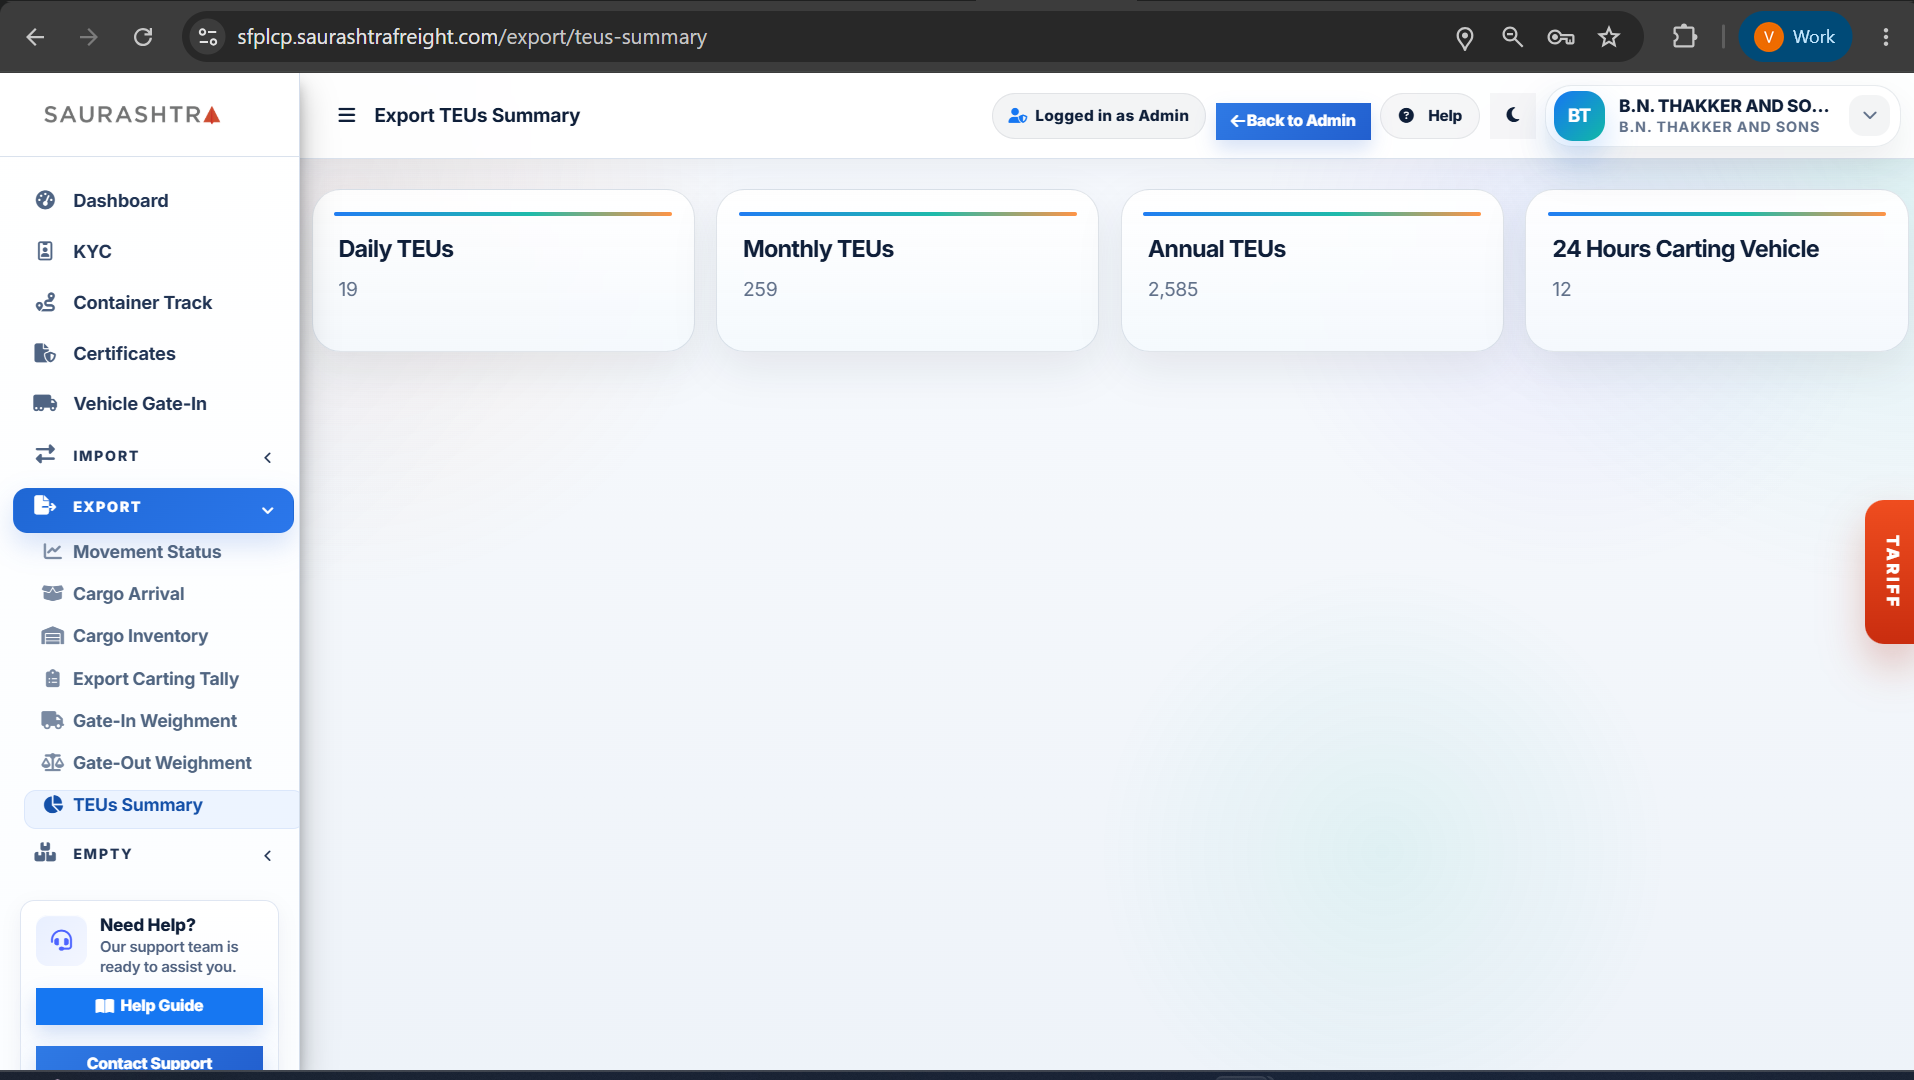
Click image to view full size
How to View Export TEUs Summary
- Navigate to TEUs Summary — Expand EXPORT in the left sidebar menu and click TEUs Summary.
- Review Performance Metrics — View key operational throughput counters on the analytics dashboard:
- Daily TEUs — Total Twenty-Foot Equivalent Units (TEUs) processed today.
- Monthly TEUs — Total export TEU volume handled during the current month.
- Annual TEUs — Cumulative export TEU volume for the current financial year.
- 24 Hours Carting Vehicle — Total export cargo vehicles gated in and unloaded during the last 24 hours.
TEUs Summary metrics update automatically from the CFS terminal operating system to provide real-time operational volume insights for exporters and logistics managers.
Empty Module Group
AuthenticatedManage empty container yard inventory and search container availability by booking or container reference.
Booking No. Search
Search empty containers allocated under specific shipping line booking orders. Select Booking Number as Search Type to view all containers linked to the booking, including container numbers, sizes, types, exit modes, shipping lines, liner agents, gate-in timestamps & locations, gate-out dates, and destination locations.
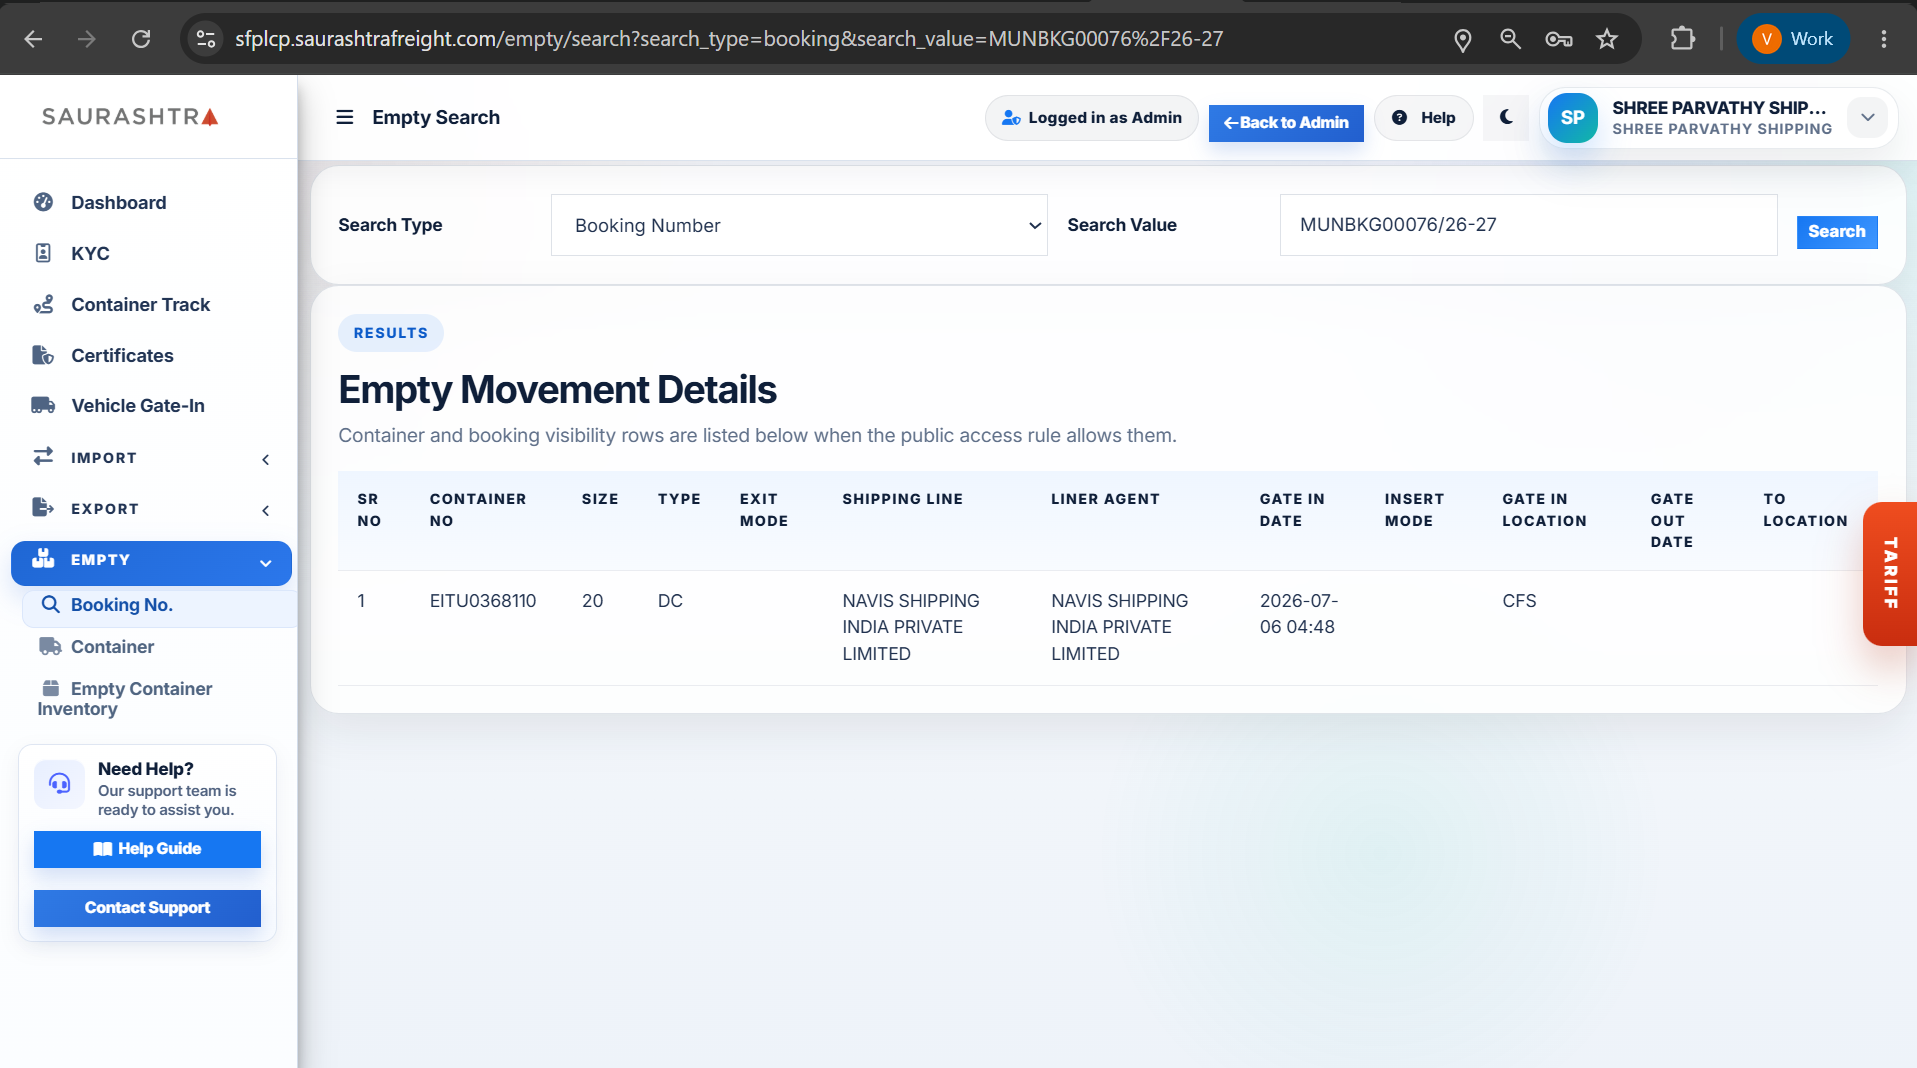
Click image to view full size
How to Search by Booking Number
- Navigate to Booking No. Search — Expand EMPTY in the left sidebar menu and click Booking No. Search.
- Select Search Type — Set the Search Type drop-down menu to Booking Number.
- Enter Booking Number & Execute — Type the shipping line booking reference number into the Search Value field and click the blue Search button.
- Review Empty Movement Details — View matching container rows under the booking, including Container No, Size & Type, Exit Mode, Shipping Line, Liner Agent, Gate-In Date & Location, Gate-Out Date, and Destination Location.
Booking number lookup allows exporters and freight forwarders to verify which empty containers have been allocated and gated in under their specific shipping line booking order.
Container Search
Search and track empty container movement details by selecting Container Number search type or Booking Number search type. View container size, type, exit mode, shipping line, liner agent, gate-in timestamp & location, gate-out date, and destination location.
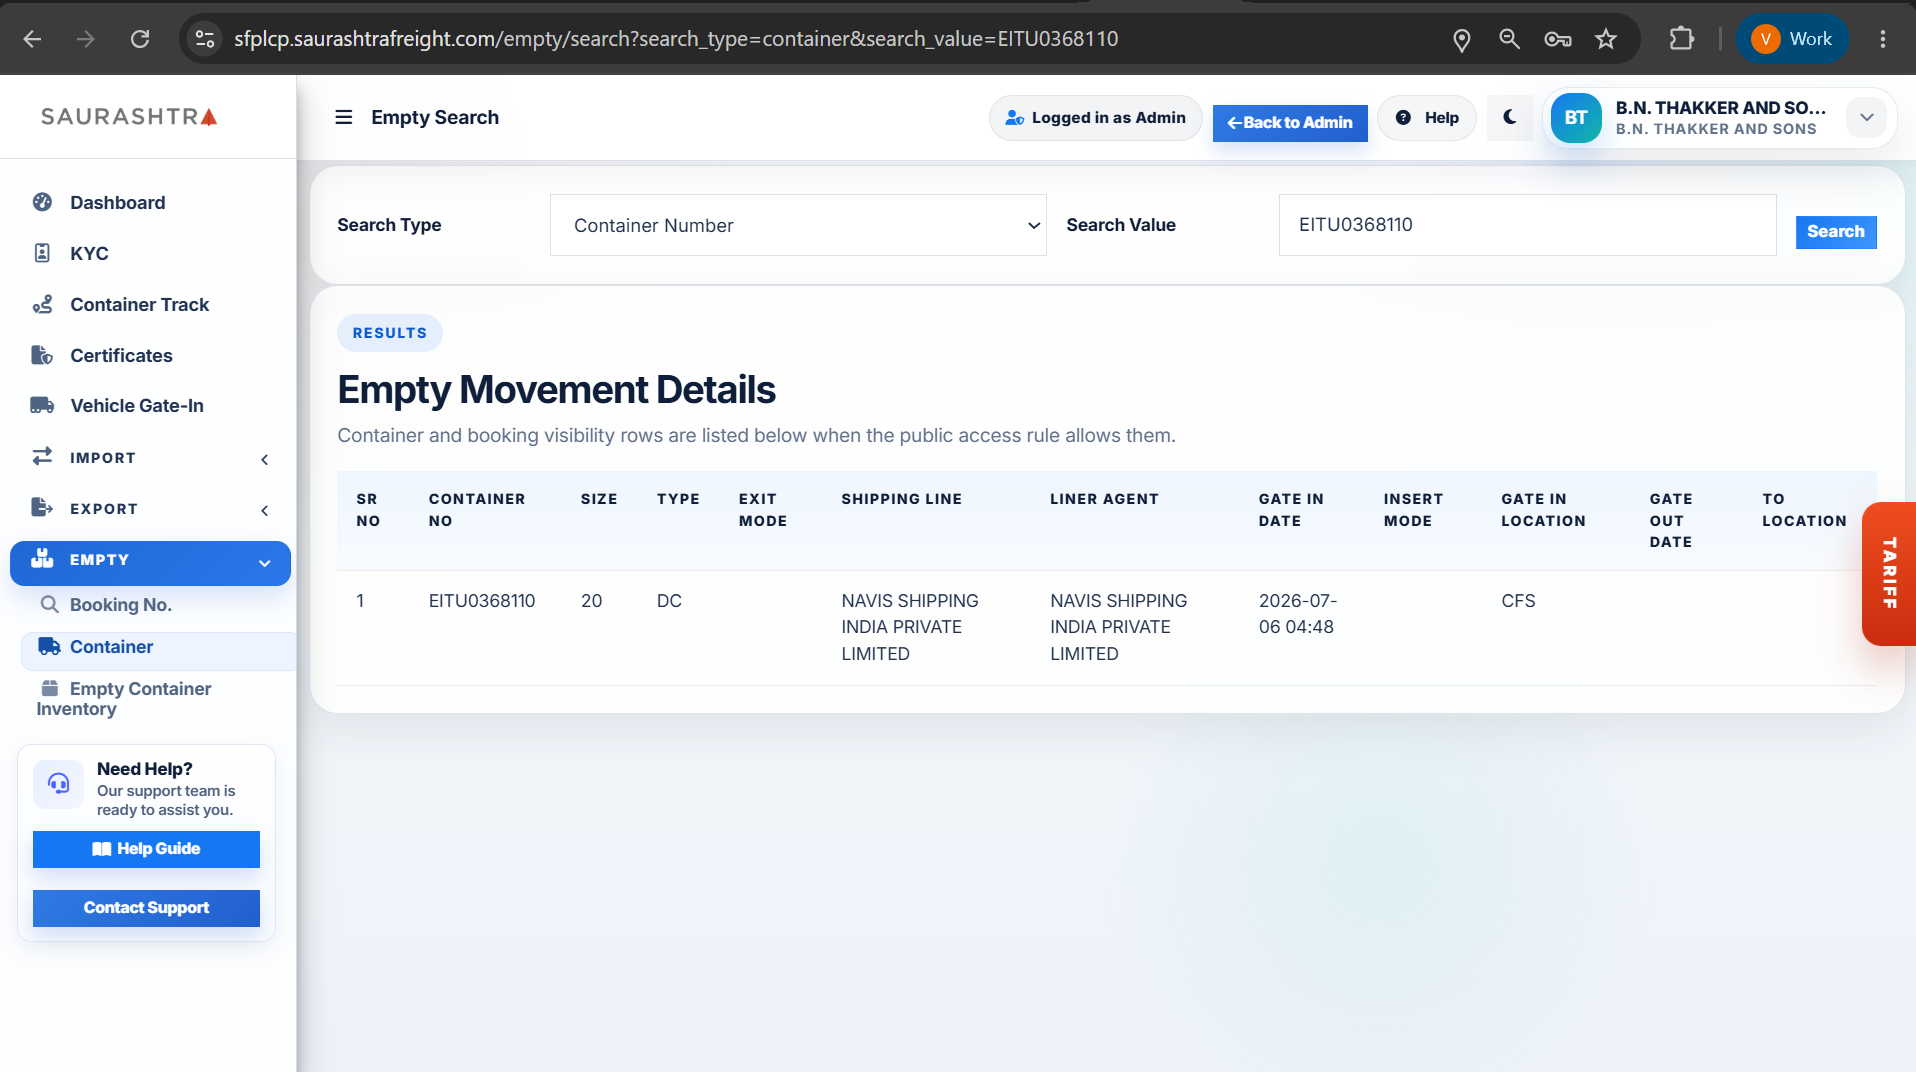
Click image to view full size
How to Search Empty Containers
- Navigate to Container Search — Expand EMPTY in the left sidebar menu and click Container Search (or Booking No. Search).
- Select Search Type — Choose your search mode from the Search Type drop-down menu:
- Container Number — Enter a specific 11-character container number for direct container status lookup.
- Booking Number — Enter a shipping line booking reference number to view all empty containers linked under that booking.
- Enter Search Value & Execute — Type your container or booking number into the Search Value field and click the blue Search button.
- Review Empty Movement Details — View comprehensive tracking fields including Container No, Size & Type, Exit Mode, Shipping Line, Liner Agent, Gate-In Date & Location, Gate-Out Date, and To Location.
Empty container search enables shipping lines, CHAs, and exporters to verify empty container gate-in status and destination movement history prior to release.
Empty Container Inventory
View real-time empty container stock reports, filter inventory matrix by Shipping Agent or Shipping Line name, switch between depot yard location tabs (ALL, Logistics Park / S Yard 2), and inspect breakdown counts by container size (20ft, 40ft, 45ft) and container type (GP, HC, RF, OT, FR, TK) with grand total TEUs.
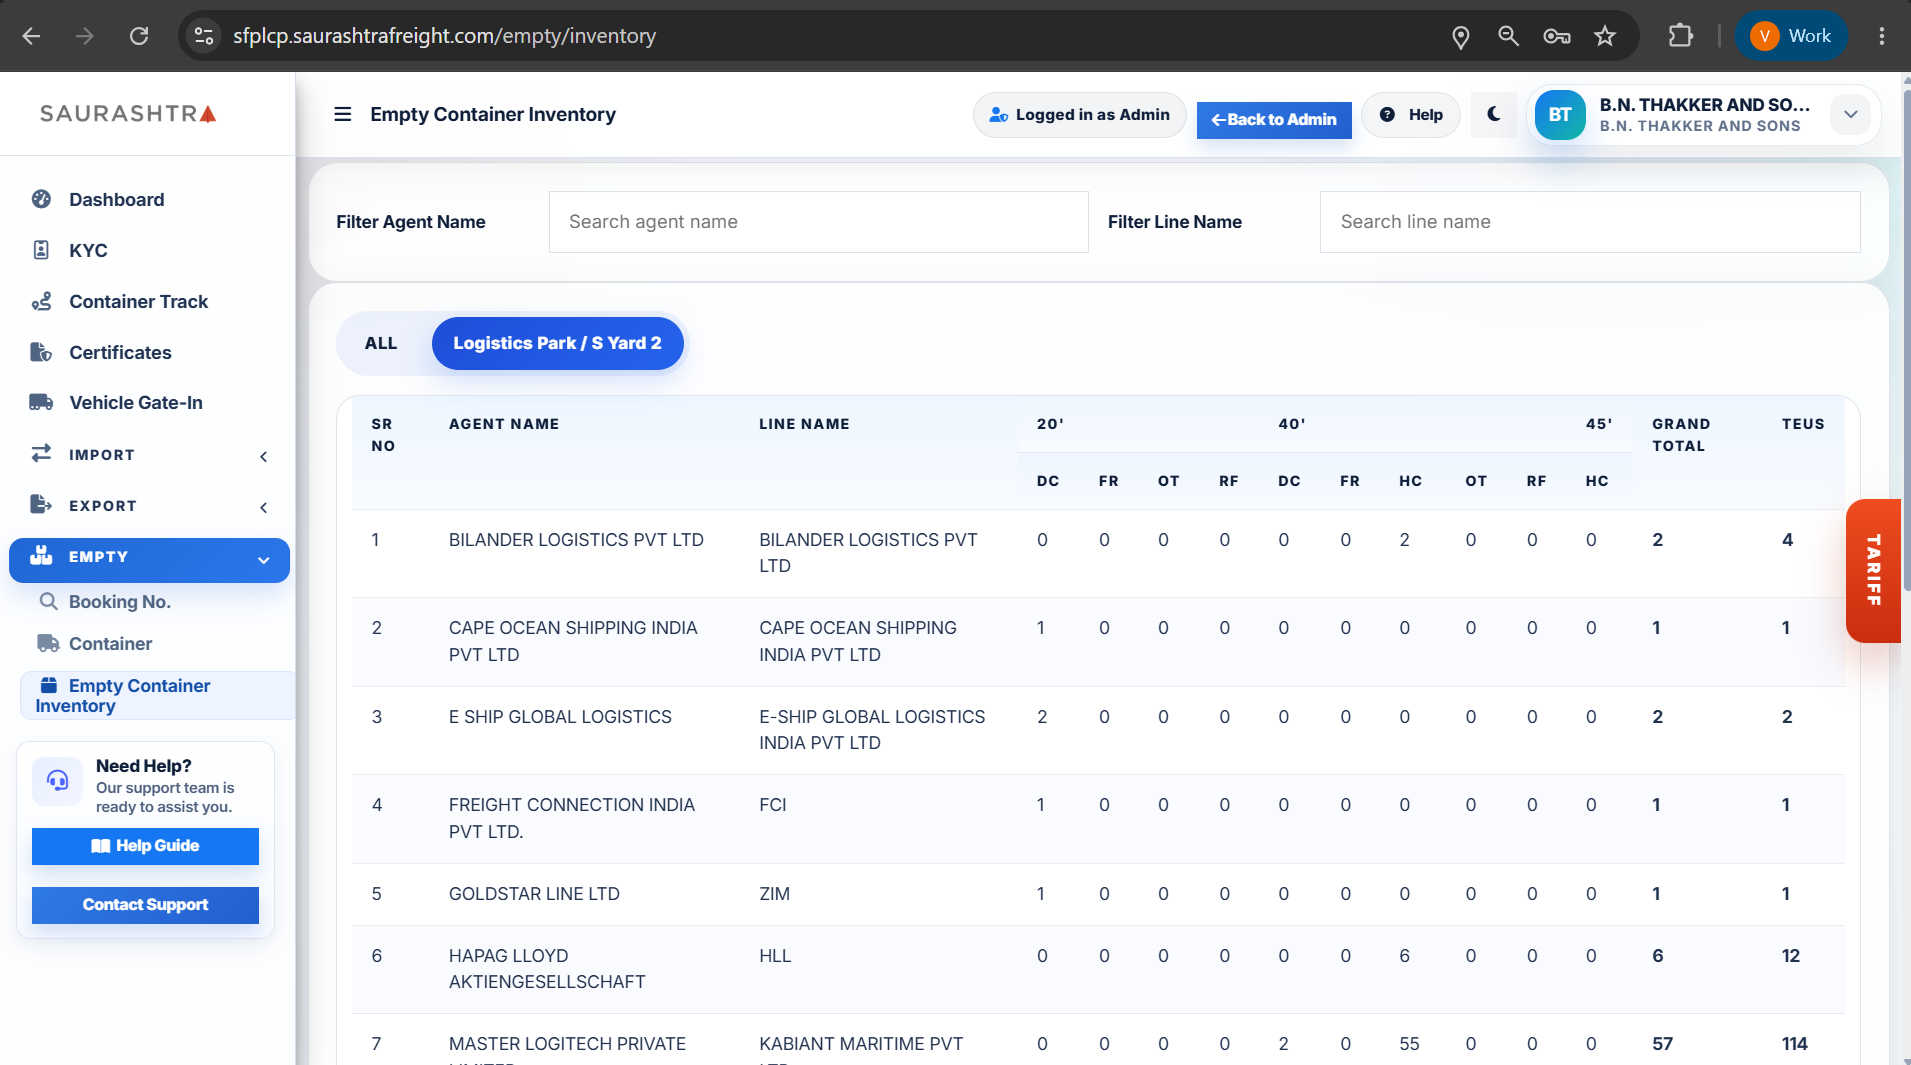
Screen 1: Inventory Matrix (ALL)
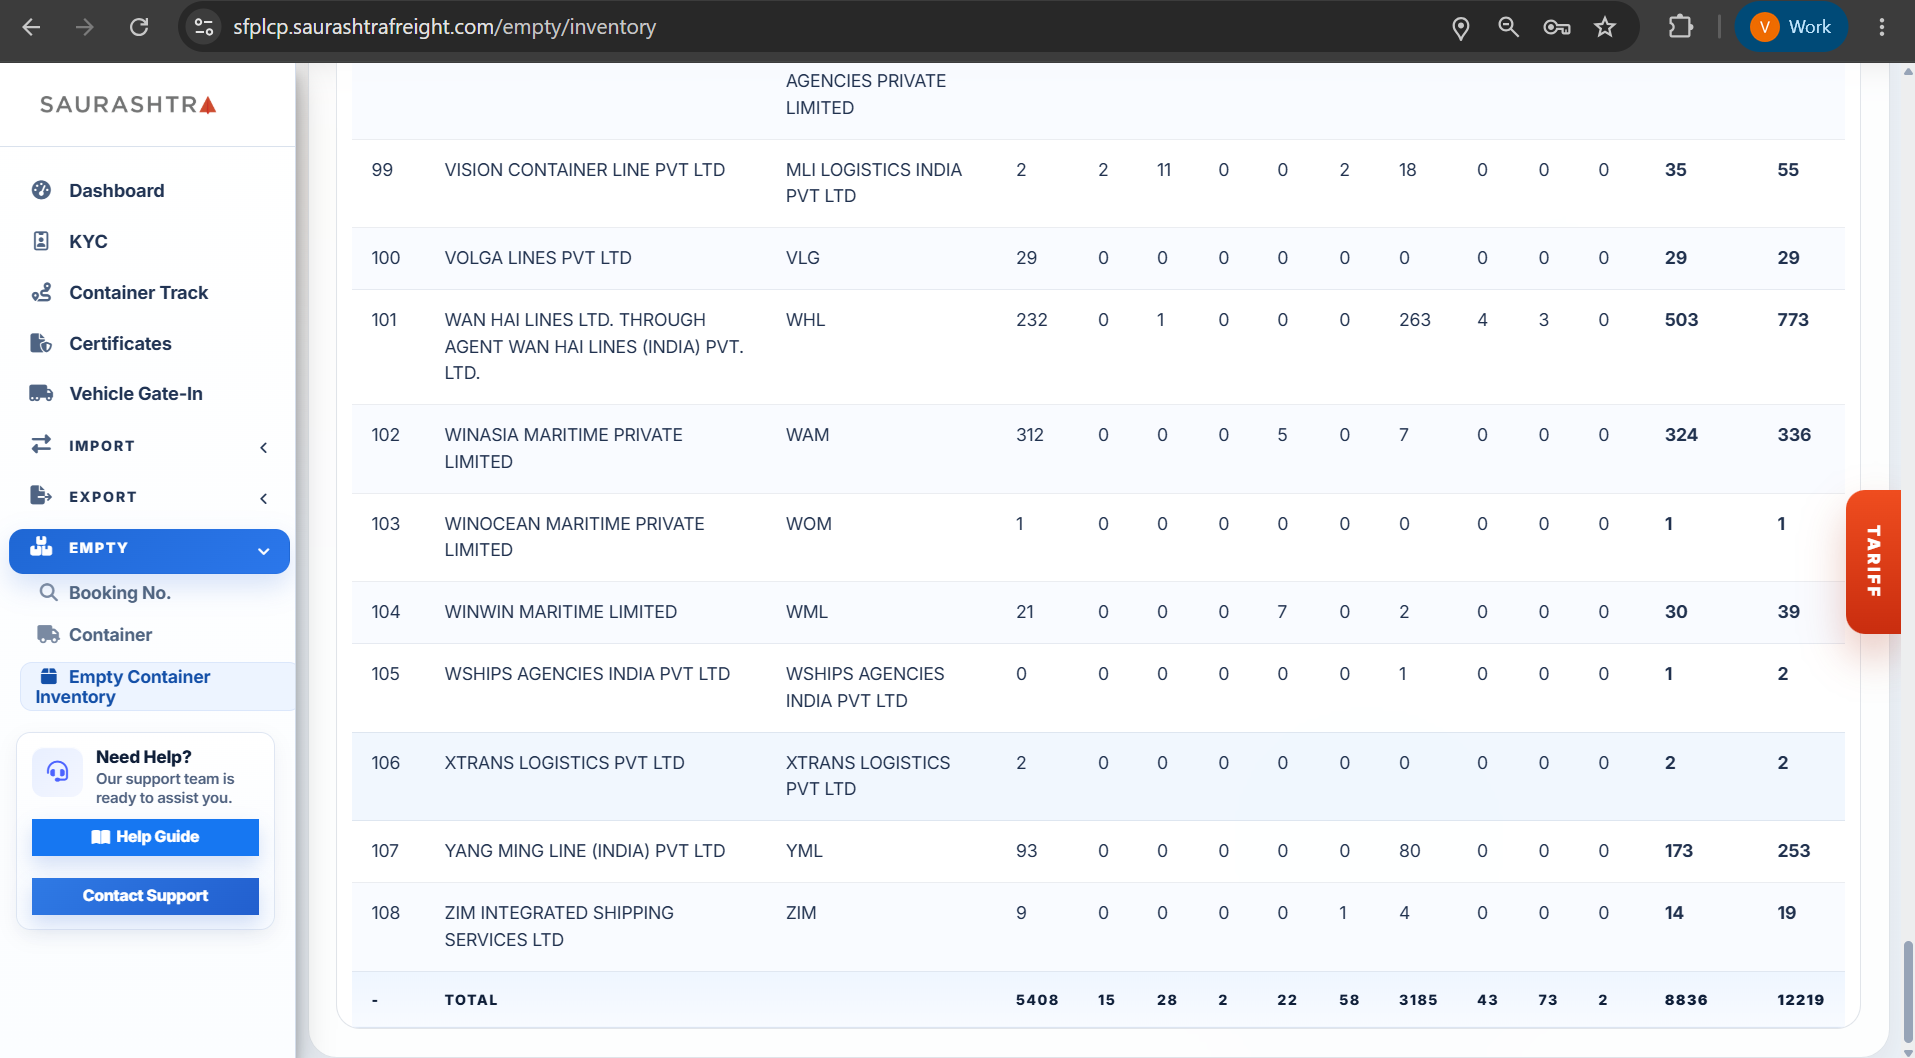
Screen 2: Yard Filtered View
How to Check Empty Container Inventory
- Navigate to Empty Container Inventory — Expand EMPTY in the left sidebar menu and click Empty Container Inventory.
- Filter by Agent & Line Name — Use the filter input fields to narrow down stock rows:
- Filter Agent Name — Type a Shipping Agent name to filter inventory by agent.
- Filter Line Name — Type a Shipping Line name to filter inventory by line.
- Switch Yard Location Tabs — Click the section tabs to toggle yard locations:
- ALL — View combined empty container inventory across all depot yards.
- Logistics Park / S Yard 2 — View inventory stored specifically at Logistics Park / S Yard 2.
- Review Stock Matrix & TEU Totals — Inspect container quantities itemized by Container Size (20', 40', 45'), Container Type (GP, HC, RF, OT, FR, TK), Grand Total units, and total TEUs in yard.
Real-time empty container inventory visibility helps shipping lines and freight forwarders track container availability for booking allocations and export releases.